
Related Manuals for Braun Perfusor Space


Summary of Contents for Braun Perfusor Space
- Page 1 Perfusor® Space and Accessories Instructions for Use Rx only Please make sure all pumps on your Valid for Software 688F ward are equipped with the same software version. 951092 Rev C (03/08)
-
Page 2: Table Of Contents
CONTENTS C O N T E N T S Contents ........................2 Perfusor® Space Overview.......................3 Patient Safety ........................5 The Perfusor® Space Menu Structure / Overview ....................8 Infusion Syringe Pump System in- Menu Structure / Navigation....................9 cludes an external Chapter 1 Operation ......................11 transportable elec- tronic infusion sy- 1.1 Start of Infusion .........................11... -
Page 3: Perfusor® Space Overview
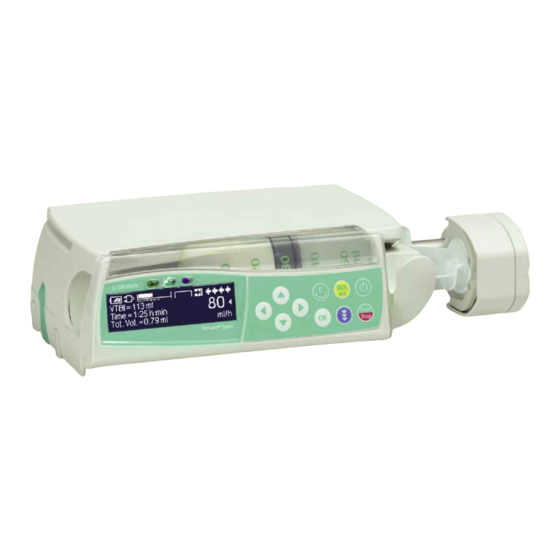
PERFUSOR SPACE® OVERVIEW P E R F U S O R ® S PA C E O V E R V I E W Up and Down Arrows Press to reset single values Drive head with Scroll through menus, change setting of numbers... - Page 4 PERFUSOR® SPACE OVERVIEW Syringe Fixation Pull and turn the syringe holder to the right to open the green axial fixation mechanism (see red arrow). Syringe must be fixed with wings upright in the slot to the left side of the green axial fixation mechanism before closing syringe holder.
-
Page 5: Patient Safety
PATIENT SAFETY PAT I E N T S A F E T Y Operation • The initial training of the Perfusor® Space is to be performed by B. Braun sales personnel or other authorized persons. After each software update, the Caution:... - Page 6 PATIENT SAFETY • A supplemental patient monitoring must be carried out if critical medication is performed. • Avoid applying external force on the drive mechanism during administration. • In case high potent drugs are given be sure to have a second infusion pump for that drug at hand.
- Page 7 PATIENT SAFETY (e.g. HF surgical equipment, nuclear spin tomography units, mobile telephones etc.) maintain the recommended protective distances from these devices. As there is no international standard for enteral nutrition pumps the safety fea- tures of the Infusomat Space are also for this therapy designed according to IEC 601-2-24 Symbols Electrical Shock Protection Rating...
-
Page 8: Infusion Syringe Menu Structure / Overview
MENU STRUCTURE / OVERVIEW MENU STRUCTURE / OVERVIEW Symbols On/Off button Start/Stop button Bolus button Clear button OK button Keypad with arrow up, -down, -left, -right button Connection button Menu Structure Start Up Main Status Special Options Menu Menu Menu Functions Menu Syringe... -
Page 9: Menu Structure / Navigation
MENU STRUCTURE / NAVIGATION MENU STRUCTURE / NAVIGATION Display Settings Explanation At the top of the screen the last therapy is indicated. Yes/No question can be answered by pressing for yes or for no. Parameters which can be changed (e.g. rate in ml/hr) are accessed with k. - Page 10 MENU STRUCTURE / NAVIGATION Display Settings Explanation Set pressure level with confirm by pressing k. Cancel to edit pressure by using c. Optionally the pressure values can be displayed in mmHg. Pre-alarms are indicated by an alarm tone with a message on the display (e.g. “Syringe nearly empty”), and a flashing yellow LED.
-
Page 11: Operation
OPERATION Chapter 1 OPERATION 1.1 Start of Infusion • Ensure the pump is properly secured. Check if all pump components are present and that there are no damages. If the pump is connected to A/C, the display states information such as the battery status, the A/C connection symbol and last therapy. -
Page 12: Setting Different Combinations Of Rate, Vtbi (Vtbi= Volume To Be Infused)
OPERATION Chapter 1 • Press to start infusion. Running arrows on display and green LED above display indicate that infusion was started. Note: Stop the infusion at any time by pressing . The pump can be turned off at any time by pressing for 3 sec (Exception: Data lock level 2). -
Page 13: Bolus Application
OPERATION Chapter 1 • Change of time => Adjustment of rate. Previous and new target: VTBI b) Target symbol is placed in front of time: • Change of time => Adjustment of VTBI. Previous and new: Time • Change of VTBI => Adjustment of time. New target: VTBI 1.3 Bolus Application There are three ways to administer a bolus: 1.) Manual Bolus: Press... -
Page 14: Syringe Change And New Therapy Start
OPERATION Chapter 1 At low bolus volumes, under dosages due to the start up characteristic of the pump and the tolerances in the infusion system cannot be excluded. Disconnect patient while purging. 1.4 Syringe Change and New Therapy Start Note: Always disconnect patient line before syringe change to avoid inadvertent administrations. -
Page 15: End Of Infusion
OPERATION Chapter 1 1.5 End of Infusion • Press to stop infusion. The green LED will go off. Disconnect from the patient. • Open the syringe holder. The drive mechanism will move backwards into the starting position. • Open pump door. Remove syringe, turn the syringe holder into an upright position and close the front door. -
Page 16: Advanced Operations
ADVANCED OPERATIONS Chapter 2 ADVANCED OPERATIONS 2.1 Request Status of Infusion while Pump is Running Press to switch between run display and Main Menu while the pump is running. Navigate through the menu using to check parameters. In order to check parameters in the Status/Options Menu, select "Status"... -
Page 17: Chapter 3 Special Functions
SPECIAL FUNCTIONS Chapter 3 SPECIAL FUNCTIONS 3.1 Dose Rate Calculation (Overview) The dose rate calculation enables a calculation of the rate in ml/hr from the entered dose parameters. Dose Infusion rate [ml/hr] = x Patient weight (optional) Concentration Setting parameters: 1. -
Page 18: Drug Library
SPECIAL FUNCTIONS Chapter 3 To get out of dose rate calculation is only possible when the pump is stopped. from Main Menu and then press d. Press Caution: A change of the patient weight will alter the flow rate. 3.3 Drug Library Up to 720 drug names including therapy data and information can be stored in 15 categories. -
Page 19: Chapter 4 Options
OPTIONS Chapter 3 that describe the status with regard to the soft limits are being displayed: The infusion is within the range of the minimum and maximum soft limit The infusion is within the range of the maximum soft limit The infusion is within the range of the minimum soft limit Violation of the upper soft limit Violation of the lower soft limit... -
Page 20: Occlusion Pressure
OPTIONS Chapter 4 O P T I O N S The options functions may be selected and changed while the pump is running or stopped. To edit a menu item, select “Options” in the Main Menu and press l. Then select desired function with and follow the Instructions for Use as described. -
Page 21: Bolus Rate
OPTIONS Chapter 4 audible alarm, a nurse call will go off and the yellow LED blinks. If a target value is reached while data lock is active a new start of the pump is only possible after entering the code. In order to deactivate the function, select “Off”... -
Page 22: Date / Time
OPTIONS Chapter 4 4.7 Date / Time • Access date/time in Options Menu with l. • Change date/time with and confirm with k. 4.8 Macro Mode The infusion rate appears larger on the display when the macro mode is activated and the pump is infusing. •... -
Page 23: Chapter 5 Alarms
ALARMS Chapter 5 ALARMS The Perfusor® Space is equipped with an audible and optical alarm signal. Alarm- Audible Optical signal Staff call User confirmation type signal Red LED Yellow LED Text Device flashes device alarm Press and follow Alarm and alarm the instruction on the code display. - Page 24 ALARMS Chapter 5 Display message Pre-alarm reason “Syringe nearly empty“ Very little fluid is left in syringe. “VTBI near end“ The preselected volume is nearly infused. “Time near end“ The preselected time is almost over. “Battery nearly empty“ The battery is almost discharged. “KVO active“...
- Page 25 ALARMS Chapter 5 “KVO finished” KVO is reached. Continue with old or set new therapy. “Pressure high“ Occlusion occured in the system. The set pressure level was exceeded. A bolus reduction is automatically initiated by the pump. Check if syringe is empty, kinks are in tubing and tubing isn't damaged, IV patency and filter patency.
-
Page 26: Reminder Alarms
ALARMS Chapter 5 “Data Lock" An attempt was made to stop or switch the pump off without entering the code. Enter the correct code in order to continue the therapy or in order to turn the pump off. The red LED doesn’t go off until the administration is started again or the pump is turned off. -
Page 27: Battery Operation And Maintenance
BATTERY OPERATION AND MAINTENANCE Chapter 6 BATTERY OPERATION AND MAINTENANCE The Perfusor® Space is equipped with a NiMH-battery. It has an operating lifetime of 8 hours at 25 ml/hr when new. For optimal treatment of the battery, the device is equipped with protection against overcharge and deep depletion. - Page 28 BATTERY OPERATION AND MAINTENANCE Chapter 6 Caution: Batteries may explode or leak if they are opened or incinerated. Dispose properly! Battery maintenance: To accurately balance the battery capacity cyclical battery maintenance is necessary. The pump asks the user to perform battery maintenance every 30 days. The battery maintenance mode detects a possible capacity loss (e.g.
-
Page 29: Compatible Syringes
COMPATIBLE SYRINGES Chapter 7 COMPATIBLE SYRINGES The syringe types listed in the following tables can be used with the Perfusor® Space. Please refer to the listed material number (Mat. No.1)) to ensure specific syringe brand compatibility. The alarm Time to Occlusion was measured at 5ml/hr. -
Page 30: Chapter 8 Start Up Graphs And Trumpet Curves
START UP GRAPHS AND TRUMPET CURVES Chapter 8 START UP GRAPHS AND TRUMPET CURVES Start Up Curves Trumpet Curves The graphs show the accuracy/uniformity of flow in relation to time. They allow for the following: The delivery behaviour or delivery precision is essentially influenced by the type of (disposable syringe) used. -
Page 31: Chapter 9 Technical Data
Moisture protection IP 22 (drip protected for horizontal usage) External power supply: • Rated voltage Via B. Braun SpaceStation or optional A/C adaptor (rated voltage 100 … 240 V AC~, 50/60 Hz) for stand alone operation • External low voltage 11 …... - Page 32 < 10 ml/hr: KVO-rate 1 ml/hr Delivery rate < 1 ml/hr: KVO-rate = set rate (default setting 0.1 ml/hr) Computer connection USB connection in combination with B. Braun interface lead CAN SP (8713230) including electrical insulation. Please pay attention to safety notices. History protocol 1000 last history entries.
-
Page 33: Chapter 10 Tsc* / Service / Training / Cleaning / Disposal
Medical Devices Training 93/42/EEC” dated 14th June 1993. B. Braun offers training and inservicing. Please ask your local representative for B. Braun further details. Melsungen AG Check regularly Check for cleanliness, completeness and damage. Only use devices according to Instructions for Use. - Page 34 TSC* / SERVICE / TRAINING / CLEANING / DISPOSAL Chapter 10 Disposal The pumps as well as battery packs can be returned to B. Braun for further disposal. When taking care of disposing of disposables as well as infusion solutions, please consider the applicable hygiene and disposal regulations.
-
Page 35: Chapter 11 Instructions For Use Accessory
Comfort additionaly includes a central alarm management and alarm LEDs. PoleClamp SP (8713130) A maximum of three B. Braun Space pump either Infusomat™or Perfusor® can be stacked together when used with the PoleClamp SP. For detailed instructions on secure fixation of the PoleClamp SP please refer to "Overview Perfusor® Space"... - Page 36 INSTRUCTIONS FOR USE ACCESSORY Chapter 11 2.) Connect plug of Connection Lead SP with Combi Lead SP. 3.) Push plug of Connection Lead SP into 12 V connector. A maximum of three plugs can be plugged into each other in socket P2. Note: Battery-Pack SP (8713180) For further information on the Battery-Pack SP (NiMH) see “Battery Operation”.
- Page 37 INSTRUCTIONS FOR USE ACCESSORY Chapter 11 Connection Lead for Staff Call SP (8713232) To connect the Perfusor® Space to staff call, use the Connection Lead for staff Call SP. The staff call needs to comply with the requirements of VDE 0834 (consider country specific regulations).
-
Page 38: Ordering
ORDERING Art. No. B. Braun Perfusor® Space (100 – 240 V) ........871 3030U/US Recommended accessories for the B. Braun Perfusor® Space: SpaceStation .....................871 3140U SpaceCover Standard ................871 3147U SpaceCover Comfort ................871 3145U PoleClamp SP....................871 3130 Power Supply SP (US Plug)..............871 3112A Combi Lead SP 12 V .................871 3133... -
Page 39: Technical Support
B. Braun Customer Service at (800) 627-PUMP. A Returned Materials Authorization number will be provided. Carefully pack the pump (preferably in the original packing), and ship it prepaid to the address below. B. Braun cannot assume any responsibility for loss or damage to returned instruments while they are in transit. - Page 40 Manufactured by: B. Braun Melsungen AG P.O.Box 1120 D-34209 Melsungen, GERMANY Tel +49-(0) 56 61 - 71 - 0 Fax +49-(0) 56 61 71 - 204 Distributed by: B.Braun Medical, Inc. 824 12th Avenue Clinical and Technical Support for USA and Canada:...
Need help?
Do you have a question about the Perfusor Space and is the answer not in the manual?
Questions and answers