Table of Contents
Advertisement
Advertisement
Table of Contents

Related Manuals for Mircom TAS-2000 Series


Summary of Contents for Mircom TAS-2000 Series
- Page 1 Telephone Access System Installation and Operation Manual LNOTICE All information, documentation and specifications contained in this manual are subject to change without prior notice by the manufacturer. 2002 by Mircom Technologies Ltd. Printed in Canada, March 2002 LT-646 Rev. 5...
-
Page 2: Table Of Contents
Table of Contents INTRODUCTION AND GENERAL NOTES ..............1 INDUSTRY CANADA NOTICE FOR ALL TAS-2000 PRODUCTS SOLD IN CANADA . -
Page 3: Introduction And General Notes
INTRODUCTION AND GENERAL NOTES Mircom's TAS-2000 Series of Telephone Access Units provides high quality two way communication between residents and their visitors in a multi-unit dwelling establishment. The TAS-2000 may be used as an NSL system which does not require a subscriber phone line since it uses the existing telephone lines for communication, this is known as the non-subscriber line access (NSL). -
Page 4: Industry Canada Notice For All Tas-2000 Products Sold In Canada
In the event repairs are ever needed on the Communicator, they should be performed by Mircom Technologies Ltd. or an authorized representative of Mircom Technologies Ltd. For information contact Mircom Technologies Ltd. at the address and phone numbers shown on the last page of this document. -
Page 5: System Configurations
SYSTEM CONFIGURATIONS ADC CONFIGURATIONS There are many architectural configurations possible for the TAS-2000 System, but all will fall into either ADC AutoDialler or NSL groups. ADC operation uses the Bell Phone Lines (or other local telephone company) to communicate to Residents in a building. The simplest ADC configuration using one Lobby Unit. - Page 6 A single Lobby Unit ADC configuration with a 2008E Elevator Restriction Unit. A two building, dual Lobby Unit ADC configuration sharing one Bell Phone Line, with 2008E Elevator Restriction Units. Page 4...
- Page 7 A two building, three Lobby Unit ADC configuration. The Parking Garage and Lobby Unit shares one Bell Phone Line with Building #1. Each Building has a 2008E Elevator Restriction Unit. All three Lobby Units could share the same Bell Line, but if one Lobby Unit is used, the other Lobby Units show a system busy and cannot be used until that line is available again.
-
Page 8: Nsl Configurations
NSL CONFIGURATIONS NSL (No Subscriber Line) operation does not use Bell Phone Lines; rather the 2008M NSL Units (and 2008/16 NSL Expanders) in electrical/telephone rooms intercept all Resident Bell Phone Lines coming into a building and communicate directly to them. The simplest NSL configuration with one 2001 Lobby Unit, a 2008M NSL Unit (and any... - Page 9 INDEPENDENT BUILDING ACCESS: A two building, three 2001 Lobby Unit NSL configuration. Each building’s 2001 Lobby Unit (only one is shown per building, but there could actually be more, such as for multi-entrances) uses one Audio Line. Each 2008M NSL Unit (and any 2008/16 NSL Expanders) connects to two Audio Lines (each has capability for 5 Audio Lines);...
- Page 10 SHARED BUILDING ACCESS: A two building, three 2001 Lobby Unit NSL configuration. Each 2001 Lobby Unit (only one is shown, but there could actually be more, such as for multi-entrances) uses one Audio Line. Each 2008M NSL Unit (and any 2008/16 NSL Expanders) connects to three Audio Lines (each has capability for 5 Audio Lines);...
-
Page 11: Adc Single And Multiple Entrance System Wiring Application
ADC SINGLE AND MULTIPLE ENTRANCE SYSTEM WIRING APPLICATION Page 9... -
Page 12: Nsl Single Entrance System Wiring Application
NSL SINGLE ENTRANCE SYSTEM WIRING APPLICATION Page 10... -
Page 13: Nsl Multiple Entrance System Wiring Application
NSL MULTIPLE ENTRANCE SYSTEM WIRING APPLICATION Page 11... -
Page 14: Lobby Unit Enclosures
LOBBY UNIT ENCLOSURES The are two sizes of lobby panel enclosures. The Universal 2000 Series features both scrolling and non-scrolling lobby panels and the Universal 3000 Series is a larger panel which provides only a non-scrolling function. UNIVERSAL 2000 PANELS The UNIVERSAL 2000 Series entry/lobby panels are surface mounted. -
Page 15: Universal 3000 Panels
UNIVERSAL 3000 PANELS Universal 3000 Panels for Non-Scrolling Directory TAS-2000 Model US-3140 Stainless Steel finish entry panel with speaker, 140 Name Paper Directory ± or space for 35 Magnetic Letters and micro switch for postal lock. Requires a Numeric Entry Type 2001 Main Board & Display. Model US-3140H Stainless Steel finish entry panel with handset, 140 Name Paper Directory ±... -
Page 16: Mounting The 2000 Universal Type Lobby Unit Enclosure
MOUNTING THE 2000 UNIVERSAL TYPE LOBBY UNIT ENCLOSURE: Mount the panel as shown in the next two Figures using the supplied screws. Page 14... - Page 17 MOUNTING THE FLUSH TRIM FOR THE 2000 SERIES UNIVERSAL ENCLOSURES The diagram below displays the installation of the flush trim. Page 15...
- Page 18 MOUNTING THE THERMOSTAT HEATER KIT MODEL TH-102 IN THE UNIVERSAL ENCLOSURE (OPTIONAL): Mount the Heater Kit according to the Figure below. Install the TH-102 Heater into bottom left hand corner of the universal enclosure using the two spacers and two hex nuts provided. Use a pair of #18 AWG wires to connect from the TH-102 unit to 24VAC tap on a PS-24 transformer.
-
Page 19: Mounting The 3000 Universal Type Lobby Unit Enclosure
MOUNTING THE 3000 UNIVERSAL TYPE LOBBY UNIT ENCLOSURE: Mount the panels as shown in the following two Figures using the supplied screws. Page 17... - Page 20 MOUNTING THE FLUSH TRIM FOR THE 3000 SERIES UNIVERSAL ENCLOSURES The diagram below displays the installation of the flush trim. MOUNTING THE MAGNETIC LETTER KIT MLK-2035 (OPTIONAL): Mount the Magnetic Letter Kit according to the Installation Instruction that comes with the Kit. This kit is used only for the Universal 3000 type panel and provides a metal mounting chassis and letters for 35 names.
-
Page 21: Uft-3002 Flush Mounting Frame For Two 3000 Universal Panels
UFT-3002 FLUSH MOUNTING FRAME FOR TWO 3000 UNIVERSAL PANELS The UFT-3002 Flush Mounting frame allows installation of two 3000 Universal panels (such US-3140, US-3140H and US-3280)within the frame as shown in the Figure below. Page 19... -
Page 22: Lobby Units
LOBBY UNITS The 2001 Lobby Unit Main Board & Display has many configurable options, but the number of Residents / Suites, and whether the Scrolling Directory Feature is present is dependent upon the model chosen ... NON-SCROLLING DIRECTORY MODELS SCROLLING DIRECTORY MODELS Model Resident Capacity Model... -
Page 23: 2001 Lobby Unit Wiring
2001 LOBBY UNIT WIRING The 2001 Lobby Unit Main Board has both ribbon cable sockets and screw terminals. Connection via ribbon cable to the Lobby Unit Display & Keypad Board mounted on the enclosure’s door. RS-485 Port for connection to an RS-485IMA Interface Module or MDM-1000 modem. - Page 24 WIRING OF LOBBY UNIT Page 22...
- Page 25 WIRING OF LOBBY UNIT continued Page 23...
-
Page 26: 2001 Lobby Unit Configuration
2001 LOBBY UNIT CONFIGURATION Most of the 2001 Lobby Unit Configuration is set using either the Unit’s own Keypad and Display, or via the PC Configuration Software (see separate manual). One item that is separately set is the Lobby Unit’s ID and RS-485 Communications Speed. These are set by the SW2 DIP Switches on the Main Board (see the Main Board diagram in the Lobby Unit Wiring section). -
Page 27: 2001 Lobby Unit Configuration Via A Personal Computer
2001 LOBBY UNIT CONFIGURATION VIA A PERSONAL COMPUTER The easiest way to configure the 2001 Lobby Unit is with the Mircom PC Configuration Software Package. This Windows 95/98 software is provided on a single CD-ROM. It is connected to the TAS-2000 system via the Mircom RS-485IMA Interface Module ... -
Page 28: Nsl & Elevator Unit Enclosures Mechanical Installation
NSL & ELEVATOR UNIT ENCLOSURES MECHANICAL INSTALLATION Both the NSL and Elevator Restriction Units are intended for mounting in the Electrical/Telephone Room of a Building. They come Factory assembled in one of two enclosure sizes shown below. The 2008M NSL Unit includes the 27” enclosure. The 2008 includes the 13 15/16” enclosure. -
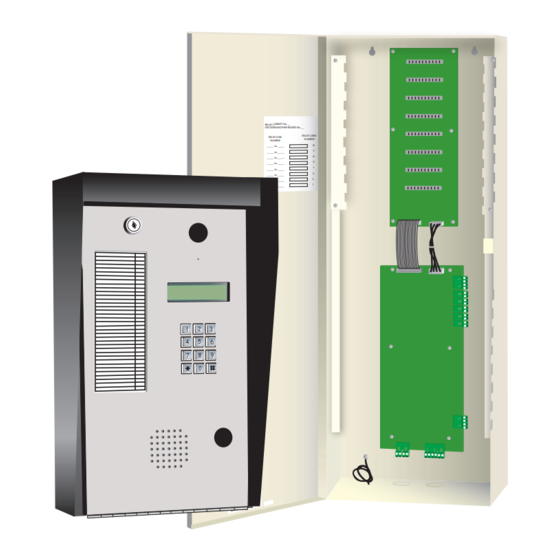
Page 29: 2008M Nsl (Non-Subscriber-Loop) Units
2008M NSL (NON-SUBSCRIBER LINE) UNITS The 2008M NSL Unit includes a cabinet for mounting into an electrical/telephone room. In this cabinet there is the Main NSL Controller Board and one NSL Backplane. Up to eight 2012 NSL Relay Boards may be installed on the NSL backplane, allowing for 96 Residents in this enclosure. -
Page 30: 2008M Nsl Unit Wiring
2008M NSL UNIT WIRING The 2008M NSL Unit Controller Board has both ribbon cable sockets and screw terminals. The screw terminal connections are defined more fully in the following pages. RS-485 Port for connection to an RS-485IMA Interface Module. P2 & P3 Expansion to the first NSL Backplane. Turns the Unit’s Power on and off for servicing, or to re-start the unit. - Page 31 Page 29...
-
Page 32: 2008M Nsl Unit Configuration
2008M NSL UNIT CONFIGURATION Most of the 2008M NSL Units settings are actually set by the 2001 Lobby Unit Configuration. One item that is separately set is the NSL Unit’s ID and RS-485 Communications Speed. These are set by the DIP Switches on the NSL Unit’s Controller Board. - Page 33 The 2008M / 2008 / 2016 NSL Unit Relay Backplane Boards have both ribbon cable sockets and Relay Board sockets. P1 & P2 Expansion from the previous Backplane or the NSL Main Controller board. P11&12 Expansion to the next Backplane. P3 to 10 Connectors for the 2012 NSL Relay Boards.
-
Page 34: 2012 Nsl Relay Board Wiring
Since there are two types of block wiring configuration, CA-71A and RJ-71C, we recommend the user contact the Telephone Company as to what block wiring configuration is available. We suggest using Mircom's standard 9106 cable for CA-71A or RJ- 71C configured blocks since they are straight forward and easy to use. - Page 35 Page 33...
-
Page 36: Ca-71A Bix Block Wiring Configuration
CA-71A BIX Block Wiring Configuration: Page 34... -
Page 37: Ca-71A Bix Block Identification Form
CA-71A BIX Block Identification Form: Page 35... -
Page 38: Rj-71C Punch-Down Block Wiring Configuration
RJ-71C Punch-Down Block Wiring Configuration: Page 36... -
Page 39: Rj-71C Punch-Down Block Identification Form
RJ-71C Punch-Down Block Identification Form: Page 37... -
Page 40: 2008E Elevator Restriction Units
2008E ELEVATOR RESTRICTION UNITS Elevator Restriction function allows the visitor limited access in the building. The 2008E Elevator Restriction Unit includes a cabinet for mounting into an electrical room with the Main Elevator Restriction Controller Board and the Elevator Backplane. Up to eight 2012E Elevator Relay Boards may be installed, allowing for 96 Elevator floors to be accessed in this enclosure. -
Page 41: 2008E Elevator Restriction Unit Wiring
2008E ELEVATOR RESTRICTION UNIT WIRING The 2008E Elevator Restriction Unit Controller Board has both ribbon cable sockets for connection to the Backplane Board. RS-485 Port for connection to an RS- 485IMA Interface Module. P2 & P3 Expansion to the Elevator Restriction Backplane. - Page 42 Page 40...
- Page 43 The 2008E Elevator Restriction Unit Backplane Board has ribbon cables to connect to the Elevator Main Controller Board and 2012E Relay Board sockets. There can only be one Backplane Board per 2008E Unit. P1 & P2 Expansion from the Elevator Restriction Main Controller Board.
- Page 44 The 2012E Elevator Restriction Relay Boards plug into the Backplane portion of the 2008E Elevator Restriction Unit. They number from 1 to 8 starting from the bottom slot and moving towards the top. Each has 12 Form “A” or “B” (Each is Jumper selectable as Normally Closed or Normally Open) Relay contacts rated at 28 VDC, 0.5 ampere.
-
Page 45: 2008E Elevator Restriction Unit Configuration
2008E ELEVATOR RESTRICTION UNIT CONFIGURATION Most of the 2008E Elevator Restriction Units settings are actually set by the 2001 Lobby Unit Configuration. One item that is separately set is the Elevator Restriction Unit’s ID and RS-485 Communications Speed. These are set by the DIP Switches on the Elevator Restriction Unit’s Controller Board. -
Page 46: Appendix A - Specifications
24 VAC/ 40 VA, CSA approved Class 2 Power Transformer. Door Strikes: Select the appropriate door strike as required by your system applications. We recommend using Mircom's door strikes below and its compatible power transformer. Mircom Model M-10 DC (silent) or AC (buzzing) Door Strike. (Use PS-3B transformer) The door strike must have its own separate power transformer. -
Page 47: Appendix B: Programming The Tas 2000 Via The Keypad
APPENDIX B: PROGRAMMING THE TAS 2000 VIA THE KEYPAD APPENDIX B: PROGRAMMING THE TAS 2000 VIA THE KEYPAD To program the TAS-2000 via the keypad, press the number 9 four times ‘9999', the following screen will appear, Enter the Password [ _ _ _ _ _ _ _ _ _ _ ] Press the keys 1111111111 (Default Password) and you will get you will get a list of operations that can be chosen (Programming Menu). - Page 48 , Initialize Logging , Init/Erase all Data , Exit We will provide information as to how to input data using the programming menu. The following table provides the function of the command keys used to program the TAS 2000. COMMAND KEYS FUNCTION to move arrow down or accept to move arrow up or cancel...
- Page 49 IMPORTANT Before entering any data into the system, the following three steps must be performed in order to initialize the system properly. Before you enter resident names and dial codes or do anything, move the arrow to Init/Erase all data, you will see the following screen, Are you sure? [*=CANCEL][#=OK] press #, this will erase all data, initialize the system and add all the default values and returns to...
- Page 50 Add New Record To add resident names and dial codes move arrow to the ‘Add new record’ function. Use the # and * keys to move arrow up and down. To select the ‘Add new record’ function press 0. The display will show, Enter Name [ _ _ _ _ _ _ _ _ _ _ _ _ _ _ _] To enter a name use the keys 0 to 9 and press once, twice or three times depending on the letter which is required,...
- Page 51 PROGRAMMING MENU NSL (NON- ADC (NON- Explanation/Description (SCROLLING) SCROLLING) (SCROLLING) SCROLLING) Enter the resident’s name Enter Name (15 digits) [______________] Enter the resident’s Enter Telephone No. telephone number (14 [______________] digits including comma which is used as 1 second delay). Press # and the 1 for comma.
- Page 52 Decimal AVAILABLE RING PATTERN Value 2s ON 4s OFF standard ring A 800ms ON 400ms 800ms ON 4s OFF distinct ring B 200ms ON 400ms 200ms ON 400ms 800ms ON 4s OFF distinct ring C 200ms ON 400ms 800ms ON 400ms 200ms ON 4s OFF...
- Page 53 This function defines the key which will be pressed by the resident to open the main door, the default is 9. Press any other number if you wish to change this. NOTE: for pulse phones, make the DTMF key higher than 5 to avoid interpretive problems.
- Page 54 NOTE: Any time the parameters above are changed, the system must be reset, by chosing the options menu and selecting reset. Parameters such as DTMF Values, Timers and Password. Place arrow on Set Time and Date and press 0 and the next screen will be: [MM/DD/YYYY][HH:MM] [__/__/____][__:__] Enter month, for example August as ‘08', day ‘10', year ‘1999' and the hour and minutes.
- Page 55 Sort By Name Place arrow on Sort by Name and press `0' and the next screen will be: Sorting please wait... Press # to go back to programming menu. NOTE: The system will sort the entered data by name, but should there be a power failure or reset the names will returned to the order in which they were entered.
- Page 56 Set NSL ID and SP This function is for setting the NSL ID and speech path (SP). Each NSL controller has five (5) speech paths or audio lines (AUDIO LINES 1 TO 5) to select. These speech paths are used as audio lines which can be connected to as many as five (5) lobby panels.
- Page 57 EXAMPLE OF SPEECH PATH DESIGNATION: In the following example, there are five lobby units and two NSL units. They each must be given an ID (two digit address). The NSL with ID 06 must talk to the Front Lobby Panel of Building #1 as does the NSL with ID 07. The NSL with ID 06 must also talk to the Front Lobby Panel of Building #2 as does the NSL with ID 07.
- Page 58 We may now fill in the NSL IDs and their speech path for each Lobby Panel Program the Lobby Panel with address 01 in Building #1 by selecting the Set NSL ID and SP function on the menu. Enter all numerical values and press # to accept, otherwise press * to cancel. Enter NSLA ID&SPA NSL Cabinet A 06 ] [01]...
- Page 59 For the back lobby of Building #1, the set up will be: NSL ID Speech Path (SP) NSL ID Speech Path (SP) or Audio Line or Audio Line NSLA ID NSLE ID NSLB ID NSLF ID NSLC ID NSLG ID NSLD ID NSLH ID The set up for the back lobby of Building #2:...
- Page 60 Select the Set ELV ID and Time function. Enter the Elevator ID (address) and Timer Period as shown below. Press # to accept, otherwise press * to cancel. Enter ELEV-A ID & Elev. Restriction Cabinet A Time[__][__] Elev. Restriction Cabinet B Enter ELEV-B ID &...
- Page 61 AUTO PROGRAMMING This function is provided to allow the user to auto program the Number of Residents, Dial Codes, Relay Number, NSL ID, Ring Pattern and Elevator ID. This feature is particularly useful when programming the system with different ranges of Dial Codes with the same NSL ID, Ring Pattern and Elev. ID. Please note that each resident can have a distinct Ring Pattern if desired.
- Page 62 Set Tone/Pulse mode Choose 0 for a touch tone telephone (DTMF) or 1 for a pulse (rotary) type telephone. Select tone/pulse [ _ ] [ 0=T, 1=P] Reset This function acts as an OFF/ON switch. Place arrow on the Reset function and press 0 to accept. Resetting the system, please wait ...
-
Page 63: Appendix C - Tas 2000 Slim Line And Mrk-1Rk Retro-Fit
The MRK-1RK is a NSL (No Subscriber Line) system which has all the same features as the TAS- 2000 including ring pattern selection, keyless code entry and an event log. The Mircom MRK-1RK is also available as a scrolling (display) under the model MRK-1RKS. - Page 64 TAS 2000 SLIM LINE TELEPHONE ACCESS The Mircom TAS 2000 Slim Line Telephone Access Unit is designed to provide a slimmer, sleeker version of the standard TAS 2000. The system provides 2 line by 20 character LCD back-lit display, a built-in Postal Lock micro switch and tamper proof screws.
- Page 65 TAS 2000 SLIM LINE LOBBY UNIT AND MARK 1 WIRING The TAS 2000 Slim Line and Mark 1 has both ribbon cable sockets and screw terminals. P1 RJ-11 Modular Telephone Jack for connection to the Telephone Line or NSL Audio Line. P2 RS-485 Port for connection to an RS- 485IMA Interface Module.
- Page 66 Wiring of the Door Strike and System Supply Wiring of Telephone, RS-485 and Auxiliary Inputs Page 64...
-
Page 67: Appendix D - Worksheets
APPENDIX D - WORKSHEETS Copies may be made of this NSL worksheet and filled in with additional resident names and numbers. RESIDENT DIRECTORY WORK SHEET FOR NSL SYSTEMS KEYLESS DIAL RELAY / TEL. CO. APT. # RESIDENT NAME ENTRY CODE LINE AMPHENOL CODE... - Page 68 APPENDIX D - WORKSHEETS (Continued) Copies may be made of this ADC worksheet and filled in with additional resident names and numbers. RESIDENT DIRECTORY WORK SHEET FOR ADC SYSTEMS Unit No. Dial Phone Keyless Resident's Name Code Phone Number Type Entry Flr.
-
Page 69: Appendix E - Kits
APPENDIX E - KITS MUS-2060SDK Electronic Scrolling Directory Lobby Panel Kit consists of 4 Line by 20 LCD Character Display Main Controller Board for 60 Residents (Model 2001-0060S) PS-4 Transformer US-2000S Lobby Panel and Enclosure URH-2000 Rain Hood and Light Assembly MUS-2120SDK Electronic Scrolling Directory Lobby Panel Kit consists of 4 Line by 20 LCD Character Display Main Controller Board for 120 Residents (Model 2001-0120S) - Page 70 TELEPHONE ACCESS SLIM-LINE KITS continued MUS-1120SDK Slim-Line Electronic Scrolling Directory Lobby Panel Kit consists of 2 Line by 20 LCD Character Display Main Controller Board for 120 Residents (Model 1001-0120S) PS-4 Transformer US-1000 Lobby Panel and Enclosure MUS-1360SDK Slim-Line Electronic Scrolling Directory Lobby Panel Kit consists of 2 Line by 20 LCD Character Display Main Controller Board for 360 Residents (Model 1001-0360S) PS-4 Transformer...
-
Page 71: Warranty
Said equipment must be shipped to MIRCOM prepaid. Return freight will be prepaid by MIRCOM. We shall not be responsible to repair or replace equipment which has been repaired by others, abused, improperly installed, altered or otherwise misused or damaged in any way. - Page 72 MIRCOM TELEPHONE ENTRY SYSTEM (NSL SYSTEM) RESIDENT OPERATING INSTRUCTIONS Mircom's state-of-the-art door entry system has been installed in this building to provide you and your guest with an increased level of confidence and security. The system operates with your existing telephone. Your guest simply dials your code number or selects your name by scrolling through the electronic directory on the lobby panel and your telephone will ring.
- Page 73 MIRCOM TELEPHONE ENTRY SYSTEM (ADC SYSTEM) RESIDENT OPERATING INSTRUCTIONS Mircom's state-of-the-art door entry system has been installed in this building to provide you and your guest with an increased level of confidence and security. The system operates with your existing telephone. Your guest simply dials your code number or selects your name by scrolling through the electronic directory on the lobby panel and your telephone will ring.
Need help?
Do you have a question about the TAS-2000 Series and is the answer not in the manual?
Questions and answers