Table of Contents
Advertisement
Quick Links
X-431 ADAS PRO Calibration Tool User Manual
Copyright Information
Copyright © 2019 by LAUNCH TECH. CO., LTD. All rights reserved. No part of this
publication may be reproduced, stored in a retrieval system, or transmitted in any form
or by any means, electronic, mechanical, photocopying, recording or otherwise, without
the prior written permission of LAUNCH.
Neither LAUNCH nor its affiliates shall be liable to the purchaser of this unit or third
parties for damages, losses, costs, or expenses incurred by purchaser or third parties
as a result of: Accident, misuse, or abuse of this unit, or unauthorized modifications,
repairs, or alterations to this unit, or failure to strictly comply with LAUNCH operating
and maintenance instructions. LAUNCH shall not be liable for any damages or
problems arising from the use of any options or any consumable products other than
those designated as Original LAUNCH Products or LAUNCH Approved Products by
LAUNCH.
All information, specifications and illustrations in this manual are based on the latest
information available at the time of printing. LAUNCH reserves the right to make
changes at any time without prior written or oral notice.
Trademark Information
LAUNCH is a registered trademark of LAUNCH TECH CO., LTD. (LAUNCH) in China
and other countries. All other LAUNCH trademarks, service marks, domain names,
logos, and company names referred to in this manual are either trademarks, registered
trademarks, service marks, domain names, logos, company names of or are otherwise
the property of LAUNCH or its affiliates. In countries where any of the LAUNCH
trademarks, service marks, domain names, logos and company names are not
registered, LAUNCH claims other rights associated with unregistered trademarks,
service marks, domain names, logos, and company names. Other products or
company names referred to in this manual may be trademarks of their respective
owners. You may not use any trademark, service mark, domain name, logo, or
company name of LAUNCH or any third party without permission from the owner of the
applicable trademark, service mark, domain name, logo, or company name. You may
contact LAUNCH by visiting the website at www.cnlaunch.com, or writing to LAUNCH
TECH. CO., LTD., Launch Industrial Park, North of Wuhe Avenue, Banxuegang,
Bantian, Longgang, Shenzhen, Guangdong, P.R.China, to request written permission
to use Materials on this manual for purposes or for all other questions relating to this
manual.
i
Advertisement
Table of Contents

Subscribe to Our Youtube Channel
Related Manuals for Launch X-431 ADAS PRO


Summary of Contents for Launch X-431 ADAS PRO
- Page 1 LAUNCH. Neither LAUNCH nor its affiliates shall be liable to the purchaser of this unit or third parties for damages, losses, costs, or expenses incurred by purchaser or third parties...
-
Page 2: Table Of Contents
2 PRODUCT DESCRIPTION .................... 4 2.1 P ........................4 ROFILE 2.2 P ......................5 ACKING 3 KNOWLEDGE OF X-431 ADAS PRO CALIBRATION TOOL .......... 8 3.1 X-431 ADAS PRO C ............... 8 ALIBRATION 3.2 B ......................10 UPPORT 3.3 B ) .................. - Page 3 X-431 ADAS PRO Calibration Tool User Manual 5.3 C ADAS ................47 ALIBRATING ADAR BASED 5.3.1 Calibrating the radar sensor with magnetic laser ..........48 5.3.2 Calibrating the radar sensor without magnetic laser ........49 6 CARE & MAINTENANCE .................... 51...
-
Page 5: Safety Precautions
X-431 ADAS PRO Calibration Tool User Manual 1 Safety Precautions The X-431 ADAS PRO calibration tool is exclusively intended for use on a vehicle. To avoid personal injury, property damage, or accidental damage to the product, read all of the information in this section before using the product: ... - Page 6 Protect the X-431 ADAS PRO calibration tool from water and strong impacts. Protect the X-431 ADAS PRO calibration tool from long periods of exposure to solar radiation. Do a regular check and service for the X-431 ADAS PRO calibration tool.
- Page 7 X-431 ADAS PRO Calibration Tool User Manual Do not use the meter in areas where it is prohibited e.g. near airports and hospitals, or where it would be in violation of the law. To ensure proper operation, avoid using the meter in areas with strong electromagnetic interference.
-
Page 8: Product Description
X-431 ADAS PRO calibration tool. There are two main components to the X-431 ADAS PRO calibration tool: ... -
Page 9: Packing List
LAUNCH X-431 ADAS PRO Calibration Tool User Manual Diagnostic Tool (sold separately) – The calibration tool can be exclusively operated in conjunction with a Launch-specific diagnostic tool. Diagnostic tools from other manufacturers will not be supported. 2.2 Packing List Please check the packing list upon receiving your tool so that complaints can be issued immediately regarding potential damage or missing parts. - Page 10 X-431 ADAS PRO Calibration Tool User Manual Calibration panel kit (*Note: Different vehicle makes has different calibration reference patterns. The calibration pattern is available as in packages or individual.) Wheel clamps kit Radar kit User manual...
- Page 11 LAUNCH X-431 ADAS PRO Calibration Tool User Manual To provide power to the beam lifter Power adaptor (1 adaptor + 2 through connection to AC outlet. power cords) ADAS activation card The ADAS calibration software on the diagnostic tool is disabled at default. User...
-
Page 12: Knowledge Of X-431 Adas Pro Calibration Tool
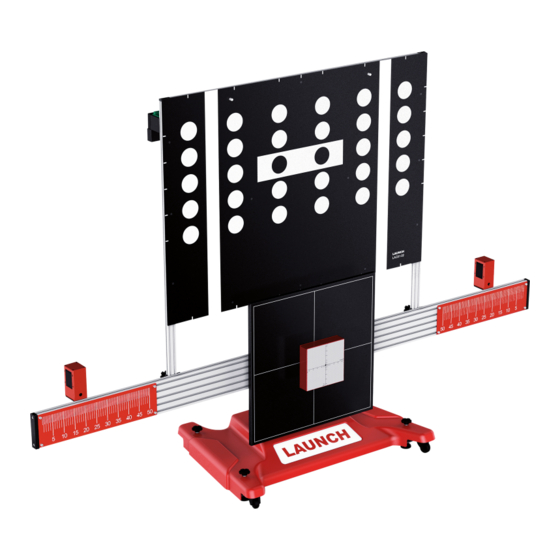
3 Knowledge of X-431 ADAS PRO Calibration Tool 3.1 X-431 ADAS PRO Calibration Tool The X-431 ADAS PRO calibration tool mainly includes the following items and components: Fig. 3-1 (This figure is fictious and only for illustrative purpose. It is subject to change due to... - Page 13 LAUNCH X-431 ADAS PRO Calibration Tool User Manual Description Base support To firmly fasten the beam lifter to balance the cross member and calibration frame installed on the beam lifter. Equipped with four rolling casters, it also provides the ability to move the tool anytime and anywhere.
-
Page 14: Base Support
X-431 ADAS PRO Calibration Tool User Manual 3.2 Base Support Fig. 3-2 Description Upper cover It should be removed before installing the beam lifter. It is divided into two parts. The part installed with the name plate should be installed on the other part. -
Page 15: Beam Lifter (Upstand)
LAUNCH X-431 ADAS PRO Calibration Tool User Manual 3.3 Beam Lifter (Upstand) Fig. 3-3 Description Upper cover It should be removed firstly before disassembling and installing all other components of the beam lifter. A rocker switch (11) and a tuning knob (10) - Page 16 X-431 ADAS PRO Calibration Tool User Manual are available on it. Handle For moving and holding the beam lifter easier. Slider For lifting the cross member up or dropping it along the lifter. Mouting holes Bearing Never collide it abruptly when installing the beam lifter. Doing so may cause damage to it.
-
Page 17: Calibration Frame & Cross Memeber
LAUNCH X-431 ADAS PRO Calibration Tool User Manual 3.4 Calibration Frame & Cross Memeber Fig. 3-4a Front view Fig. 3-4b Rear view... - Page 18 X-431 ADAS PRO Calibration Tool User Manual Description Calibration pattern The pattern varies from vehicle to vehicle. The default calibration pattern is VAG Type 1(Front). For detailed calibration reference patterns, please refer to Appendix. Laser module The laser beam can be projected onto the scale dial of the 3 points wheel alignment clamp.
-
Page 19: Laser Module
LAUNCH X-431 ADAS PRO Calibration Tool User Manual 3.5 Laser Module Fig. 3-5 Description Output of the laser beam Output for laser beam. Use the laser beam to read the actual value at the scales of the cross member and at wheel clamp. -
Page 20: Points Wheel Alignment Clamp
X-431 ADAS PRO Calibration Tool User Manual Fig. 3-6 3. Follow the correct installation direction/battery polarities to install the new batteries. 4. Restore the battery compartment cover and use the screw to fasten it. *Caution: Laser radiation may cause damage to/destruction of the retina. Never look directly into the laser beam. -
Page 21: Installing The Attachment Bracket On The Wheel Clamp
LAUNCH X-431 ADAS PRO Calibration Tool User Manual Fig. 3-7 Description Attachment brackets for vehicle tyre Attach it to the vehicle’s tyre. Level gauge Handle Adjustment screw Turning it can slide all attachment brackets (1) in (out) simultaneously. Set screw To fasten/loosen the laser module. -
Page 22: Installing The Laser Module On The Wheel Clamp
X-431 ADAS PRO Calibration Tool User Manual *Note: To insert the attachment brackets to the bottom of the slot, just pull the cable (6) pull switch and then push it until it reaches to the bottom. Fig. 3-8 3. After properly installing, hold the handle (2) of the wheel clamp and store it, making sure that the attachment brackets firmly sit on the ground. - Page 23 LAUNCH X-431 ADAS PRO Calibration Tool User Manual 3. Use the set screw (5) to tighten it and follow Fig. 3-10a/3-10b to lay it aside or hang it on the cross member. Fig. 3-10a Lay it on the ground (For longer ones) Correct Fig.
-
Page 24: Attaching The Wheel Clamp To The Vehicle's Tyre
X-431 ADAS PRO Calibration Tool User Manual when storing the wheel clamp. See Fig. 3-10c. Doing so may destroy the installation of the laser module and cause calibration error. 3.6.3 Attaching the wheel clamp to the vehicle’s tyre After properly installing the wheel clamp, you need to attach the wheel clamp to the vehicle’s tyre. -
Page 25: Radar Kit
LAUNCH X-431 ADAS PRO Calibration Tool User Manual 3.7 Radar Kit There are three main components to the radar kit: radar reflector, magnetic laser and angular attachment plate. Fig. 3-13 Description Radar Reflector Switch Switch the laser on and off. -
Page 26: Laser Distance Meter
X-431 ADAS PRO Calibration Tool User Manual Switch the electromagnet on so that it can firmly attach on the radar reflector. To detach it, turn the lever off. Angular Attachment plate To mount the radar kit on the cross member. -
Page 27: Operation Tips
LAUNCH X-431 ADAS PRO Calibration Tool User Manual 2. Put the battery in it correctly. 3. Close the battery cover. *Note: Please take out the battery if you don’t use the meter for a long time. 3.8.2 Operation tips ... - Page 28 X-431 ADAS PRO Calibration Tool User Manual without operation for 3 minutes. 2) Cancel the last instruction or clear the display. It is forbidden to place the meter into water, plase use the soft and damp cloth to clean it. Do not use corrosion or volatilization to clearn it.
-
Page 29: Initial Use
LAUNCH X-431 ADAS PRO Calibration Tool User Manual 4 Initial Use 4.1 Installing the ADAS Calibration Tool 4.1.1 Installing the beam lifter on the base support Follow the steps mentioned below to proceed: 1. Loosen the screws of the fixing baffle (4). Remove the upper cover (1) of the base support. - Page 30 X-431 ADAS PRO Calibration Tool User Manual 4. Take out the beam lifter from the package box, gently attach it on the base support, with the mounting holes on the beam lifter aligning with ones on the base support. Use the screws to tighten it on the base support.
-
Page 31: Installing The Cross Member & Calibration Frame
LAUNCH X-431 ADAS PRO Calibration Tool User Manual 4.1.2 Installing the cross member & calibration frame While installing the cross member and calibration frame, please prepare the following items: Cross member Laser modules (x 2) Calibration frame 1. Secure the cross member on the beam lifter: There are two mark-off lines (the... - Page 32 X-431 ADAS PRO Calibration Tool User Manual Fig. 4-5 When the cross member is centrally located on the beam lifter, align the mouting holes on the cross-linking bracket 2 with the floating screws on the cross member, and then use the dedicated screws to fasten the cross member on the beam lifter.
- Page 33 LAUNCH X-431 ADAS PRO Calibration Tool User Manual 2. Install the calibration frame: Hold the handles to lift the calibration frame up, and insert it into the calibration frame holder at the same time until it reaches to the bottom. Use the set screws to fix it in place. See Fig. 4-7a & Fig. 4-7b.
- Page 34 X-431 ADAS PRO Calibration Tool User Manual holes (Each side has two) reserved on the calibration frame. User can choose to install the laser distance meter on either side of the calibration frame to your preference. Fig. 4-8 2). Install the level gauge on the top of the fixing bracket. Make sure that the mouting holes on the fixing bracket are aligned with the ones on the calibration frame and use the screws to secure it in place.
-
Page 35: Installing The Radar Kit
LAUNCH X-431 ADAS PRO Calibration Tool User Manual 3). Align the mouting holes on the docking holder with the ones on the fixing bracket and use the screws to fix it. 4). Place the laser distance meter into the dock holder ensuring the screen facing down. - Page 36 X-431 ADAS PRO Calibration Tool User Manual need to attach it on the cross member. *Note: While calibrating the front camera, NEVER keep the radar kit hanging on the cross member. Decreasing the cross member may cause the radar kit accidentally reaching to the floor, which will cause damage to the radar kit or generate a risk of person injury.
-
Page 37: Installing The Calibratioin Reference Pattern
Fig. 4-14 Fig. 4-15 4.2 Activate the Software Calibration Function By default, the calibration feature of the pre-installed diagnostic software of LAUNCH scanners is disabled. To ensure normal use of the calibration function of the diagnostic... - Page 38 *Note: Different LAUNCH scanners have different accesses to the ADAS function. 1. Press the [POWER] button on the diagnostic tool to turn it on. 2. Tap the application icon on the home screen to launch it. 3. Log in the system, a screen similar to the following figure appears: Fig.
- Page 39 LAUNCH X-431 ADAS PRO Calibration Tool User Manual Fig. 4-18 6. Scratch or scrap the designated area on the included Activation Card to reveal the password, and input the 24-digit password to activate it. 7. Now the ADAS function becomes accessible and is ready for use.
-
Page 40: Working With The Adas Calibration Tool
• Vehicle system is working properly. • No trouble codes stored in ECU memories. • Prepare vehicle-specific calibration reference pattern. • A LAUNCH’s scanner supporting ADAS system calibrating is required (sold separately). • Front & rear axle track is properly adjusted. - Page 41 LAUNCH X-431 ADAS PRO Calibration Tool User Manual the calibration panel to the vehicle) Distance E = reserved for about 1m (from the vehicle to other obstacles) Distance F = at least 0.5m (a lane for technician to walk through) 5.1.1.2 For rear &...
-
Page 42: Workstation Ground
X-431 ADAS PRO Calibration Tool User Manual Distance E = about 2.9m (the width of the vehicle, varies from vehicle to vehicle) For European vehicles, Distance A = about 4.5m (the width of the whole workstation) Distance B = about 7m (the length of the whole workstation) Distance C = at least 0.5m (a lane for technician to walk through) -
Page 43: Workstation Lighting
LAUNCH X-431 ADAS PRO Calibration Tool User Manual Wrong: 5.1.3 Workstation lighting The lighting system around the calibration workstation should be a non-frequency flash source, including but not limited to: LED light source, industrial lighting complying with international standards, dual light source in opposite phase. -
Page 44: Calibrating Camera-Based Adas
X-431 ADAS PRO Calibration Tool User Manual The light source should ensure uniform illumination distribution in the calibration workstation. The brightness of the light should not be changed, and ensure that there will be no other changing light source around the workstation, such as a driving vehicle with lights ON, etc. - Page 45 LAUNCH X-431 ADAS PRO Calibration Tool User Manual 5.2.1.1 Placing the ADAS calibration panel in front of the vehicle Proceed as follows to place the ADAS calibration panel in front of the vehicle: 1. Connect the diagnostic tool to the vehicle.
- Page 46 X-431 ADAS PRO Calibration Tool User Manual 2. Launch the diagnostic App. 3. Tap “ADAS” to auto-identify the vehicle info and navigate to the ADAS menu. Or manually select the vehicle model and the system to be calibrated, e.g. MFK.
- Page 47 LAUNCH X-431 ADAS PRO Calibration Tool User Manual Or the distance from the center of the front wheel hub of the vehicle to the calibration panel. 5. Use the adjusting screws of the base support to adjust so that the horizontal and the vertical level gauge of the calibration frame are centred respectively.
- Page 48 X-431 ADAS PRO Calibration Tool User Manual Proceed as follows to place the ADAS calibration panel centred in front of the vehicle: 1. Attach one wheel clamp on the left rear wheel. *Note: You are strongly recommended to install the wheel clamp on the rear wheel since the farther distance (between the calibration panel and wheel clamp) makes the calibration more accurate.
- Page 49 LAUNCH X-431 ADAS PRO Calibration Tool User Manual Fig. 5-6 5.2.1.3 Placing the ADAS calibration panel in parallel with the vehicle In this step, we just need to make sure that the left (WL) and right (WR) scale of the wheel clamp reflected from the laser modules on the cross member show the same values.
- Page 50 X-431 ADAS PRO Calibration Tool User Manual Proceed as follows to place the ADAS calibration panel in parallel with the vehicle: 1. Switch on the laser beam of the laser module with the switch. 2. Align the laser beam of the laser module on the cross member with the scale of the wheel clamp.
-
Page 51: Calibrating The Rear & Avm Camera
5.3 Calibrating Radar-based ADAS X-431 ADAS PRO calibration system provides a Radar expansion kit for the calibration of the radar-based Advanced Driver Assist Systems (ADAS). Compatible with the systems used by VAG and on certain ADAS-equipped Mercedes-Benz models, it extends the capability of the X-431 ADAS PRO calibration tool beyond just camera-based systems. -
Page 52: Calibrating The Radar Sensor With Magnetic Laser
Proceed as follows to calibrate the radar sensor with the magnetic laser: 1. Connect the diagnostic tool to the vehicle. 2. Launch the diagnostic App and select “Local Diagnosis” on the Job menu. 3. Follow the on-screen instructions to select the identified vehicle model and the system to be calibrated. -
Page 53: Calibrating The Radar Sensor Without Magnetic Laser
Proceed as follows to calibrate the radar sensor without the magnetic laser: 1. Connect the diagnostic tool to the vehicle. 2. Launch the diagnostic App and select “Local Diagnosis” on the Job menu. 3. Follow the on-screen instructions to select the identified vehicle model and the system to be calibrated. - Page 54 X-431 ADAS PRO Calibration Tool User Manual 4. Refer to Chapter 4.1.3 to attach the radar reflector to the cross member. The radar reflector must be within the radar sensor area. 5. Follow the instructions on the screen to calibrate the radar sensor.
-
Page 55: Care & Maintenance
LAUNCH X-431 ADAS PRO Calibration Tool User Manual 6 Care & Maintenance For every spare part, the ADAS calibration tool should also be handled with care. Regularly lubricate moving parts with acid-free and resin-free grease or oil. Clean the ADAS calibration tool with non-aggressive cleaning agents on a regular basis. -
Page 56: Appendix: Car Adas Reference Pattern Kit
X-431 ADAS PRO Calibration Tool User Manual Appendix: Car ADAS Reference Pattern Kit 1. Front Camera Panels Kit Configuration (301250002) Panel Name Panel Code Pattern MERCEDES-FC LAC01-01 (301250005) HONDA-FC 01 LAC01-03 (301250007) HONDA-FC 02 LAC01-04-L (301250008) LAC01-04-R... - Page 57 LAUNCH X-431 ADAS PRO Calibration Tool User Manual TOYOTA-FC LAC01-06 (301250009) NISSAN-FC 01 LAC01-07 (301250010) NISSAN-FC 02 LAC01-08 (301250011)
- Page 58 X-431 ADAS PRO Calibration Tool User Manual HYUNDAI/KIA-F LAC01-09 (301250012) MAZDA-FC 01 LAC01-10 (301250013) ALFA GIULIA-FC LAC01-11 (301250014) MAZDA-FC 02 LAC01-16 (301250019)
- Page 59 LAUNCH X-431 ADAS PRO Calibration Tool User Manual 2. Rear Camera & AVM Panels configuration(Asian) (307010023) Panel Name Panel Code Pattern LAC04-01 HONDA-AVM LAC04-02 NISSAN-AVM LAC04-11 LAC04-12-01 HYUNDAI-AVM LAC04-12-02 3. Rear Camera & AVM Panels configuration(American) (307010024) Panel Name Panel Code...
- Page 60 X-431 ADAS PRO Calibration Tool User Manual 4. Rear Camera & AVM Panels configuration(European) (307010025) Panel Name Panel Code Pattern MERCEDES-R LAC02-02 VW-RC LAC02-03 VW-AVM LAC04-04 LAC04-08-01 MERCEDES-RF LAC04-08-02 LAC04-10-01 RENAULT-AVM LAC04-10-02...
- Page 61 LAUNCH X-431 ADAS PRO Calibration Tool User Manual 5. Corner Radar Reflector configuration (301250022) 6. RENAULT/SMART Front Camera single target configuration(LAC01-12) (301250015) 7. DAIHATSU Front Camera single target configuration(LAC01-14) (301250017)
- Page 62 X-431 ADAS PRO Calibration Tool User Manual 8. SUBARU Front Camera single target configuration(LAC01-15) (301250018) 9. HONDA Front Camera single target configuration 3(LAC01-17) (301250020)
- Page 63 The exclusive remedy for any automotive meter found to be defective is repair or replacement, and LAUNCH shall not be liable for any consequential or incidental damages.
- Page 64 P.R.China, 518129 Statement: LAUNCH reserves the rights to make any change to product designs and specifications without notice. The actual object may differ a little from the descriptions in the manual in physical appearance, color and configuration. We have tried our best to make the...
Need help?
Do you have a question about the X-431 ADAS PRO and is the answer not in the manual?
Questions and answers