Table of Contents
Advertisement
Advertisement
Table of Contents

Related Manuals for Launch Creader 5001


Summary of Contents for Launch Creader 5001
- Page 1 V1.00.000 2019-03-19...
- Page 2 LAUNCH. The information contained herein is designed only for the use of this unit. LAUNCH is not responsible for any use of this information as applied to other units.
- Page 3 Creader 5001 English User’s Manual LAUNCH maintenance instructions. LAUNCH shall not be liable for any damages or problems arising from the use of any options or any consumable products other than those designated as Original LAUNCH Products or LAUNCH Approved Products by LAUNCH.
-
Page 4: Table Of Contents
2.4 OBD II Readiness Monitors .................. 2 2.5 OBD II Monitor Readiness Status ................. 3 2.6 OBD II Definitions ....................4 3. Product Descriptions ....................... 6 3.1 Outline of Creader 5001..................6 3.2 Specifications ......................7 3.3 Accessories ......................7 4. Connection & Settings ..................... 8 4.1 Connection ...................... -
Page 5: Introduction
It can be connected to PC through the USB cable for upgrade to keep synchronized with the latest software version. Note: Creader 5001 may automatically reset while being disturbed by strong static electricity. THIS IS A NORMAL REACTION. 2. General Information 2.1 On-Board Diagnostics (OBD) II... -
Page 6: Location Of The Data Link Connector (Dlc)
Creader 5001 English User’s Manual LAUNCH Figure 2-1 2.3 Location of the Data Link Connector (DLC) The DLC (Data Link Connector or Diagnostic Link Connector) is typically a 16-pin connector where diagnostic code readers interface with the vehicle’s on-board computer. The DLC is usually located 12 inches from the center of the instrument panel (dash), under or around the driver’s side for most vehicles. -
Page 7: Obd Ii Monitor Readiness Status
Creader 5001 English User’s Manual LAUNCH indicators used to find out if all of the emissions components have been evaluated by the OBD II system. They are running periodic tests on specific systems and components to ensure that they are performing within allowable limits. -
Page 8: Obd Ii Definitions
Creader 5001 English User’s Manual LAUNCH constantly evaluating, they will be reported as “Ready” all of the time. If testing of a particular supported non-continuous monitor has not been completed, the monitor status will be reported as “Not Complete” or “Not Ready.”... - Page 9 Creader 5001 English User’s Manual LAUNCH load, fuel pressure, fuel trim value, engine coolant temperature, ignition timing advance, or closed loop status. Fuel Trim (FT) -- Feedback adjustments to the base fuel schedule. Short-term fuel trim refers to dynamic or instantaneous adjustments. Long-term fuel trim refers to much more gradual adjustments to the fuel calibration schedule than short-term trim adjustments.
-
Page 10: Product Descriptions
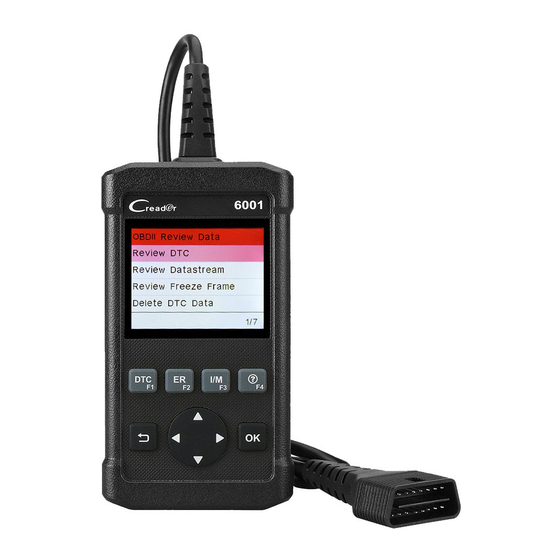
Creader 5001 English User’s Manual LAUNCH 3. Product Descriptions 3.1 Outline of Creader 5001 Figure 3-1 Front View Name Descriptions Indicates test results. Quick access to I/M readiness function. Note: I/M refers to Inspection and Maintenance that is I/M(F3) legislated by the Government to meet federal clean-air standards. -
Page 11: Specifications
Creader 5001 English User’s Manual LAUNCH Move cursor left or right for selection; Or turn page up and down when more than one page is displayed. Mini USB port To connect on PC to upload data or print test results. -
Page 12: Connection & Settings
CAUTION: Don’t connect or disconnect any test equipment with ignition on or engine running. 4.2 Settings Select [Settings] in the main menu and press [OK], the system will enter the following screen: Figure 4-2 Note: The “Record Mode” does not appear on Creader 5001. - Page 13 Creader 5001 English User’s Manual LAUNCH 1) Language This option enables you to set the user interface language. Note: Due to continuous software upgrade, language interface may differ from different software versions. 2) Unit of Measure This option allows you to set measurement unit.
-
Page 14: Diagnose
Creader 5001 English User’s Manual LAUNCH 5. Diagnose 5.1 How to Diagnose? Select [Diagnose] in Main Menu and press [OK], the screen will display Entering System interface as following figure 5-1: Figure 5-1 In figure 5-1, after entering the system, the screen will automatically jump to figure 5-2:... - Page 15 Creader 5001 English User’s Manual LAUNCH Figure 5-3 It mainly includes the following functions: 1. Read Codes This option is used to identify which section of the emission control system has malfunctioned. 2. Erase Codes After reading the retrieved codes from the vehicle and certain repairs have been carried out, you can use this function to erase the codes from the vehicle.
- Page 16 Creader 5001 English User’s Manual LAUNCH This option retrieves and displays live data and parameters from the vehicle’s ECU. 5. View Freeze Frame When an emission-related fault occurs, certain vehicle conditions are recorded by the on-board computer. This information is referred to as freeze frame data. Freeze Data is a snapshot of the operating conditions at the time of an emission-related fault.
-
Page 17: Help
Creader 5001 English User’s Manual LAUNCH 6. Help This menu enables you to view the tool information and retrieve the vehicle’s DLC. In the main menu, select [Help] and press [OK] to enter figure 6-1. Figure 6-1 6.1 About OBD This option allows you to have a general knowledge of OBD. -
Page 18: Update
Creader 5001 can be upgraded via connecting to PC via USB cable. Follow the steps described as below to perform the update: 1. Go to http://mycar.x431.com, click “Products” -> “Creader Online” -> “Creader 5001” to enter the following page. Figure 7-1 2. - Page 19 Creader 5001 English User’s Manual LAUNCH Figure 7-3 c) Choose the destination folder path that the update tool will be installed and then click [Next] to proceed to the next step. Figure 7-4 d) Click [Install] to begin the installation.
- Page 20 4. Connect one end of the USB cable to the USB port of PC, and the other end to the tool. 5. Once the tool is powered up, launch the update tool on your PC, the system automatically identifies the device information and directly navigates to the update center (See Figure 7-6).
-
Page 21: Faq
Creader 5001 English User’s Manual LAUNCH 8. The update process is complete and your tool is now ready for use. 8. FAQ Here we list some frequently asked questions and answers related to the tool. 1. Question: System halts when reading data stream. What is the reason? Answer: It may be caused by a slackened connector. - Page 22 Creader 5001 English User’s Manual LAUNCH 3) Launch the update tool on your PC and a screen similar to the following figure appears: Figure 8-2 4) Type in the Product Serial Number (can be found in figure 8-1 or on the back of the tool),...
- Page 23 Creader 5001 English User’s Manual LAUNCH Figure 8-4 6) Click [Upgrade] to start updating. 7) Once update is complete, the “Upgrade success” message box will pop up. 8) Disconnect the USB cable from the PC and the tool.
- Page 24 The exclusive remedy for any automotive meter found to be defective is repair or replacement, and LAUNCH shall not be liable for any consequential or incidental damages.
- Page 25 LAUNCH Statement: LAUNCH reserves the rights to make any change to product designs and specifications without notice. The actual object may differ a little from the descriptions in the manual in physical appearance, color and configuration. We have tried our best to make the descriptions and illustrations in the manual as accurate as possible, and defects are inevitable.
Need help?
Do you have a question about the Creader 5001 and is the answer not in the manual?
Questions and answers