
Related Manuals for Clarke TIGER 2600A


Summary of Contents for Clarke TIGER 2600A
- Page 1 WARNING: Read these instructions before using the machine PETROL DRIVEN POWER WASHER MODEL NO: TIGER 2600A PART NO: 7320206 OPERATION & MAINTENANCE INSTRUCTIONS ORIGINAL INSTRUCTIONS LS0120 - ISS 1...
- Page 2 Faulty goods should be returned to their place of purchase, no product can be returned to us without prior permission. This guarantee does not effect your statutory rights. ACCESSORIES The range of accessories listed below are available from your CLARKE dealer. ITEM PART NUMBER 5 Litres Detergent (Traffic Film Remover)
-
Page 3: General Safety Rules
3. DO NOT let children or untrained personnel use this machine. 4. DO NOT operate the machine with any of the covers removed. 5. DO NOT try to repair this machine. Always refer to your CLARKE service department for all repairs. -
Page 4: Safety Symbols
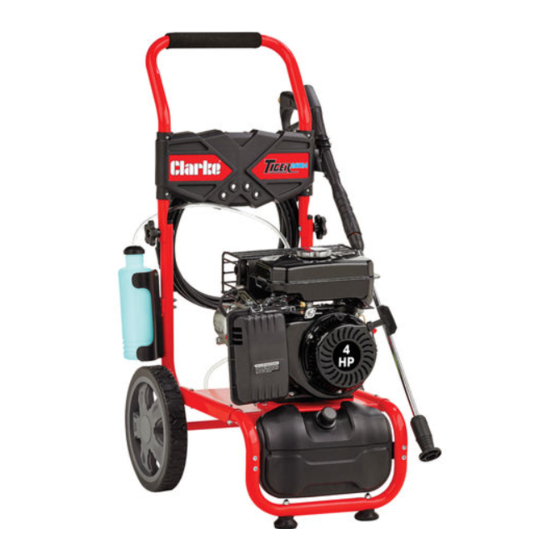
SAFETY SYMBOLS WARNING: Risk of injection or severe injury. Do not direct discharge stream at persons or animals. Keep clear of nozzle. This machine is to be used only by qualified operators. WARNING: Risk of spray injury. Spray can propel objects. - Page 5 OVERVIEW DESCRIPTION NO DESCRIPTION Fuel Tank Cap Engine On/Off Switch Fuel Tank Oil Filler Cap Spark Plug Water Outlet Choke Detergent Tank Gun Assembly Water Inlet Lance Bypass Drain Hose Air Filter Cover Hose Holder Recoil Pull Start Lance Holder Fuel Valve Priming Bottle Throttle...
-
Page 6: Connecting The Wheels
ASSEMBLY Unpack your pressure washer and check to ensure the following items are present. Contact your CLARKE dealer immediately if any parts are missing or damaged. •1 x Petrol Power Washer •1 x Gun Assembly •2 x Wheel c/w Axle •1 x Lance / Nozzle Assembly... -
Page 7: Connecting The Handle
FITTING THE RUBBER FEET 1. Fit the rubber feet to the legs as shown. CONNECTING THE HANDLE 1. Slide the upper handle into position as shown. 2. Secure using a bolt and handwheel. • The handwheel should be on the outside. FITTING THE WATER BOTTLE NOTE: The water bottle is only used when using the drawing water from an unpresurrised source such as a water butt. -
Page 8: Connecting The High Pressure Hose
FITTING THE LANCE/HOSE HOLDER Fit the holders into the positions shown and secure using the washers and nuts provided. CONNECTING THE HIGH PRESSURE HOSE CONNECT THE HOSE TO THE GUN 1. Screw the high pressure hose onto the gun assembly. •... -
Page 9: Connecting The Water Supply
CONNECTING THE WATER SUPPLY Always follow the regulations of your local water supplier. The pressure washer must never be connected to the drinking water supply without using a system separator (also known as a backflow preventer) available from most hardware stores. NOTE: Water that has flowed through a system separator is considered non- drinkable. - Page 10 2. Insert the oil filler cap back into place and then remove it again. 3. If the oil reads low on the dipstick, add oil to the oil reservoir (Max 0.6L). • We recommend the use of SAE10W-30 oil. • Do not overfill the oil reservoir.
-
Page 11: Starting Your Pressure Washer
STARTING YOUR PRESSURE WASHER 1. Turn the water supply on, making sure that the tap is fully open. WARNING: FAILURE TO TURN ON THE WATER COULD CAUSE DAMAGE TO THE PRESSURE WASHER. 2. Set the choke lever to the CLOSE position. - Page 12 5. Set the engine switch to the on (I) position. 6. Pull the recoil starting handle lightly until you start to feel resistance and then pull up sharply to start the engine. • You may have to do this more than once.
-
Page 13: Interrupting Operation
INTERRUPTING OPERATION 1. Release the trigger. NOTE: The pressure washer will automatically go into bypass mode. WARNING: DO NOT ALLOW THE UNIT TO OPERATE IN BYPASS MODE FOR MORE THEN TWO MINUTES AT ANY TIME. TURN THE UNIT OFF IF IT IS NOT GOING TO BE USED FOR LONGER THAN THIS. -
Page 14: Applying Detergents And Cleaning Agents
CLARKE Wash & Wax, both available from your CLARKE dealer. 3. Hold the rear of the nozzle on the high pressure lance and slide the front of the nozzle forwards to low pressure. - Page 15 3. Turn off the engine switch, to the off (0) position. 4. Turn water supply off at the tap. • NEVER turn the water off with the engine running. 5. Release the pressure in the pump and hose by squeezing the trigger for a few seconds until no more water comes out of the nozzle.
-
Page 16: Water Butt Connection
WATER BUTT CONNECTION This machine has the ability to draw its own water, meaning you can use water not under pressure such as rainwater collected in a water butt. To do this you must carry out the following procedure. 1. Remove the quick connector from the water inlet. -
Page 17: Before Storing The Pressure Washer
7. Release the exhaust valve. 8. Turn the self-suction valve to the on position. 9. Release the trigger lock and pull the trigger. 10. When the water spray is at high pressure, close the exhaust valve and set the suction valve to the OFF position. -
Page 18: Maintenance
MAINTENANCE CLEANING THE NOZZLE 1. Shut off the pressure washer and turn off the water supply. 2. Pull the trigger on the gun to release any water pressure. 3. Disconnect the lance from the gun assembly. 4. Remove any obstructions with the nozzle cleaning tool provided and back flush with clean water. -
Page 19: Cleaning The Fuel Strainer
• If the air filter is damaged contact CLARKE spare parts department for a replacement. 6. Replace the filter into its original position and refit the air filter cover. -
Page 20: Changing The Spark Plugs
CHANGING THE SPARK PLUGS CAUTION: ALLOW THE ENGINE TO COOL BEFORE REMOVING THE SPARK PLUG. 1. Remove the spark plug cap from the spark plug. 2. Use the spark plug spanner supplied to remove the spark plug. 3. Remove any carbon that has accumulated around the sparkplug. -
Page 21: Troubleshooting
TROUBLESHOOTING If the following does not solve your problem, please contact the CLARKE service department. PROBLEM CAUSE SOLUTION Engine will not No fuel. Add fuel. start (see engine Low oil. Add oil. manual for further engine Pressure builds up after... - Page 22 PROBLEM CAUSE SOLUTION Lack of pressure Choke lever is in the Set the choke lever to the OFF (right) (initial use) OPEN position. position. (continued) Throttle control lever is Move the throttle control lever to left. not set high enough. High pressure hose is too Make sure the high pressure hose is under long.
-
Page 23: Specifications
SPECIFICATIONS MODEL NO TIGER 2600A ENGINE Engine type Petrol (unleaded) Capacity/displacement: 127 cc Oil Capacity 0.6 L Lubrication Grade SAE10W-30 Fuel Tank Capacity:(Litres) 2.1 Litres WATER CONNECTION Maximum Inlet Temperature 60 °C Maximum Inlet Pressure 3-6 Bar PERFORMANCE DATA Maximum Pump Pressure... -
Page 24: Exploded Diagram + Parts List
EXPLODED DIAGRAM + PARTS LIST WARNING: TO ENSURE MACHINE SAFETY, USE ONLY ORIGINAL SPARE PARTS FROM CLARKE INTERNATIONAL. Parts & Service: 020 8988 7400 / E-mail: Parts@clarkeinternational.com or Service@clarkeinternational.com... - Page 25 Cross Pan Head RKTIG2600A01 RKTIG2600A32 Screw M6x40 Detergent Tank RKTIG2600A02 Overflow Valve Cover RKTIG2600A33 Inner Hexagon Bolt RKTIG2600A03 Panel RKTIG2600A34 M8x42 Rubber Foot Washer RKTIG2600A04 Locknut M8 RKTIG2600A35 Rubber Foot RKTIG2600A05 Flat Washer Ø5 RKTIG2600A36 Frame RKTIG2600A06 Gun Holder RKTIG2600A37 Locknut M8 RKTIG2600A07 Flat Washer Ø5...
-
Page 26: Declaration Of Conformity
DECLARATION OF CONFORMITY Parts & Service: 020 8988 7400 / E-mail: Parts@clarkeinternational.com or Service@clarkeinternational.com... - Page 27 DECLARATION OF CONFORMITY Parts & Service: 020 8988 7400 / E-mail: Parts@clarkeinternational.com or Service@clarkeinternational.com...
Need help?
Do you have a question about the TIGER 2600A and is the answer not in the manual?
Questions and answers
Do you sell fuel tanks for tiger 2600a
Yes, the parts list includes a "Detergent Tank" (RKTIG2600A02), but it does not specifically mention a fuel tank for sale.
This answer is automatically generated
Do you sell fuel tanks for the tiger 2600 a