
Related Manuals for Clarke PLS190N


Summary of Contents for Clarke PLS190N
- Page 1 PETROL POWER WASHER MODEL NO: PLS190N, PLS260N PART NO: 7330345, 7330355 OPERATION & MAINTENANCE INSTRUCTIONS LS0413...
-
Page 2: Introduction
This guarantee does not effect your statutory rights. UNPACKING Unpack your power washer and check to ensure the following items are present. Contact your Clarke dealer immediately if any parts are missing or damaged. Power Washer Delivery Hose... -
Page 3: Table Of Contents
EXPLODED DIAGRAM ......22 PARTS LIST PLS190N ......23 PARTS LIST PLS260N . -
Page 4: General Safety Rules
15. When using the chemical injection facility, use only the chemical cleaning agents (detergents), that are approved for power washers. CLARKE Traffic Film Remover or CLARKE Wash and WAX (available from your dealer), is recommended. 16. Refuel in a well ventilated area with the engine switched off. -
Page 5: Safety Symbols
SAFETY SYMBOLS ALWAYS: Read this manual. Understand all warnings and instructions before operating this equipment. DANGER: Risk of fire or explosion. Shut off engine before adding fuel. Keep work area free of combustible materials. Do not spray flammable liquids. DANGER: Risk to breathing. Engine exhaust fumes can kill. For outdoor use only. -
Page 6: Overview
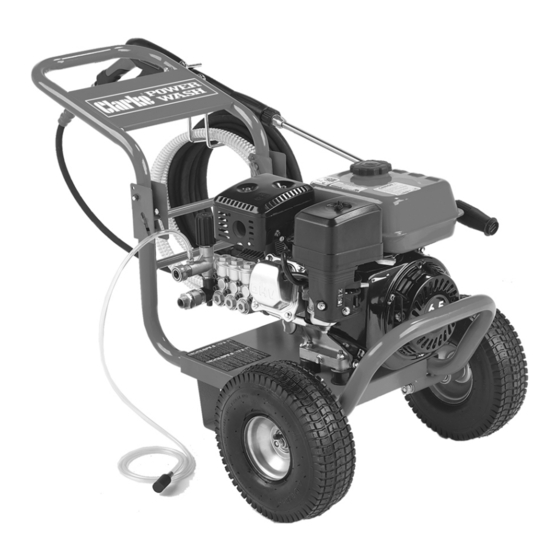
OVERVIEW DESCRIPTION NO DESCRIPTION Gun/lance High pressure hose Spray wand Foldable handle Engine Pressure regulator Adjustable nozzle Engine starter Wheels Throttle Chemical detergent hose Parts & Service: 020 8988 7400 / E-mail: Parts@clarkeinternational.com or Service@clarkeinternational.com... -
Page 7: Assembly
ASSEMBLY CONNECTING THE WHEELS 1. Remove the nut, spring washer and washer from the axle. 2. Fit the axles into the axle ports as shown, secure with the nut, spring washer and flat washer. 3. Fit the wheels to the axles and secure with the nut and washer. - Page 8 THE HIGH PRESSURE HOSE CONNECT THE HOSE TO THE GUN 1. Slide the connector on the hose backwards. 2. Push the gun into the connector. 3. Release the connector. NOTE: Make sure the connection is secure. CONNECT THE HOSE TO THE POWER WASHER 1.
-
Page 9: Before Use
REMOVE THE TRAVEL PLUG BEFORE USE. 1. Remove the red travel plug. 2. Inside the small bag attached is an oil filler cap which needs to be fitted in its place. BEFORE USE WARNING: TO CARRY OUT THIS CHECK, PLACE THE POWER WASHER ON LEVEL GROUND WITH THE ENGINE SWITCHED OFF. - Page 10 3. If the oil is low, fill the oil reservoir to the edge of the oil filler hole. • We recommend the use of SAE30 oil in the engine. 4. Replace the oil filler cap. CAUTION: RUNNING THE ENGINE WITH INSUFFICIENT OIL CAN CAUSE ENGINE DAMAGE.
- Page 11 PRESSURE REGULATOR When supplied, the pressure regulator may be set to minimum. Turn the pressure regulator on the pump fully clockwise to allow water pressure to build up when the pressure washer is running. If you find the pressure is too high, you can adjust this later.
-
Page 12: Using Your Power Washer
USING YOUR POWER WASHER POWER WASHER TERMINOLOGY PSI: Pounds per square inch, the unit of measurement for water pressure. GPM: Gallons per minute. CU: Cleaning units, GPM x PSI. Bypass mode: In bypass mode, the pump recirculates the water because the trigger of the spray gun is not being pulled. - Page 13 STARTING THE POWER WASHER Prior to starting, refer to your engine manual for proper starting procedures for your engine type. 1. Make sure the engine has sufficient fuel. See page 10. 2. Check engine oil level. See page 9. 3. Turn water supply on. WARNING: FAILURE TO TURN ON THE WATER COULD CAUSE DAMAGE TO THE PUMP.
- Page 14 ADJUSTING THE SPRAY The nozzle is adjustable to allow you to change the spray from a narrow jet of water to a wide spray. To adjust the nozzle, proceed as follows. 1. Hold the shaft of the lance in one hand. 2.
- Page 15 APPLYING CHEMICALS AND CLEANING SOLVENTS 1. Push the chemical hose onto the ridged fitting as shown. 2. Place the other end of the chemical hose with the filter on it, into a container holding the chemical/cleaning solution. 3. Slide the nozzle forward for low pressure operation.
-
Page 16: Maintenance
MAINTENANCE CHANGING THE PUMP OIL CAUTION: PROLONGED EXPOSURE TO USED OIL IS DANGEROUS, ALWAYS WASH YOUR HANDS THOROUGHLY AFTER HANDLING USED OIL. Unscrew and remove the oil filler cap. OIL FILLER CAP 2. Place an oil collection tray (not supplied) under the drain plug. CRANKCASE 3. - Page 17 CLEANING THE NOZZLE if the nozzle becomes partially clogged or restricted by dirt or other foreign material, excess pump pressure may develop. Clean the nozzle immediately by following the instructions below. 1. Shut off the power washer and turn off the water supply. 2.
-
Page 18: Storage
STORAGE ENGINE See the separate engine manual supplied for information regarding the storage procedure. PUMP 1. Drain all water from the high pressure hose, coil it and store it on the gun/ hose holder located on the side of the power washer handle. 2. -
Page 19: Troubleshooting
TROUBLESHOOTING If the following does not solve your problem, please contact the CLARKE service department. PROBLEM CAUSE SOLUTION Engine will not No fuel Add fuel start (see engine Low oil Add oil manual for further engine Pressure builds up after... - Page 20 PROBLEM CAUSE SOLUTION No or low Choke lever is in the Move the choke lever to the NO CHOKE pressure (initial CHOKE position position use) continued Throttle control lever is Move the throttle control lever to the fast not in the fast position position High pressure hose is too Make sure the high pressure hose is under...
-
Page 21: Specifications
SPECIFICATIONS Model PLS190N PLS260N Engine Engine Model 200F(D) 390F(D) Power (HP) Engine type Petrol (unleaded) Starting system Recoil Recoil Fuel Capacity (L) Water supply Max. feed temperature Min. feed volume 5 gallons per minute at 20 PSI Performance Data Working pressure... -
Page 22: Exploded Diagram
EXPLODED DIAGRAM Parts & Service: 020 8988 7400 / E-mail: Parts@clarkeinternational.com or Service@clarkeinternational.com... -
Page 23: Parts List Pls190N
PARTS LIST PLS190N 43 Valve Housing RKPLS190N43 Drain Plug RKPLS190N01 44 Soap Suction Nozzle RKPLS190N44 Gasket RKPLS190N02 45 O-Ring RKPLS190N45 Screw RKPLS190N03 46 Steel Ball RKPLS190N46 Crankcase Cover RKPLS190N04 47 Spring RKPLS190N47 O-ring RKPLS190N05 48 Valve Plug RKPLS190N48 Side Glass... -
Page 24: Parts List Pls260N
PARTS LIST PLS260N 43 Valve Housing RKPLS260N43 Drain Plug RKPLS260N01 44 Soap Suction Nozzle RKPLS260N44 Gasket RKPLS260N02 45 O-Ring RKPLS260N45 Screw RKPLS260N03 46 Steel Ball RKPLS260N46 Crankcase Cover RKPLS260N04 47 Spring RKPLS260N47 O-ring RKPLS260N05 48 Valve Plug RKPLS260N48 Side Glass RKPLS260N06 49 Spring RKPLS260N49... -
Page 25: Pls190N Declaration Of Conformity
PLS190N DECLARATION OF CONFORMITY PAGE 1 Parts & Service: 020 8988 7400 / E-mail: Parts@clarkeinternational.com or Service@clarkeinternational.com... -
Page 26: Pls260N Declaration Of Conformity
PLS260N DECLARATION OF CONFORMITY PAGE 1 Parts & Service: 020 8988 7400 / E-mail: Parts@clarkeinternational.com or Service@clarkeinternational.com... -
Page 27: Declaration Of Conformity
DECLARATION OF CONFORMITY PAGE 2 Parts & Service: 020 8988 7400 / E-mail: Parts@clarkeinternational.com or Service@clarkeinternational.com...
Need help?
Do you have a question about the PLS190N and is the answer not in the manual?
Questions and answers