Advertisement
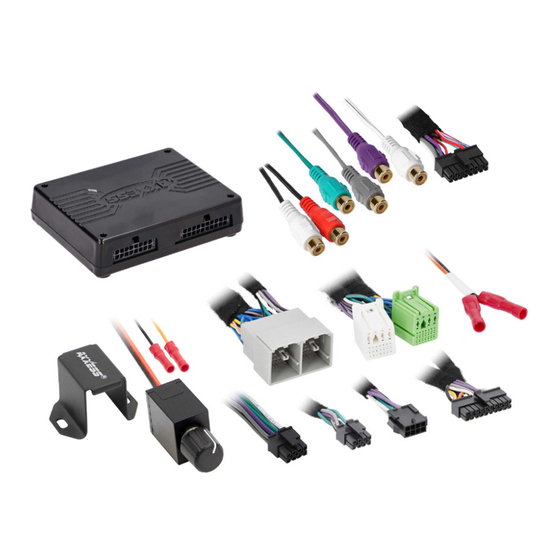
INTERFACE COMPONENTS
• AXDSPL-GM33 interface
• AXDSPL-GM33 output harness (LD-AX-DSP-OUT2)
• AXDSPL-GM33 vehicle T-harness (LD-DSP-GM33)
• Resistor Pad (LD-DSP-RPAD2)
• Bass knob (LD-BASSKNOB)
APPLICATIONS
Visit
Axxessinterfaces.com
for current application list
AxxessInterfaces.com
GM DSP Interface With Pre-Wired Harness
2021-Up
INTERFACE FEATURES
• Includes a DSP (Digital Signal Processor)
• 15 Band graphic EQ
• 4 inputs and 6 individually assignable outputs
• Independent equalization for front, rear, and sub
• Selectable low pass, band pass, and high pass filters
• Selectable crossover slopes; 12db, 24db, 36db, 48db
• Each channel can be delayed independently up to 10ms
• Clipping detection and limiting circuits
• Retains factory parking sensor chimes
• Retains OnStar® voice prompts
• Adjustable chime level
• Designed for non-amplified models
• Easy behind the radio installation with pre-wired harness
• Internal header port for adding interface modules
• Bass knob included for level control of subwoofer amp
• Settings adjusted via Bluetooth
®
in a smart device application (tablet
or mobile phone), compatible with both Android and Apple devices
• Read, write, and store configurations for future recall
• Password protect feature available in the mobile app
• Micro-B USB updatable
© COPYRIGHT 2024 METRA ELECTRONICS CORPORATION
AXDSPL-GM33
I N S T A L L A T I O N I N S T R U C T I O N S
TABLE OF CONTENTS
Installation Options ...............................................2
Installation .............................................................2
Connections ........................................................ 3-4
AXDSPL-BT Installation...........................................5
AXDSPL-SP Installation...........................................6
Mobile App ......................................................... 7-8
Specifications .........................................................9
TOOLS & INSTALLATION ACCESSORIES REQUIRED
• Crimping tool and connectors, or solder gun,
solder, and heat shrink • Tape • Wire cutter
• Zip ties • Multimeter
MetraOnline.com
may be used to assist with dash
assembly instructions. Simply enter your Year,
Make, Model vehicle into the vehicle fit guide and
look for the Dash Kit Installation Instructions.
www.MetraOnline.com
REV. 1/31/24 INSTAXDSPL-GM33
Advertisement
Table of Contents

Related Manuals for Axxess AXDSPL-GM33


Summary of Contents for Axxess AXDSPL-GM33
-
Page 1: Table Of Contents
• Designed for non-amplified models look for the Dash Kit Installation Instructions. • AXDSPL-GM33 interface • Easy behind the radio installation with pre-wired harness • AXDSPL-GM33 output harness (LD-AX-DSP-OUT2) www.MetraOnline.com • Internal header port for adding interface modules • AXDSPL-GM33 vehicle T-harness (LD-DSP-GM33) •... -
Page 2: Installation Options
1. Remove the factory radio †, then unplug all connectors. This feature offers the ability to add a subwoofer to a factory system. (refer to page 3) 2. Install the AXDSPL-GM33 vehicle T-harness to the vehicle and make all necessary connections, but leave the amp turn-on wire disconnected. -
Page 3: Connections
ADDING A SUB TO A FACTORY SYSTEM Factory Radio Bass Knob Black - Ground Orange - Control Any remaining wires tape off and disregard Factory Radio Harness These outputs can be used for additional sub amps, or for adding onto the system at a later date Vehicle T-Harness Interface RCA Jacks... - Page 4 ADDING A FULL-RANGE AMP & SUB TO A FACTORY SYSTEM Factory Radio Bass Knob An SPDT relay, Metra part number Black - Ground Any remaining wires E-123, is required if the amp turn-on Orange - Control tape off and disregard current of all amps exceeds 1-amp.
-
Page 5: Axdspl-Bt Installation
16-pin Header option, the AXBK-1 (sold separately) can be used to control the volume. AX-DSPL-BT Note: The bass knob included with the AXDSPL-GM33 can be used if it will not be used to control a subwoofer. Important! Unplug the interface from the vehicle. -
Page 6: Axdspl-Sp Installation
TOSLINK DIGITAL OUTPUT • The AXDSPL-SP Toslink digital output can be used for adding a digital output to the interface. AX-DSPL-SP 16-pin Header 16-pin Header Important! Unplug the interface from the vehicle. AX-DSPL-BT 2. Remove (4) Phillips screws securing the interface, then remove the top cover, exposing the circuit board within. -
Page 7: Mobile App
Select the Vehicle’s model: ____ (Example: Sierra 1500) • Select With OE Amp • Hit Apply (Figure B) 5. Make sure radio volume is all the way down. 6. Connect the amp turn-on wire from the AXDSPL-GM33 harness to the aftermarket amplifiers. (Figure B) REV. 1/31/24 INSTAXDSPL-GM33... - Page 8 Locking Down Data 7. From the Configuration page click the Identify button to confirm that the AXDSPL-GM33 is connected properly. If so, a chime will be heard from the front left speaker. 8. Press the Lock Down button to save the configuration. (Do not turn ignition off until this process is completed) (Figure C) 9.
-
Page 9: Specifications
SPECIFICATIONS Input Impedance 1M Ohm Crossover Filter Low pass, band pass, high pass Input Channels Crossover Frequency Selectable 20hz to 20khz Input Options High Level or Low Level Crossover Slope 12db/24db/36db/48db Input Type Differential balanced Crossover Type Linkwitz-Riley Input Voltage 0 - 28-volts (peak-to-peak) Sampling 48kHz... - Page 10 AXDSPL-GM33 I N S T A L L A T I O N I N S T R U C T I O N S Having difficulties? We’re here to help. Contact our Tech Support line at: 386-257-1187 Or via email at: techsupport@metra-autosound.com...
Need help?
Do you have a question about the AXDSPL-GM33 and is the answer not in the manual?
Questions and answers