Table of Contents
Advertisement
Advertisement
Table of Contents

Related Manuals for Barco Balder Series


Summary of Contents for Barco Balder Series
- Page 1 Balder User Manual ENABLING BRIGHT OUTCOMES...
- Page 2 Barco Fredrikstad AS Habornveien 53, N-1630 Gamle Fredrikstad, Norway Support.fre@barco.com www.barco.com...
- Page 3 Changes Barco provides this manual 'as is' without warranty of any kind, either expressed or implied, including but not limited to the implied warranties or merchantability and fitness for a particular purpose. Barco may make improvements and/or changes to the product(s) and/or the program(s) described in this publication at any time without notice.
- Page 4 Barco. If the purchaser or a third party carries out modifications or repairs on goods delivered by Barco, or if the goods are handled incorrectly, in particular if the systems are operated incorrectly or if, after the transfer of risks, the goods are subject to influences not agreed upon in the contract, all guarantee claims of the purchaser will be rendered invalid.
-
Page 5: Table Of Contents
Table of contents 1 Safety............................................7 General considerations ..................................8 Important safety instructions .................................9 Projector Hazard Distances ................................12 Safety symbols....................................12 Disposal Information ..................................13 Turkey RoHS compliance ................................14 China RoHS compliance................................14 Taiwan RoHS compliance................................15 Contact information ..................................16 1.10 Product Info......................................17 1.11 Statement......................................17 2 Getting to know the projector................................19 Main Components ....................................20 Service and Maintenance................................21 LED Status Light ....................................21... - Page 6 3.1.2.2 Display Port 1.2 ............................35 3.1.2.3 HDMI 2.0 ..............................35 3.1.2.4 SDI ................................35 3.1.2.5 HDBase T..............................36 3.1.3 Control interfaces................................36 3.1.3.1 RS-232...............................37 3.1.3.2 LAN/Ethernet ............................37 3.1.3.3 USB-A port ..............................37 Power up the projector...................................37 Power down the projector ................................38 Power mode transitions.................................38 3.4.1 General....................................38 3.4.2 Power on projector ................................38...
-
Page 7: Safety
When referring in this manual to the term, 'Balder', means that the content is applicable for the following products: • Balder Model certification name The Balder products in general, are all products within the Barco GP7 Platform 601–0443 /03 Balder... -
Page 8: General Considerations
Safety 1.1 General considerations WARNING: Be aware of suspended Loads. WARNING: Wear a hard hat to reduce the risk of personal injury. WARNING: Be careful while working with heavy loads WARNING: Mind your fingers while working with heavy loads. Notice on optical radiation from Balder Projector When installing an interchangeable lens with a throw ratio that make the projector become an RG3 unit, (See the chapter “Approved Lenses”... -
Page 9: Important Safety Instructions
HIGH BRIGHTNESS PROJECTORS) in performing a task, and of measures to minimize the potential risk to themselves or other persons. Only Barco authorized SERVICE PERSONNEL, knowledgeable of such risks, are allowed to perform service functions inside the product enclosure. The term USER and OPERATOR refers to any person other than SERVICE PERSONNEL. - Page 10 To prevent fire hazard • Barco projection products are designed and manufactured to meet the most stringent safety regulations. This projector radiates heat on its external surfaces and from ventilation ducts during normal operation, which is both normal and safe. Exposing flammable or combustible materials into close proximity of this projector could result in the spontaneous ignition of that material, resulting in a fire.
- Page 11 • Unplug this product from the wall outlet and refer servicing to Barco authorized service personnel or technicians under the following conditions: If liquid has been spilled into the equipment.
-
Page 12: Projector Hazard Distances
• Replacement parts: When replacement parts are required, be sure the service technician has used original Barco replacement parts. Unauthorized substitutions may result in degraded performance and reliability, fire, electric shock or other hazards. Unauthorized substitutions may void warranty. •... -
Page 13: Disposal Information
Safety Image Description “Risk Group 3 Safety”, page 47 , and chapter “Lenses” in user manual This projector may become RG3 when an interchangeable lens with throw ratio greater than 4.7 is For North America, this projector may become RG3 when an interchangeable lens with throw ratio installed. -
Page 14: Turkey Rohs Compliance
Electronic Products” (Also called RoHS of Chinese Mainland), the table below lists the names and contents of toxic and/or hazardous substances that Barco’s product may contain. The RoHS of Chinese Mainland is included in the MCV standard of the Ministry of Information Industry of China, in the section “Limit Requirements of toxic substances in Electronic Information Products”. -
Page 15: Taiwan Rohs Compliance
Chinese Mainland, marked with the Environmental Friendly Use Period (EFUP) logo. The number inside the EFUP logo that Barco uses (please refer to the photo) is based on the “General guidelines of environment-friendly use period of electronic information products”... -
Page 16: Contact Information
備註: 此RoHS表格適用於以下產品型號: GP6,GP7,GP8,GPC Hint: This RoHS table is suitable for following models: GP6,GP7,GP8,GPC 1.9 Contact information Barco contact information Registered office address: President Kennedypark 35, 8500 Kortrijk, Belgium Contact address: Beneluxpark 21, 8500 Kortrijk, Belgium Contact address (for Taiwan) : 公司名稱... -
Page 17: Product Info
Safety Importers contact information To find your local importer, contact Barco directly or one of Barco's regional offices via the contact information given on Barco's web site, www.barco.com. Contact information Norway factory Barco Fredrikstad as Habornveien 53, N1630 Gamle Fredrikstad, Norway Phone: +476930 4550 Support:Support.fre@barco.com... - Page 18 Safety 601–0443 /03 Balder...
-
Page 19: Getting To Know The Projector
Getting to know the projector. Overview • Main Components • Service and Maintenance • LED Status Light • Power on / Standby button backlight indications • LCD panel • LCD functionality in Ready Mode • Local keypad • Remote Control •... -
Page 20: Main Components
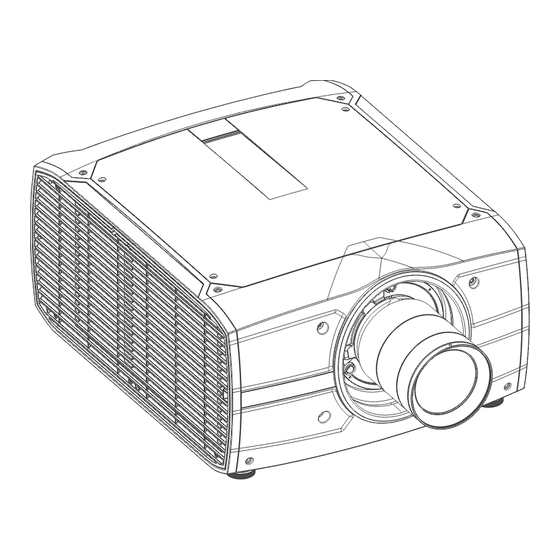
Getting to know the projector. 2.1 Main Components Naming Conventions Back Left Right Front Image 2-1 Projector Items Overview Image 2-2 Item Description Item No. LED Warning Indicator Adjustable Feet Lens Lens Holder IR Receiver. For receiving remote control signals LCD Display Keypad Panel. -
Page 21: Service And Maintenance
2.2 Service and Maintenance General The Balder Projector does not have any user serviceable parts. All service tasks must only be carried out by the manufacturer, or a Barco authorized service personnel or Barco technicians. 2.3 LED Status Light About The Balder Status Led is located on the rear top of the Projector During normal operation, the LED is not illuminated. -
Page 22: Lcd Functionality In Ready Mode
Getting to know the projector. Toggle between the two indications by using the Menu button on the keypad, or on the remote control When mirroring the OSD, the LCD showing the menus and adjustment information. When in information mode, showing this Information regarding the status of the projector: •... -
Page 23: Remote Control
Getting to know the projector. Image 2-3 Item Description Name LCD Display Shows Projector status and navigation menu. Navigation keys Navigation arrows (up, down, left, right), confirm selection (✓) Menu button Toggle between OSD / Information menu. Standby Power on / standby Back Undo action / back to previous screen. - Page 24 Getting to know the projector. Image 2-4 Insert the two AA size batteries, making sure the polarities match the + and - marks inside the battery compartment. Tip: Use alkaline batteries for optimum range and life time. Image 2-5 Insert (1) both lower tabs of the battery cover in the gaps at the bottom of the remote control, and press (2) the cover until it clicks in place.
-
Page 25: Remote Control, Protocol Setup
Depending on the projector to control the remote control can be switched between these protocols. Which protocol to use • The NEC protocol have to be used for Barco projectors based on the Pulse platform: Loki, Balder, F70, F80, F90, HDX 4K, UDX, ... •... -
Page 26: Functionality Overview
Getting to know the projector. 2.8.3 Functionality overview Remote Control Unit buttons Backspace (while Button pressed indicator. entering values) XLR connector. Shutter Open. Decimal mark (while Shutter Close. entering values) Touch Panel On/Off. Macro button. (Not in (Not in use). use) Menu Back. -
Page 27: Function Of The Rgb Filter Button
Getting to know the projector. Image 2-8 2.8.5 Function of the RGB filter button Filtering the color of the projected image By pressing the RGB filter button on the RCU you can place a color filter on the output of the projector. This feature can be useful during the installation and configuration of a multi-projector or multi-channel setup. -
Page 28: Wired Rc Connection
Getting to know the projector. When all sensors are turned off, the projector will not receive any signals from the remote control. To enable the sensors again, use the keypad on the projector. 2.8.7 Wired RC connection About The remote control can also be directly wired to the projector from the stereo jack connector on the remote, (See “Functionality overview”, page 26 ), to the RC connector on the back panel of the projector.(See section “Connector Panel”) In this mode, the projector will not be affected by signals from other non-wired remote controls. -
Page 29: Color Wheels
The Balder Projector is delivered with a standard Color wheel, that is suitable for most applications. Other colorwheels are available upon request. Consult Barco sales office or a service partner in order to find the most suitable colorwheel for the specific application. -
Page 30: Optional Accessories
Getting to know the projector. Image 2-11 2.13 Optional Accessories Rigging Frame Item Description Item Number R9802224 F70/F90 Multifunctional Frame. The F70 Rigging frame is a rugged, easy to install frame, designed to streamline the process of installing one or more projectors. When installed i the frame, the projector: •... - Page 31 Getting to know the projector. Image 2-12 The F70 Flight Case is a custom designed container, that is suitable for shipping the projector, including flight frame, signal and power cords and up to two lenses. The case is fully-lined to protect the projector and lenses during transit and storage. 601–0443 /03 Balder...
- Page 32 Getting to know the projector. 601–0443 /03 Balder...
-
Page 33: Getting Started
Getting started About this chapter This chapter describes how to set up and optimize your projector setup when the physical installation process is complete. Overview • Projector source and control connections • Power up the projector • Power down the projector •... -
Page 34: Projector Source And Control Connections
Getting started 3.1 Projector source and control connections Overview • Making connections • Connector specifications • Control interfaces 3.1.1 Making connections The source switching time is variable and could take few seconds.. Source signal connectivity The connector panel at the back of the projector is used for all source connections. Source signal connectivity on the projector is: •... -
Page 35: Display Port 1.2
Getting started 3.1.2.2 Display Port 1.2 Specifications Parameter Value Connector Standard Display port Signal characteristics DP 1.2 Functionality Mandatory Max. cable length 2 m (24 AWG) - RBR; 2 m (24 AWG) – HBR1, HBR2 Supported Link Rate RBR, HBR1, HBR2 Scan format Progressive Max. -
Page 36: Hdbase T
Getting started Parameter 12G-SDI 3G-SDI Return loss -6dB @ 12GHz >10dB at 3GHz Impedance 75 ohm resistive 75 ohm resistive 3.1.2.5 HDBase T Specifications Parameter Value Reference specification HDBaseT 1.0 Specification, June 2010 Connector Standard RJ-45, 8P8C Signal characteristics HDBaseT Max. -
Page 37: Lan/Ethernet
Getting started 3.1.3.1 RS-232 Specifications Parameter Value RS-232 connector 1 female DB9 connector (RS232-in) for projector control and debug 3.1.3.2 LAN/Ethernet Specifications Parameter Value Ethernet connector 1 RJ45 Connector for projector control (not content) Protocols DHCP, TCP/IP, UDP/P Speed 10/100 Mbit/1000Mbit 3.1.3.3 USB-A port Specifications Parameter... -
Page 38: Power Down The Projector
Getting started 3.3 Power down the projector Power down using the keypad or remote Depress and hold the power button on the keypad or remote for four (4) seconds. The Projector is now in cooling down phase. Wait 2 minutes before disconnecting the power cord. (If disconnecting is required). WARNING: There is a risk of reducing the expected lifetime of the projectors DMD device if the power cord is removed too early, due to the device’s shutdown sequence. -
Page 39: Going From Ready To On
Getting started Description Plug the 3-prong plug of power cord into a grounded AC outlet. The projector will go to READY mode. During this stage the system boots and performs the internal check of the boards. The Power On/Off button will BLINKING WHITE until READY mode is achieved. -
Page 40: Customize Projector Settings
Getting started Description Mode Normal Projector is booted up and the light source is on Ready Projector is booted up but the light source is off ECO Standby Light source is switched off and projector electronics are powered down 3.6 Customize projector settings About The projector display, behavior and user interface can be adjusted to meet individual requirements. - Page 41 Getting started Press the OSD button to deactivate the OSD on the screen. Only critical warnings will be displayed. Some menu options are reserved for Power or Service Users; these will be grayed out and not available for selection when in standard user mode. To access these features, enter your Power or Service Code in the Service Menu or contact your support representative for more information.
- Page 42 Getting started 601–0443 /03 Balder...
-
Page 43: User Maintenance
User Maintenance Overview • Update Projector Firmware 601–0443 /03 Balder... -
Page 44: Update Projector Firmware
The LCD display will show the progression and status of the upgrade during the process. Update • Go to www.barco.com and select your product. All available firmware downloads are filed under the Technical Downloads tab. • Download the firmware. Extract and save the file to a USB stick with FAT file system. Use the eject function on your PC to safely remove the device from the computer. -
Page 45: Cleaning The Projector
Cleaning the projector 601–0443 /03 Balder... -
Page 46: Projector Lenses
Cleaning the projector 5.1 Projector lenses General guidelines for cleaning projector lenses Blow off dust with clean compressed air (or pressurized air cans) . Use lens cleaner and a clean lens cleaning cloth to remove the dust and contamination. Wipe in broad strokes, in one direction only. Warning: Do not wipe back and forwards across the lens surface as this tends to grind dirt into the coating. -
Page 47: Risk Group 3 Safety
Risk Group 3 Safety 601–0443 /03 Balder... -
Page 48: General Considerations
Users definition The Balder projector is intended for persons who have been instructed and trained by Barco authorized personnel to identify energy sources that may cause injury and to take precautions to avoid unintentional contact with or exposure to those energy sources. -
Page 49: High Brightness Precautions
Risk Group 3 Safety 6.3 High Brightness Precautions Restriction Zone (RZ) based on the HD (Hazard Distance). The HD depends on the amount of lumens produced by the projector and the type of lens installed. See next chapter"HD in function of the lens Throw Ratio (TR)", page 8 . To protect untrained end users (as cinema visitors) the installation shall comply with the following installation requirements: Operators shall control access to the beam within the hazard distance or install the product at the height that will prevent spectators’... - Page 50 • This product can only be installed by Barco or sold or leased only to valid laser light show variance holders. In other words our installers are required to have an approved laser light show variance. Such installers may currently hold a valid variance for production of Class IIIb and IV laser light shows and/or for incorporation of the RG3 LIPs into their shows.
-
Page 51: Hazard Distance For Fully Closed Projection System
The installation checklist for laser illuminated RG3 projectors must be fully completed after the installation and sent to pvg@barco.com. This checklist can be downloaded from the Barco website. Only when the installer is a valid laser light show variance holder the checklist should not be sent to Barco. -
Page 52: Hd In Function Of The Lens Throw Ratio (Tr)
Risk Group 3 Safety • HDdiffuse : the relevant distance to be considered while observing the defuse surface of the rear projection screen. As described in "High Brightness precautions: Hazard Distance (HD)", page 6 , it is mandatory to create a restricted zone within the beam areas closer than any NOHD. -
Page 53: Hd In Function Of Lens Throw Ratio (Tr) For Cinemascope Variants
Risk Group 3 Safety 6.6 HD in function of lens Throw Ratio (TR) For Cinemascope variants TR (Throw Ratio) The ratio of the distance to the screen (throw) to the screen width. Hazard Distance Thermal Accidental exposure Trow Ratio Image 6-5: Hazard Distance in meters versus Throw ratio of the lens for the Balder Cinemascpope projector Graphs shows Hazard Distance in meters versus Throw ratio of the lens 601–0443 /03 Balder... - Page 54 601–0443 /03 | 2018-10-17 Barco Fredrikstad AS | Habornveien 53, N-1630 Gamle Fredrikstad, Norway www.barco.com...
Need help?
Do you have a question about the Balder Series and is the answer not in the manual?
Questions and answers