
Related Manuals for Kratki SIMPLE BOX


Summary of Contents for Kratki SIMPLE BOX
- Page 1 SIMPLE BOX Installation and operating instructions The producer: www.kratki.com Kratki.pl Marek Bal ul. W. Gombrowicza 4 26-660 Wsola/Jedlińsk...
- Page 2 www.nierobdymu.com, fb/nierobdymu For the INSTALLER: Leave the manual with the device. CONSUMER: Keep this manual for future reference.
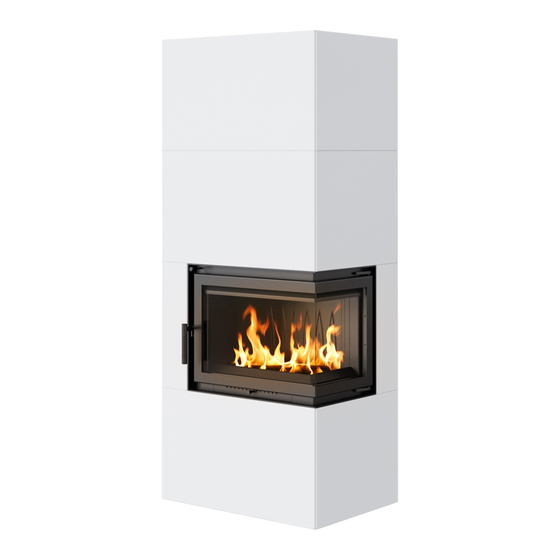
- Page 3 Thank you for trusting us and choosing our SIMPLE BOX. This device was designed with your sa- fety and comfort in mind. We are confident that you will be satisfied with your choice due to the commitment we have put into the design and production of this device.
-
Page 4: Installation Dimensions
INSTALLATION DIMENSIONS Figure 1: A dimensioned installation drawing of the SIMPLE BOX in BSP version SIMPLE/BOX z kominkiem SIMPLE/M/S Figure 2: A dimensioned installation drawing of the SIMPLE BOX in BSL version... -
Page 5: Installation
INSTALLATION NOTE: FAILURE TO FOLLOW THE INSTRUCTIONS IN THIS MANUAL WITH RESPECT TO INSTAL- LATION, OPERATION, OR FAILURE TO FOLLOW THE INSTRUCTIONS FOR PERMITTED PARTS AND ACCESSORIES FOR THIS DEVICE MAY RESULT IN SERIOUS INJURY OR DAMAGE TO PRO- PERTY. EACH BUILT-IN MODEL IS A DEDICATED MODEL, THAT IS TO SAY, IT IS DESIGNED FOR INTU- ITIVE AND QUICK INSTALLATION ONLY OF THE FIREPLACE MODEL THAT IS SOLD WITH THE BUILT-IN MODEL. -
Page 6: Safety Information
NOTE: All surfaces of the device and dedicated installation of the SIMPLE BOX, especially in the version with steel panels, should be treated as working surfaces! This means that during operation... -
Page 7: Installation Introduction
INSTALLATION - INTRODUCTION NOTES ON THE MOVEMENT OF THE DEVICE: This device has been designed for easy installation and assembly with the possibility to place it practically in any place, i.e. anywhere where the chimney can be brought out in accordance with the installation requirements of the fireplace manual and the building law. - Page 8 Step 1: First of all, screw the rear legs of the substructure as shown in the diagram below, turning them into M6 bolts and nuts at the points indicated. Also, screw in the supplied adjustable feet for subsequent levelling of the entire structure. Screw M6x12 Śruba M6x12 Footer...
- Page 9 Step 2: Following the steps of step 1, screw the front legs of the superstructure in accordance with the diagram below.
- Page 10 Step 3: Install the back panel, as shown in the diagram below, using the hooks on the panel and inser- ting it into the notches in the substructure frame.
- Page 11 Step 3.2 (Inlet option) If an air intake is connected, the fireplace must then be placed on a dedicated base, first placing the base as close as possible to where the unit will eventually be placed, leaving at least 0.5 m of free space W przypadko podłączenia dolotu powietrza, on either side of the unit for the free installation of the installation elements.
- Page 12 Step 4: In the next step, install the side panel according to the diagram below, inserting it using the hooks in the notches in the substructure. Use the M5 screws in the diagram below to level the side panels in the first case. The M5 bolt used to fix the hook should only be partially screwed in, leaving room for the hook as shown in the diagram in steps 10 and 11.
- Page 13 Step 5: Then install the opposite side panel, similar to the instructions in Step 4. 1x screw M5x10 - fixing 1x śruba M5x10 the starter - mocowanie zaczepu Step 6 As shown in the diagram below, mount the front-bottom panel by inserting it using the hooks in the notches in the side-bottom panels...
- Page 14 Step 7: If you have not installed the inlet, this means that the unit is not yet installed on the substructu- re, so in the next step place the unit on the substructure as shown in the diagram below.
- Page 15 Step 8: Mount the frame of the upper part of the superstructure as shown in the diagram below. The diagram also shows that the side and front panels should extend 2 mm beyond the flange of the fireplace frame. Screw m5x10 Śruba M5x10...
- Page 16 Step 9: Install the top panel as shown in the diagram below by screwing it to the superstructure. Screw m5x10 Śruba M5x10...
- Page 17 Step 10: Insert the side panel by inserting it into the notches in the substructure, using the hooks that must be fastened after inserting it according to the diagram below. Before installation, screw the hooks as shown in the diagram below and screw the hook screws to the top of the side panel by only partially screwing it in (a few coils of thread) to leave room for the hook of the top panel.
- Page 18 Step 11. Similar to step 10, install the smaller side panel on the opposite side of the superstructure. ZACZEP ZACZEP...
- Page 19 Step 12: Prepare the smaller front panel before installing it on the building structure, as shown in the diagram below. Depending on the BSL or BSP version, screw in the appropriate hangers according to the schemes below. Schraube m4x6 Śruba M4x6 Panel mniejszy z wieszakami w wersji BSL Smaller panel with hangers in BSL design...
- Page 20 Step 13: Install the smaller front panel by sliding it into the notches in the side panel and substructure as shown in the diagram below.
- Page 21 Step 14: Prepare the two double side panels for installation as shown in the diagram below. Both pa- nels will be in mirror image - the number of hooks at the bottom of both panels differs for the BSL and BSP versions of the unit (see drawings below).
- Page 22 Step 15: Install side panels, top panels as shown in the diagram below. 1x Clip 1 x ZACZEP 2x Clip 2 x ZACZEP...
- Page 23 F ( 1 : 3 ) Hang the rear and side screens Zawiesic tylny i boczny ekran in the appropriate cut-outs. w odpowiednich wycięciach.
- Page 24 Widok z założonymi ekranami. View with screens attached Loosen 4 M5 screws Poluzować 4 śruby M5 Slide in the screen and tighten Wsunąć ekray 4 M5 screws i dokręcic 4 śruby M5.
- Page 25 Step 16. Prepare the double front panel, top panel as shown in the diagram below. Screw M5x10 Śruba M5x10 Screw M6x12 Śruba M6x12 M6-Mutter Nakrętka M6...
- Page 26 Step 17: Install the front cover plate as shown in the following figure by inserting it into the recesses in the side panels using the hooks.
- Page 27 Step 18: Install the top frame of the superstructure as shown in the diagram below. Screw the frame to each panel so that the whole structure is adequately stiffened. Śruba M5x10...
- Page 28 Step 19: Install the top cover plate by screwing it to the previously installed frame of the substructure, as shown in the diagram below. Screw M5x10 Śruba M5x10...
- Page 29 Ready to install with the unit...
-
Page 30: Maintenance Warning
The connection of the fireplace to the chimney installation should respect the local construction law and the guidelines contained in the manual of the device itself, for which the SIMPLE BOX is only an accessory. If there are no local guidelines for the installation of the appliance and its chimney installa- tion, follow the instructions for the appliance and its connection included with the purchased fireplace. -
Page 32: Support Services
SELLER Seller’s seal and signature; Name: Address: Tel/fax: Date of sale: INSERT BUYER The fireplace insert should be installed in accordance with Date and legible signature of the Buyer; the rules and regulations valid in the country, the manual provisions by the installer having required qualifications. I hereby declare that having read the operating manual and the guarantee conditions in case of failure to observe the provisions included there the producer bears no liability for... - Page 33 REGISTER OF SMOKE DUCT INSPECTIONS Inspection during the insert installation Date, signature and seal of the chimney sweeper Date, signature and seal of the chimney sweeper Date, signature and seal of the chimney sweeper Date, signature and seal of the chimney sweeper Date, signature and seal of the chimney sweeper Date, signature and seal of the chimney sweeper Date, signature and seal of the chimney sweeper...
- Page 34 Kratki.pl Marek Bal ul. Gombrowicza 4, Wsola, 26-660 Jedlińsk, Poland tel. 00 48 48 389 99 00, 00 48 48 384 44 88, fax 00 48 48 384 44 88 wew. 106 www.kratki.com www.facebook.com/kratkipl www.youtube.com/kratkipl www.instagram.com/kratkipl AP/04/2020...
Need help?
Do you have a question about the SIMPLE BOX and is the answer not in the manual?
Questions and answers