Table of Contents
Advertisement
Quick Links
Advertisement
Table of Contents

Related Manuals for Eastwood 20644


Summary of Contents for Eastwood 20644
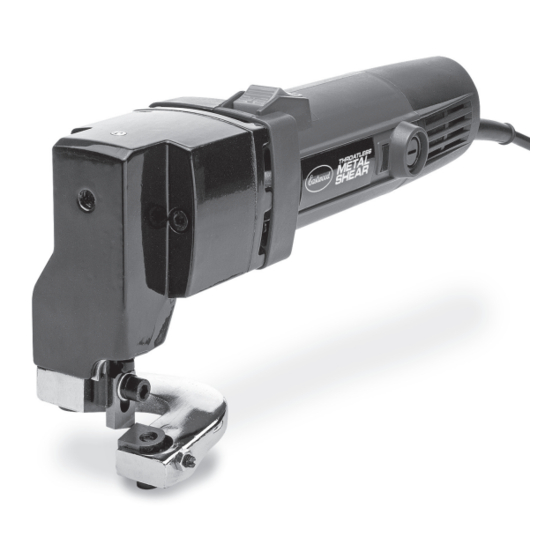
- Page 1 Part #20644 THROATLESS ELECTRIC METAL SHEAR INSTRUCTIONS...
-
Page 2: Specifications
Maximum Material Thickness: 22 ga. Stainless, 18 ga. Mild Steel, 16 ga. Aluminum Strokes per minute: 1800 Minimum Cutting Radius: 1.5” Blade Material: Tungsten Carbide Power Requirements: 120V AC~60Hz, 3.5 amps Motor Construction: Fan cooled, ball bearings, replaceable brushes Eastwood Technical Assistance: 800.544.5118 >> techelp@eastwood.com... -
Page 3: Important Safety Information
Power tools create sparks which may ignite the dust or fumes. c) Keep children and bystanders away while operating a power tool. Distractions can cause you to lose control. To order parts and supplies: 800.345.1178 >> eastwood.com... -
Page 4: Electrical Safety
Loose clothes, jewelry or long hair can be caught in moving parts. g) If devices are provided for the connection of dust extraction and collection facilities, ensure these are connected and properly used. Use of these devices can reduce dust-related hazards. Eastwood Technical Assistance: 800.544.5118 >> techelp@eastwood.com... - Page 5 5) SERVICE a) Have your power tool serviced by a qualified repair person using only identical replacement parts. This will ensure that the safety of the power tool is maintained. To order parts and supplies: 800.345.1178 >> eastwood.com...
-
Page 6: Additional Safety Information
Do not apply excessive force tool while in use. If smaller objects are being cut, be sure they are securely mounted or anchored before beginning. • Keep power cord away from cutting blades and sharp metal edges to prevent damage and possible electric shock. Eastwood Technical Assistance: 800.544.5118 >> techelp@eastwood.com... - Page 7 • To make a curved cut, apply pressure in the direction needed to follow the curve. If the tool begins to bind STOP IMMEDIATELY. Do not force tool. Remove all excess material before attempting to continue the curved cut. To order parts and supplies: 800.345.1178 >> eastwood.com...
- Page 8 (FIG 3). 4. When desired gap is achieved tighten FIG. 3 cap screw and lock nut ensuring the desired blade gap is maintained. Adjustment Lock Nut Screw Cap Screw Eastwood Technical Assistance: 800.544.5118 >> techelp@eastwood.com...
-
Page 9: Blade Replacement
• Apply several drops of light machine oil occasionally to moving contact surfaces. • Add 3-4 drops of light machine oil after each use to the oil port located on the top of the Tool. To order parts and supplies: 800.345.1178 >> eastwood.com... -
Page 10: Troubleshooting
Check power at outlet and ensure that the Tool Will Not Source breaker is not tripped. Start Internal If internal damage exists, have a qualified Damage technician service the tool. Brushes Worn Replace Brushes. Eastwood Technical Assistance: 800.544.5118 >> techelp@eastwood.com... - Page 11 To order parts and supplies: 800.345.1178 >> eastwood.com...
-
Page 12: Additional Items
7pc Hammer and Dolly Set If you have any questions about the use of this product, please contact The Eastwood Technical Assistance Service Department: 800.544.5118 >> email: techelp@eastwood.com PDF version of this manual is available online >> eastwood.com/20644manual The Eastwood Company 263 Shoemaker Road, Pottstown, PA 19464, USA US and Canada: 800.345.1178 Outside US: 610.718.8335...
Need help?
Do you have a question about the 20644 and is the answer not in the manual?
Questions and answers