Advertisement
Advertisement
Table of Contents

Related Manuals for Eastwood B120


Summary of Contents for Eastwood B120
- Page 1 Item #66294 B120 ABRASIVE MEDIA BLAST CABINET ASSEMBLY AND OPERATING INSTRUCTIONS...
-
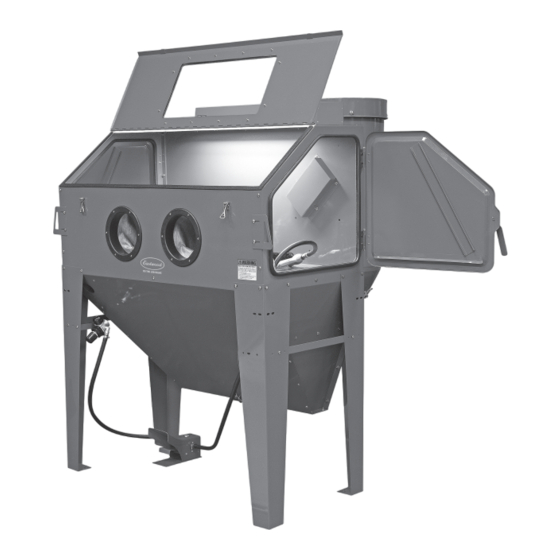
Page 2: Specifications
The EASTWOOD B120 ABRASIVE MEDIA BLAST CABINET is constructed of heavy gauge steel with a quality powder coated finish for maximum durability and trouble-free service. It features a high-intensity LED work lamp for increased visibility and a baffled, flow-through ventilation design with an included integral, high-capacity vacuum unit to maintain excellent visibility when blasting. -
Page 3: Safety Information
FIRE HAZARD! • Some abrasive blast media will spark as it removes material. Never blast items that are flammable or are saturated with highly flammable substances (eg. uncleaned fuel system components). To order parts and supplies: 800.343.9353 >> eastwood.com... -
Page 4: Shock Hazard
HEALTH AND INJURY HAZARDS! • The Eastwood Abrasive Media Blast Cabinet consists of large, heavy metal components which can cause potentially serious personal injury and property damage if allowed to drop. Avoid pinching hands while handling parts and always wear thick, well-fitting work gloves during assembly. - Page 5 Light Fixture Set the Light Fixture aside in a secure location, along with the screws removed, for installation later. • Close and relatch the Front Lid to prevent accidental damage during assembly. To order parts and supplies: 800.343.9353 >> eastwood.com...
- Page 6 • Make sure the Front Lid is closed and latched to prevent accidental damage while lifting. TEAM LIFT REQUIRED! The Eastwood Abrasive Media Blast Cabinet consists of large, heavy metal components which can cause potentially serious personal injury and property damage if allowed to drop. Avoid pinch- ing hands while handling parts and always wear thick, well-fitting work gloves during assembly.
- Page 7 (FIG 8). Protective Film on the INTERIOR side Protective Film on the INTERIOR side Light Fixture screw holes Light Fixture screw holes FIG. 8 FIG. 8 To order parts and supplies: 800.343.9353 >> eastwood.com...
- Page 8 (FIG 12) until the seal is adequate and media will not leak. FIG. 11 FIG. 11 FIG. 12 FIG. 12 Closed Closed Anti-Purge Valve Anti-Purge Valve screw holes screw holes Rotate clockwise to Rotate clockwise to increase tension increase tension Eastwood Technical Assistance: 800.343.9353 >> tech@eastwood.com...
- Page 9 • Connect the Plug on the power supply cord with the female Receptacle on the cord attached to the Light Fixture (FIG 15 ). FIG. 15 FIG. 15 FIG. 14 FIG. 14 To order parts and supplies: 800.343.9353 >> eastwood.com...
- Page 10 • If necessary, adjust the positions of the slotted Strike Plates so ample pressure is applied by the Side Doors when closed to prevent media leaks (FIG 17). • The Eastwood B120 Abrasive Media Blast Cabinet is now fully assembled and ready for set-up. BLAST CABINET SET-UP •...
- Page 11 Do not exceed the 220 lbs. [100 kg] workpiece weight capacity. Overloading could result in property damage and personal injury. Always clean or degrease items before loading them into the Blast Cabinet. Cleaning will reduce media contamination, improve blasting effect, and ensure no flammable substances are present. To order parts and supplies: 800.343.9353 >> eastwood.com...
- Page 12 • Disconnect the air supply. Leave disconnected when access- ing the Blast Cabinet or when not in use for extended periods of time. • You may now safely retrieve your workpiece via the Side Doors or Top Lid. Eastwood Technical Assistance: 800.343.9353 >> tech@eastwood.com...
-
Page 13: Maintenance
• When draining stops, clear excess media from seal area of the Anti-Purge Valve door, close and relatch the Door securely. • Add Eastwood approved Blast Media. Fill to within 10” of the Perforated Floor support flanges. DO NOT OVERFILL. Overfilling will degrade performance. - Page 14 • When done, replace Filter and secure it with the Filter Retaining Washer and Wingnut. • Replace the Motor & Filter assembly back into the Housing and latch the Clasps securely. • Reconnect the power supply cord. Eastwood Technical Assistance: 800.343.9353 >> tech@eastwood.com...
-
Page 15: Troubleshooting
Air Supply Line from Air Compressor Reduce air supply line length to 25’ or less. Too Long Weak Blast Verify the line is not kinked or damaged. If damaged, contact Eastwood for a Pinched or Damage Media Suction Line Stream replacement. -
Page 16: Additional Items
If you have any questions about the use of this product, please contact The Eastwood Technical Assistance Service Department: 800.343.9353 >> email: tech@eastwood.com PDF version of this manual is available at eastwood.com The Eastwood Company 263 Shoemaker Road, Pottstown, PA 19464, USA 800.343.9353 eastwood.com © Copyright 2023 Eastwood Automotive Group LLC 3/23...
Need help?
Do you have a question about the B120 and is the answer not in the manual?
Questions and answers