Table of Contents
Advertisement
Advertisement
Table of Contents

Related Manuals for Carimali DIVA COF


Summary of Contents for Carimali DIVA COF
- Page 1 LB.05099.02 EDITION OTTOBRE 2016 LB.05099.02 Pag. 1 18/10/16...
-
Page 2: Table Of Contents
TABLE OF CONTENTS TABLE OF CONTENTS ............................... 2 HACCP SCHEDULE ................................4 MAIN FEATURES ................................. 5 MACHINE KEYPAD ................................6 ELECTRIC CONNECTION ..............................8 HYDRAULIC CONNECTION ............................. 8 STARTING UP ..................................9 ACCESS THE MAIN SETTING MENUS WITH PASSWORD ..................12 PROGRAMMABLE PARAMETERS IN ACCORDING WITH PASSWORD ............. - Page 3 After unpacking check that the machine is not damaged. If in doubt, do not use the machine and contact an Carimali Authorized Service Centre. All packing materials (plastic wrapping, polystyrene, nails, etc.) are potentially dangerous and must be kept out of children’s reach and disposed of in a safe manner for the environment.
-
Page 4: Haccp Schedule
With correct installation, care, maintenance and cleaning with approved detergent, Carimali meet the requirement above mentioned. Carry out cleaning instruction, provided with machine, every day or at 8 hours shift intervals, to ensure that your system contains a minimum bacteria. -
Page 5: Main Features
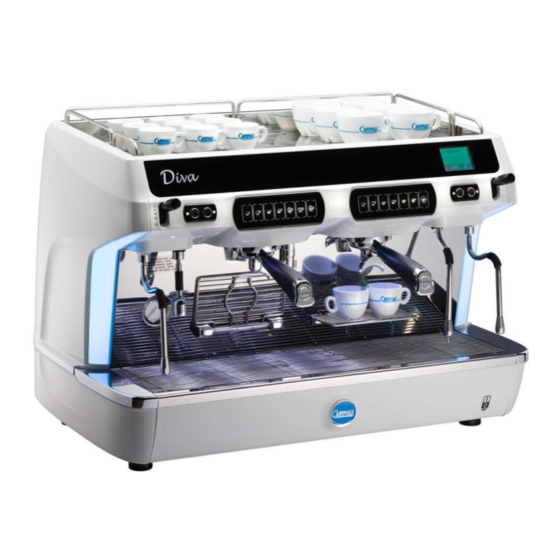
MAIN FEATURES DIVA Maximum quantity of coffee dispensed per hour Width (mm.) Height (mm.) Depth (mm.) Net weight (Kg.) 11,5 11,5 Boiler capacity (lt.) Hot water nozzle Steam nozzle Barista steam wand Mix cold water for tea Automatic cappuccino LM maker optional Milk pump 4300 4300... -
Page 6: Machine Keypad
NOTE: The registration and technical data plate of the machine is on the right side of the electrical box under the drip tray. MACHINE KEYPAD Machine keypads DIVA COF 2GR Gr. 1 keypad Gr. 2 keypad Key 11 1 Ristretto key... - Page 7 Machine keypads DIVA LM 2GR Gr. 1 keypad Gr. 2 keypad Key 11 1 Ristretto key Key 21 1 Ristretto key Key 12 2 Ristretto key Key 22 2 Ristretto key Key 13 1 Espresso key Key 23 1 Espresso key Key 14 2 Espresso key Key 24...
-
Page 8: Electric Connection
ELECTRIC CONNECTION HYDRAULIC CONNECTION WATER WATER TAP DRAIN ( 1 – 6 BAR ) WATER FILTER WATER SOFTNER LB.05099.02 Pag. 8 18/10/16... -
Page 9: Starting Up
STARTING UP After having connected the machine to the water and electric networks, turn the switch on (see diagram) The display shows: X.XX: Indicate the Software release inserted in the Rev. X.XX display and master p.c.boards Diva Rev. X.XX After a few seconds the display shows Language Use: + / - keys to select the language... - Page 10 In case the display shows “ FILLING UP T.O.” switch OFF and ON the machine by using the main switch “I.G” If the display shows “FILLING UP T.O. “ again, please contact the CARIMALI S.P.A. service centre. During this phase heating of the boiler starts, wait about 15 minutes to reach the set temperature...
- Page 11 This operation will automatically stop when the boiler temperature is reached, the display shows: 2015-FEB-16 TUE 04:54 SELECT DRINK PLEASE NOTE: LM Version DURING THE WARMING UP, THE MILKER SOLENOID VALVE WILL STAY OPEN FROM 0°C TO 95°C AND THE BARISTA STEAM WAND FROM 50°C TO 95°C.
-
Page 12: Access The Main Setting Menus With Password
- - - - - Enter one of the following passwords: User 2 2 2 2 2 Technician (for Technician password contact the Carimali Technical Service). After insert the password the display shows the main menu programming environments: SELECT INFO-RESET DOSE-PROGRAMMING SYSTEM MANAGER LB.05099.02... -
Page 13: Programmable Parameters In According With Password
PROGRAMMABLE PARAMETERS IN ACCORDING WITH PASSWORD OWNER TECHNICIAN INFO - RESET Read dose data Doses counter A Doses counter B Reset doses counter A Reset doses counter B System data Group 1 cleaning Group 2 cleaning Milker cleaning Water filter Group 1 cycles Group 2 cycles DOSE PROGRAMMING... - Page 14 CHANGE PASSWORD Owner Technician TEST ACTUATORS Actuators 1 Actuators 2 Actuators 3 Actuators 4 Milk pump BOILER DRAINING Boiler draining MACHINE CONFIGURATION Groups number Barista nozzle Milker Milk pump Cup warmer Water tank PRESET CONFIGURATION DATA Preset configuration data LB.05099.02 Pag.
-
Page 15: Info-Reset
INFO-RESET INFO-RESET READ DOSES DATA SYSTEM DATA A1) READ DOSES DATA (Doses counter A/B) Info reset Read doses data - System data Press the + / - keys to select the count A Read doses data or B. Doses counter A Is possible read two counter A or B, which can be use one for the total - Doses counter B... - Page 16 A2) READ DOSES DATA (Reset doses counter A/B) Info reset Read doses data - System data Read doses data Press the + / - keys to select the count A or B. - Doses counter A - Doses counter B Reset Doses counter A - Reset doses counter B WITH THIS OPERATION WE...
- Page 17 B) INFO RESET SYSTEM DATA Info reset - Read doses data System data Group 1 cleaning Group 1 cleaning Confirm reset Group 1 cleaning X Group 2 cleaning Group 2 cleaning Confirm reset Group 2 cleaning 0 Milker cleaning Milker cleaning Confirm reset Milker cleaning 5000 L...
-
Page 18: Doses Programming
DOSES PROGRAMMING PLEASE NOTE: TO ACCESS TO THE DOSES PROGRAMMING THE MACHINE MUST BE AT THE SET-UP TEMPERATURE Press the key to select the parameter and then press the key to confirm the selection SELECT INFO-RESET DOSE-PROGRAMMING SYSTEM MANAGER A) SET DOSES Selected n°... - Page 19 GRX BX XXXXX: Drink name XXXXX XX: Water volume amount, press +/- to select COFFEE WATER VOLUME XX ml GRX BX XXXXX: Drink name XXXXX XX: Temperature, press +/- to select COFFEE TEMPERATURE GRX BX XXXXX XXXXX: Drink name STEAMED MILK PRE XX: Time and percentage, press +/- to select XX s MILK PUMP SPEED...
-
Page 20: Default Delivery Setting
DEFAULT DELIVERY SETTING Tea 1 Ristretto Ristretto Espresso Espresso Coffee Coffee DRINK NAME KEY Tea 2 Tea 1: 2,7 s Water volume Tea 2: 5,4 s 30 ml 60 ml 40 ml 80 ml 120 ml 240 ml ON Preinfusion ml 3 ml 3 ml 3 ml... -
Page 21: System Manager
SYSTEM MANAGER SELECT INFO-RESET DOSE-PROGRAMMING SYSTEM MANAGER System manager - System clock programming - Service - Alarm history - Display regulation - Machine parameters - Change password - Test actuactors - Boiler draining - Machine configuration - Preset configuration data Press the key to confirm entering the desired environment. -
Page 22: System Clock Programming
SYSTEM CLOCK PROGRAMMING System manager System clock programming - Service - Alarm history - Display regulation Machine parameters - Change password - Test actuactors - Boiler draining Machine configuration - Preset configuration data Press the key +/- to program the date ( YY-MM-DD) System clock programming and the time ( DAY HH:MM ) YY - MM - DD... -
Page 23: Service
SERVICE System manager - System clock programming Service - Alarm history - Display regulation Machine parameters - Change password Service - Test actuactors - Boiler draining Milker Clean/Rinse Machine configuration - Maintenance set-up - Preset configuration data Milker Clean/Rinse Milker Clean/Rinse Service - Milker cleaning time... - Page 24 Milker cleaning programming Milker Clean/Rinse Variable Value : - Milker cleaning time + / - Milker cleaning programming - Milker auto rinsing Cleanig time 80 - 300s Milk pump speed 100% Milker auto rinsing Milker Clean/Rinse - Milker cleaning time - Milker cleaning programming Milker auto rinsing Disable...
- Page 25 Maintenance set-up Maintenance set-up Service - Water filter - Milker Clean/Rinse - Machine service Maintenance set-up Water filter Maintenance set-up Water filter - Machine service Press + / - to program the number of liters Water Filter before display the alarm Off –...
- Page 26 ALARM HISTORY 1 - 10: is the sequence number of the alarm System manager X: repetition number JJ: is the code of the alarm YYYYY: is the description of the alarm - System clock programming Z: is the number of times the alarm occurred in a row ( 2 - 255 ) - Service YY-MM-DD: Indicates the date of the alarm .
- Page 27 MACHINE PARAMETERS PLEASE NOTE: some of the following parameters may not be displayed depending to the machine configuration previously programmed. System manager - System clock programming - Service - Alarm history - Display regulation English Machine parameters - Change password Deutsch - Test actuactors - Boiler draining...
- Page 28 PLEASE NOTE: some of the following parameters may not be displayed depending to the machine configuration previously programmed. Enable Disable Chrono Variable Value: + / - Milk pump time pre 1.0 Sec. 0-10 Sec. Milk pump speed XX % Milk pump time post 1.5 Sec.
- Page 29 Cup warmer temperature 45 - 70 °C 60° C Serial number Set the serial number of the machine XXXXXX Press + / - to modify the machine Installation date installation date YY / MM / DD LB.05099.02 Pag. 29 18/10/16...
- Page 30 CHANGE PASSWORD System manager - System clock programming XXXXXX Indicate the user (Owner - Service - - Service Roaster - Technician) you want change the - Alarm history password - Display regulation YYYYY Indicate the password you want to change - Machine parameters Use the dose key to modify the password Change password...
- Page 31 TEST ACTUATORS System manager - System clock programming Test actuators - Service - Alarm history - Actuators 1 - Display regulation - Actuators 2 - Machine parameters - Actuators 3 - Change password - Actuators 4 Test actuators Milk pump - Boiler draining Machine configuration - Preset configuration data...
- Page 32 Actuators 3 Test actuators - Actuators 1 - Actuators 2 PRESS A DOSE KEYS BETWEEN B1 Actuators 3 TO B7 TO ACTIVATE THE ACTUATOR THAT YOU WISH TO CHECK. - Actuators 4 PRESS THE SAME DOSE KEY TO Milk pump STOP THE ACTIVATED ACTUATOR FROM WORKING.
- Page 33 BOILER DRAINING System manager - System clock programming - Service - Alarm history - Display regulation - Machine parameters - Change password - Test actuators Boiler draining Machine configuration - Preset configuration data CLOSE THE INLET WATER FROM THE TAP Press the key B1¹...
- Page 34 MACHINE CONFIGURATION System manager - System clock programming - Service - Alarm history - Display regulation - Machine parameters - Change password - Test actuators - Boiler draining Machine configuration Machine configuration - Preset configuration data Groups number Use: + / - keys to enable or disable the Barista nozzle Machine configuration Barista nozzle...
- Page 35 PRESET CONFIGURATION DATA System manager - System clock programming - Service The Technician or Factory preset can be - Alarm history carried out only with Technician - Display regulation password. - Machine parameters With Service password can be carried out only the Service preset. - Change password - Test actuators - Boiler draining...
-
Page 36: Special Functions For Machine Calibration
SPECIAL FUNCTIONS FOR MACHINE CALIBRATION Only Assistance Service personnel authorised by Carimali Spa. are permitted to enable the use of these functions. Calibrating the coffee dispensing pressure (pump pressure) To adjust the pump pressure insert the filter holder filled with properly ground, pressed coffee dose. - Page 37 4) Milk temperature setting The milk frother is equipped with a MILK TEMPERATURE REGULATOR which reduces the quantity of sucked milk. Turn the ring nut clockwise to increase temperature, or turn it anticlockwise to decrease temperature (see diagram). 5) Preset Machine configuration With this function, all the set up values, machine counters dose setting and password take the default values set up by factory.
- Page 38 UPGRADE DIVA SOFTWARE A FAST ILLUSTRATE GUIDE FOR SHOWING HOW UPGRADE SOFTWARE ON DIVA COFFEE MACHINE. Go on Carimali official website and download from the website the compress folder. Decompress and open the folder. MASTER PCB Use AVR programming KIT to upload software on master PCB. See procedure in relevant manual LB.00145 DISPLAY PCB ...
- Page 39 2.2) UPGRADE SOFTWARE ON DISPLAY PCB WITH THE USB FLASH KEY (only for machine whit software V1.06 or higher) 2.2.1) Now pick and USB key and format in FAT file type . (you can control in propriety of Your USB Key) 2.2.2.)Now open the USB Key and create a folder, folder name must be Diva.
- Page 40 2.2.4) Now you have to copy the file DivaLcd- XXX.bin inside of the folder Diva\DivaLcd. Then rename the file as follow: DivaLcd.bin (you have to delete the release number) USB – Micro USB cable 96.05411 Now connect USB key with an USB – Micro USB cable just like in the photo on 96.05411 the left.
-
Page 41: Security And Alarms
SECURITY AND ALARMS FILLING UP TIME OUT This alarm is visualized on display by code 32 Causes: the stage of boiler fillings has exceeded the maximum time of 7 minutes as a first filling, the others will take 2 minutes; the level of the probe (SLC) has not been reached. - Page 42 4) GRX INFUSION T.O. This alarm is visualized on display by code 42 The message signals that a time-out problem of the flowmeter occurred. At the next dose the message will be cancelled if dispensing is carried out correctly. 5) STEAM HEATER TIME OUT This alarm is visualized on display by code 34 It indicates that the heating up stage of the coffee boiler has exceeded 12’...
- Page 43 7) GRX MIX TEMPERATURE This alarm is visualized on display by code: 52 for Group 1 53 for Group 2 Cause: The mix temperature probe is not sending signals to the control unit Result: There is not any mix control Solution: carry out the following controls.
- Page 44 10) CHANGE WATER FILTER This alarm is visualized on display by code 90 Cause: the flowmeter has reached the maximum value of XXXXX litres of previously programmed water, which may be dispensed. Result: none. Solution: renew the softener salts. To cancel the alarm, see the Info -Reset paragraph for further information. Note: this alarm does not block dispensing.
-
Page 45: Special Maintenance
Cleaning of the coffee outlet by means of the specially provided brush is part of the daily maintenance. Special maintenance must be carried out periodically by the Carimali authorized service centre in the following way: Replace filter holder gasket every 3-6 months... - Page 46 The Carimali product you have purchased is subject to Directive 2002/96/EC of the European Parliament and the Council of the European Union on waste electrical and electronic equipment (WEEE) and, in jurisdictions adopting that Directive, is marked as being put on the market after August 13, 2005, and should not be disposed of as unsorted municipal waste.
Need help?
Do you have a question about the DIVA COF and is the answer not in the manual?
Questions and answers