Advertisement
Quick Links
Advertisement

Related Manuals for Evolveo EasyPhone AD


Summary of Contents for Evolveo EasyPhone AD
- Page 1 EasyPhone AD www.evolveo.com...
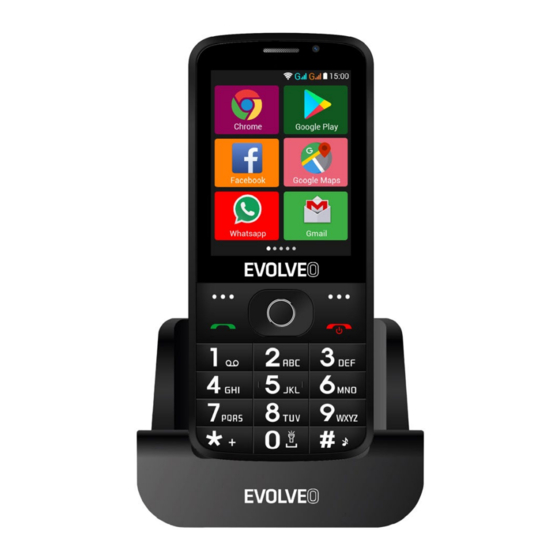
- Page 4 Multi-touch display Front camera Orientation keys Right soft key Left soft key Call key End Call /Power on/off key Number Keys * Key 10 # Key 11 Rear camera 12 Flashlight 13 SOS key 14 Speaker 15 Strip hole 16 Earset Hole 17 Reciever 18 USB 19 Hold lamp on/off...
- Page 5 Keys Functions Different functions under different menus. Left soft key Press this key to realize the function which display on the left-down corner. Different functions under different menus. Right soft Press this key to go back to previous menu. Press this key to make a call when select a number.
- Page 6 Press this key to go back to standby mode. Press this key to go back to main menu. Press this key to end a call. Move cursor left and right when edit. Sroll and scan the contact list/ number/ messages and all sub menus. Move cursor up and down Orienta-tion when edit.
- Page 7 Under standby mode, press * key twice to display “+”. * Key Under FM radio, Video player, in conversation status * key to decrease the volume. Switch input method under text edit interface. Long press change user profiles under standby # Key interface.
- Page 8 Icons Descriptions Icons Descriptions USB storage Flight Mode Turned on. & & Inserting Battery Open the battery cover on the back of your phone. Align the battery's contact points with those of the phone and gently press the battery down into place. Replace the battery cover clicking it back into position Removing Battery Switch off your phone.
- Page 9 the indication icon. To remove the memory card, perform according to the conversed installations. The rechargeable Li-ion battery that comes with your phone is ready to be used, but is not charged. It is easy to do & can be done in 3 simple steps below: Connect the charger to your phone, and plug it into a socket.
- Page 10 Please replace it with your own PIN code as soon as possible. Enter the wrong PIN three times, and your SIM will be locked. Then you’ll need to contact your network service provider to ask for a PUK code to unlock it. It is applicable for both the SIMs if you are using 2 SIM Cards.
- Page 11 enter the main menu. Click “File Manager” to enter the directory of SD card. Click the APK file you wish to install, and follow the installation wizard. & & 1) Call log Allow you to make quick outgoing calls. 2) Contact To see your list of Contacts.
- Page 12 SOS numbers may be set. SOS procedure: When SOS status on and long press key SOS button on the rear side of phone, the SOS function started with below: A loud emergence alarm will be shouted, it will start to call the emergency number one by one, each number will call 3 times;...
- Page 13 the Gallery folder. In Camera, easily choose Camcorder to record Video Files. 14) Gallery Allows you to save & view photos & videos. 15) Sound Recorder Allows you to record sounds. 16) Files You could install the files in APK format & also view your files.
- Page 14 Your Smart Phone supports Wi-Fi which allows you to connect with a Wireless connection. This is useful for surfing internet on phone. Go to Settings--Wifi, activate Wifi . Enter WiFi, select the hotspot you want to connect. If the hotspot needs password, you have to enter the right password first, and then use Wifi properly.
- Page 15 Do you still need an advice after reading this guide? First read “Frequently Asked Questions” at www.evolveo.com or contact the EVOLVEO technical support. The warranty DOESN´T APPLY to: • using the device for other purposes than it was designed to •...
-
Page 16: Declaration Of Conformity
Do not throw these products into the unsorted municipal waste DECLARATION OF CONFORMITY Hereby, the company Abacus Electric, s.r.o. declares that the EVOLVEO EasyPhone AD is in compliance with the requirements of the standards and regulations, relevant for the given type of device. - Page 17 All rights reserved. Design and specification may be changed without prior notice. -17-...
Need help?
Do you have a question about the EasyPhone AD and is the answer not in the manual?
Questions and answers