
Related Manuals for Heatmiser JG PRT-E


Summary of Contents for Heatmiser JG PRT-E
-
Page 1: Operating Instructions
Operating Instructions Model: JG PRT-E This is a multi mode thermostat, please see page 13 for setup instructions Revision 1 - 10/09 Ref: JGPRT-E... -
Page 3: Table Of Contents
Contents Page What is a programmable thermostat? Installation Icons explained Temperature Display Setting the Clock Setting the Comfort Levels Keypad Lock Facility Temperature Hold Setting the Temperature Holiday Feature Turning the Heating On/Off Factory Reset Setting the Mode Optional Thermostat Settings 14-19 Wiring 20-21... -
Page 4: What Is A Programmable Room Thermostat
What is a programmable room thermostat? A programmable room thermostat is both a programmer and a room thermostat. A programmer allows you to set “On” and “Off” periods to suit your own lifestyle. A room thermostat works by sensing the air temperature, switching on the heating when the air temperature falls below the thermostat setting, and switching it off once this set temperature has been reached. - Page 5 down. Turning a programmable room thermostat to a lower setting will result in the room being controlled at a lower temperature, and saves energy. The way to set and use your programmable room thermostat is to find the lowest temperature settings that you are comfortable with at the different times you have chosen, and then leave it alone to do its job.
- Page 6 (TRVs) on individual radiators. If you don’t have TRVs, you should choose a temperature that is reasonable for the whole house. If you do have TRVs, you can choose a slightly higher setting to make sure that even the coldest room is comfortable, then prevent any overheating in other rooms by adjusting the TRVs.
-
Page 7: Installation
Installation Procedure Do’s 1. Do mount the thermostat at eye level. 2. Do read the instructions fully so that you can get the best from our product. Don’ts 1. Do not install near a direct heat source as this will affect the workings of the thermostat. -
Page 8: Icons Explained
Step 2 Place the thermostat front somewhere safe. Terminate the thermostat as shown in the diagrams at the back of this booklet. Step 3 Clip the front of the thermostat to the back plate. Icons Explained Symbol Description Heat On Icon Shown when the heating is On Flashing when the optimum starts is in operation Frost On Icon (Heating Off) -
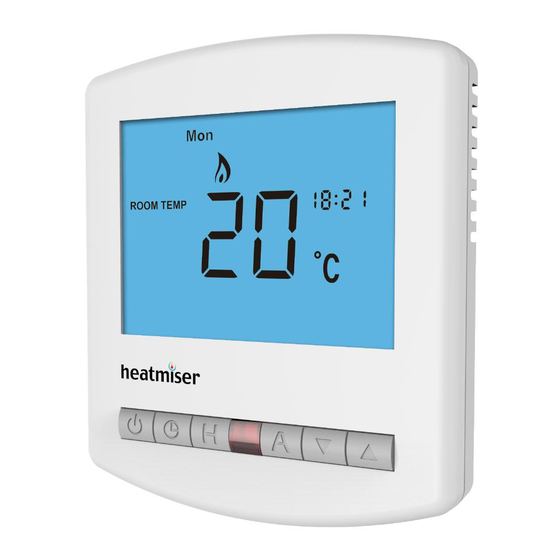
Page 9: Temperature Display
Temperature Display Room Temp = This is the current room temperature. SET = This is the temperature you are trying to achieve in your home. Setting the Clock To set the clock, follow the steps below: • With the thermostat turned on, press the Clock button twice. •... -
Page 10: Setting The Comfort Levels
Comfort Levels Explained The PRT-E provides Weekday/Weekend or 7 Day Programming. You should consult the “Configuration Menu” section to select the required mode. The thermostat is supplied with comfort levels already programmed, but these can be changed easily. The default times are: 08.00 - 21°C (Wake) 09.30 - 16°C (Leave) -
Page 11: Keypad Lock Facility
• Press H. • Using the Up/Down arrow keys, enter the required Wake Temperature. • Press H. • You will now see “Leave”. • You should repeat the programming for each period, entering --.—for unused periods. Note: For weekday/weekend Programming, the 4 comfort levels are the same for all weekdays. -
Page 12: Temperature Hold
Temperature Hold The temperature hold function is ideal for parties or when you will be going out for a number of hours. It allows you to hold a temperature for a desired period. • Press H. • Using the Up/Down arrow keys enter the required hold time. •... -
Page 13: Holiday Feature
Holiday The PRT-E has a holiday function. This allows you to enter a holiday setting. During a holiday, the thermostat will maintain the frost set temperature. At the end of your holiday, the thermostat will revert back to the programmed setting ensuring that your home is warm on your arrival. -
Page 14: Turning The Heating On/Off
Heat On / Off Frost Protect Mode: Pressing the Power button once will place the thermostat in frost protect mode. In this mode, the thermostat will display the frost icon and will only turn the heating on should the room temperature drop below the set temperature (see page 14) Should the heating be turned on whilst in frost mode, the flame symbol will be displayed. -
Page 15: Setting The Mode
Setting The Mode The PRT-E has 4 modes, these are explained below: Mode No. Mode explanation Non programmable mode with built in air sensor Non programmable with remote sensor options Programmable mode with built in air sensor Programmable mode with remote sensor options First select the best mode which suits your application, and then follow the steps below to setup the thermostat: 1. -
Page 16: Optional Thermostat Settings
THE FOLLOWING SETTINGS ARE OPTIONAL AND IN MOST CASES NEED NOT BE ADJUSTED Optional Features Explained Feature 01 - Temperature Format: This function allows you to select between °C and °F. Feature 02 – Switching Differential: This function allows you to increase the switching differential of the thermostat. The default is 1°C which means that with a set temperature of 20°C, the thermostat will switch the heating on at 19°C and off at 20°C. - Page 17 Feature 05 – Output Delay: To prevent rapid switching, an output delay can be entered. This can be set from 00-15 minutes. The default is 00 which means there is no delay. Feature 06 – Communication Address: This setting is used when you have connected your thermostat to a network system.
- Page 18 Feature 09 – Floor Limit: When the thermostat is operating in mode 01 and 03 (as described on page 13) and function 08 is set to 02, 03 or 04, function 09 becomes available. You can then set the maximum floor temperature limit - 20-45°C (28°C default).
-
Page 19: Adjusting The Optional Settings
Adjusting the Optional Settings 1. To access the configuration menu, turn off the thermostat by pressing and holding down the Power Button. Then, press and hold the Clock button until the display lights up. 2. The small number is the feature number, the large number is the setting value. - Page 20 Feature Table (continued) Feature Description Setting Frost Temperature 07-17°C (12°C Default) Output Delay 00-15 Minutes (00 Default) Communication ID Set Unique Comms Address 01-32 Up/Down Temp Limit 00-10°C (00°C Default) Sensor Selection 00 = Built In Air Sensor (Default) 01 = Remote Air Sensor 02 = Floor Sensor Only 03 = Floor Sensor and Built In Air Sensor...
- Page 21 Feature Table (continued) Feature Description Setting Floor Limiting Sensor 20-45°C 28°C Default Optimum Start 00-03 (00 hours default) Rate of Change Information only Mode Select 00=Weekday/Weekend 01 = 7 day programming...
- Page 23 PRT-E TO UH3 CONNECTIONS PRT-E OPTION 1 A remote air sensor can be connected between the RT2 and - terminals OPTION 2 A remote floor sensor can be connected between the RT1 and - terminals RT1 - RT2 N LOAD OPTION 3 Both remote air and floor sensors can be connected at the same time...
- Page 24 Support Tel: 01254 870303...
Need help?
Do you have a question about the JG PRT-E and is the answer not in the manual?
Questions and answers
Lock showing and followed instructions but will not open. Trying to extend a time for a certain day and not able to.
To unlock the Heatmiser JG PRT-E thermostat, press and hold the A and Down keys for 10 seconds until the lock symbol disappears. After unlocking, you can adjust the time settings for a specific day if your thermostat is set to 7-day programming.
This answer is automatically generated