dji MATRICE 300 RTK User Manual
Hide thumbs
Also See for MATRICE 300 RTK:
- User manual (114 pages) ,
- Product information (54 pages) ,
- Maintenance manual (19 pages)
Table of Contents
Advertisement
Quick Links
Advertisement
Table of Contents

Related Manuals for dji MATRICE 300 RTK


Summary of Contents for dji MATRICE 300 RTK
- Page 1 MATRICE 300 RTK User Manual v1.0 2020.05...
-
Page 2: Using This Manual
Download the DJI Pilot app The DJI Pilot app is required if using a mobile device connected to the remote controller. Search for Scan the QR code or visit https://m.dji.net/djipilot_enterprise to download the app. DJI Pilot supports Android 5.0 or later. -
Page 3: Table Of Contents
Contents Using This Manual Legends Before Flight Download the DJI Pilot app Download the DJI Assistant 2 for Matrice Product Profile Introduction Feature Highlights Preparing the Aircraft Aircraft Diagram Remote Controller Diagram Aircraft Profile Flight Mode Flight Status Indicator Aircraft Beacons... - Page 4 MATRICE 300 RTK User Manual Advanced Dual Operator Mode Video Transmission Descriptions Display Interface Gimbal and Camera DJI Pilot App Manual Flight Mission Flight Album DJI FlightHub Menu Flight Flight Environment Requirements GEO (Geospatial Environment Online) System Flight Restrictions GEO Unlocking...
- Page 5 Product Profile This chapter describes the features of the Matrice 300 RTK, shows how to assemble the aircraft, and contains diagrams of the aircraft and remote controller with component explanations. © 2020 DJI All Rights Reserved.
-
Page 6: Product Profile
Powered by a new design of software and hardware platform, M300 RTK boasts multiple intelligent features. With the H20 series, M300 RTK supports AI Spot-check to take photos during flight for Demo Flight, save as Flight Mission, and the aircraft can automatically take photo at the same position when each Flight Mission is performed. PinPoint enables users to mark fixed subjects and share location in real-time. Smart Track is used to autonomously identify subjects and keep track of mobile ones. The © 2020 DJI All Rights Reserved. - Page 7 MATRICE 300 RTK User Manual subject is centered and in the right size, and shares its location in real-time thanks to auto zoom. A new Primary Flight Display presents the necessary flight status clearly and visually in the FPV view, aiming to ensure the user’s flight safety and efficiency. The DJI Smart Controller Enterprise (hereinafter referred to as “Smart Controller”) features OCUSYNC Enterprise technology, capable of controlling aircraft that supports this technology, and providing a live HD view from the aircraft's camera. It can transmit image data at distances of up to 9.32 mi (15 km) and comes with a number of aircraft and gimbal controls as well as some customizable buttons. The built-in 5.5-inch high brightness 1000 cd/m² screen has a resolution of 1920×1080 pixels, featuring an Android system with multiple functions such as Bluetooth and GNSS. In addition to supporting Wi- Fi connectivity, it is also compatible with other mobile devices for more flexible usage. An HDMI port is available for HD images and video output. The transmission system support 2.4 GHz and 5.8 GHz to ensure a more reliable connection in environments prone to signal interference. The AES-256 encryption keeps your data transmission secure so you can be sure that your critical information remains safe.* The TimeSync system continuously aligns the flight controller, camera, GNSS module, DJI payloads, as well as onboard accessories via the Payload SDK or Onboard SDK at the microsecond level. It meets SDK developers’ requirements on time precision. An advanced power management system along with dual batteries ensures power supply and enhances flight safety. Without a payload, the aircraft has a flight time of up to 55 minutes. The batteries can be replaced when without powering off the aircraft, enabling non-stop, continuous operations. The camera unit is independent from image processor so that you have the flexibility to choose the...
-
Page 8: Preparing The Aircraft
MATRICE 300 RTK User Manual Preparing the Aircraft Installing the Landing Gears Install the landing gears, slide the gear lock to the end of the landing gear, then rotate it about 90° until the dot is in sync with the alignment mark. - Page 9 MATRICE 300 RTK User Manual Mounting the Gimbal and Camera Press the Gimbal Align the white and Rotate the gimbal lock Detachment button red dots and insert the to the locked position. to remove the cover. gimbal. After installation, make sure that the gimbal lock is locked in place. Make sure to press down the Gimbal Detachment button when rotating the gimbal lock to remove the gimbal and camera. The gimbal lock should be fully rotated when removing the gimbal for the next installation. Mounting the Intelligent Flight Batteries / Checking the Battery Level Insert a pair of batteries. Press the battery level button once to check the battery level. High Turning On the Aircraft Turn on / off: Press the power button on the aircraft, within 3 seconds press again and hold to turn on / off the aircraft, with the power indicator solid on.
-
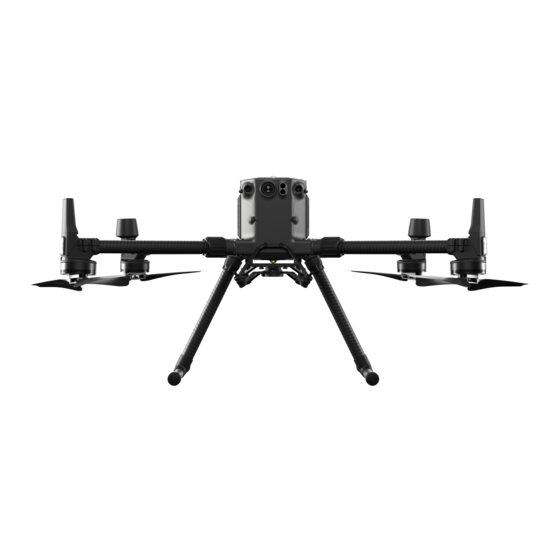
Page 10: Aircraft Diagram
MATRICE 300 RTK User Manual Aircraft Diagram Top view Bottom view Rear view 1. FPV Camera 19. Aircraft Status Indicators 2. Forward Infrared Sensing System 20. Upward Beacon 3. Forward Vision System 21. Power Button / Indicator 4. DJI Gimbal Connector v2.0 (DGC2.0) 22. Upward Infrared Sensing System 5. Gimbal Detachment Button 23. Top Auxiliary Light 6. Frame Arms 24. Upward Vision System 7. Motors 25. Assistant Port 8. Propellers 26. OSDK Port 9. ESC LEDs 27. PSDK Port* 10. Transmission Antennas 28. Downward Infrared Sensing System 11. Landing Gears 29. Downward Vision System 12. Air Filter 30. Bottom Auxiliary Light 13. Left and Right Infrared Sensing System 31. Downward Beacon 14. Left and Right Vision System... -
Page 11: Remote Controller Diagram
MATRICE 300 RTK User Manual Remote Controller Diagram 9 10 Right: Increase EV value 1. Antennas Press: Open DJI Pilot Intelligent Flight Modes 2. Back Button / Function Button menu Press once to return to the previous page and Go to Settings > Control Stick Navigation to press twice to go back to the homepage. Hold enable this function. to view a guide to using button combinations. Refer to the Button Combinations section for 12. Power Button more information. 13. Confirm Button 3. Control Sticks 14. - Page 12 MATRICE 300 RTK User Manual 24. Gimbal Pan Control Dial 25. Air Vent 26. Sticks Storage Slot 27. Spare Sticks 28. Customizable Button C2 29. Customizable Button C1 30. WB37 Intelligent Battery 31. Battery Release Button © 2020 DJI All Rights Reserved.
- Page 13 Aircraft This section describes the features of the Flight Controller, Vision System, and the Intelligent Flight Battery.
-
Page 14: Aircraft
In Attitude mode, the Vision System and some advanced features are disabled. Therefore, the aircraft cannot position or auto-brake in this mode and is easily affected by its surroundings, which may result in horizontal shifting. Use the remote controller to position the aircraft. © 2020 DJI All Rights Reserved. -
Page 15: Flight Status Indicator
2. The Aircraft Status Indicators communicate the system status of the flight controller. Refer to the table below for more information about the Aircraft Status Indicators. The Front LEDs, and Aircraft Status Indicators can be turned off in the DJI Pilot app for unobtrusive drone operations. -
Page 16: Aircraft Beacons
MATRICE 300 RTK User Manual Red flashing for 5 seconds IMU Error (when performing CSC) — Solid Red Critical Error Fast alternating red and Compass Calibration Required yellow flashing Alternating red and green The RTK function is enabled but RTK data is flashing unavailable. -
Page 17: Vision System And Infrared Sensing System
MATRICE 300 RTK User Manual Vision System and Infrared Sensing System Intoduction Top view Rear view Bottom view The main components of the Vision System are located on the front, rear, left, right, top and bottom of the aircraft, including stereo vision sensors. The Infrared Sensing System consists of two infrared sensors on the front, rear, left, right, top and bottom of the aircraft. The Vision System uses image data to help the aircraft constantly scan for obstacles and obtain the aircraft position information, and the Infrared Sensing System use the infrared modules to detect obstacles to judge the aircraft height, allowing the aircraft to maintain its current position, enabling precision hovering indoors or other environments. - Page 18 The aircraft cannot detect objects in the grey area. Please fly with caution. Users can set the braking distance and warning distance in the DJI Pilot App. The aircraft can automatically stop when flying near to the braking distance. Once the aircraft enters the warning distance, the obstacle information will be displayed as a yellow.
- Page 19 1. Power on the aircraft. 2. Connect the aircraft and the PC with a USB-C cable. 3. Launch DJI Assistant 2 for Matrice and log in with a DJI account. 4. Click M300 RTK and the calibration button. 5. Place the side of visual calibration plate with the dots facing the Vision System, and follow the instructions in the DJI Assistant 2 to complete calibration.
- Page 20 MATRICE 300 RTK User Manual Follow the steps below to use the Vision System: 1. Ensure the aircraft is in P-mode and place the aircraft on a flat surface. 2. Turn on the aircraft. The aircraft will hover in place after takeoff. The aircraft status indicators will flash green twice, which indicates the Vision System is working.
- Page 21 MATRICE 300 RTK User Manual d. Flying over moving surfaces or objects (e.g. above moving people, waving reeds, shrubs and grass). e. Flying in an area where the lighting changes frequently or drastically, or in an area where there is excessive exposure to direct, strong lighting.
-
Page 22: Return-To-Home (Rth)
Low Battery RTH The low battery level failsafe is triggered when the DJI Intelligent Flight Battery is depleted to a point that may affect the safe return of the aircraft. Users are advised to return home or land the aircraft immediately when prompted. - Page 23 MATRICE 300 RTK User Manual Battery Aircraft Status Level Remark DJI Pilot App Flight Instructions Indicator Warning Tap “Go-home” to have the aircraft If RTH is selected, the return to the Home aircraft will fly back Point and land to the Home Point...
- Page 24 5. The aircraft will return to the Home Point, and Landing Protection* will be triggered to allow the aircraft to land or hover in place. Refer to Landing Protection Function for details. * Make sure that the Landing Protection is enabled in the DJI Pilot app. Use the Smart RTK for example: 1. Record Home Point...
- Page 25 2. If Landing Protection determines that the ground is not suitable for landing, the aircraft will hover and wait for pilot confirmation. The aircraft will hover if it detects the ground is not appropriate for landing even with a critically low battery warning. Only when the battery level decreases to 0% will the aircraft land. Users retain control of aircraft flight orientation. 3. If Landing Protection is inactive, the DJI Pilot app will display a landing prompt when the aircraft descends below 0.7 meters. Tap to confirm or pull down the control stick for 2 seconds to land when the environment is appropriate for landing. Landing Protection will not be active in the following circumstances: When the user is controlling the pitch/roll/throttle sticks (Landing Protection will re-activate when the control sticks are not in use) When the positioning system is not fully functional (e.g.
-
Page 26: Center Of Gravity Calibration
MATRICE 300 RTK User Manual Center of Gravity Calibration The center of gravity will shift when the aircraft’s payloads change. To ensure stable flight, it is required to recalibrate the aircraft’s center of gravity when a new payload is installed. Calibrate in a windless environment. Make sure that the aircraft is hovering and there is a strong GNSS signal during calibration. Maintain visual line of sight of the aircraft and pay attention to flight safety. Calibration instructions: Go to Flight Controller Settings in the app, and tap Calibrate in the Center of Gravity Auto Calibration section. The Aircraft Status Indicators will glow solid purple during calibration. There will be a prompt in the app after calibration is completed. Flight Recorder Flight data is automatically recorded to the internal storage of the aircraft. You can connect the aircraft to a computer via the USB port and export this data via DJI Assistant 2 or DJI Pilot app. Propellers Propellers Usage Guide M300 RTK uses the 2110 propeller. The 2195 propeller is purpose-built to improve the aircraft’s maximum flight altitude while maintaining minimal flight noise. -
Page 27: Intelligent Battery Station
MATRICE 300 RTK User Manual Replacing the Propellers It is recommended to replace the propellers only in an emergency situation during operations. After the emergency flight is over, please contact DJI technical support or an authorized agent for overhaul as soon as possible. Propeller blades are sharp; please handle with care. Intelligent Battery Station The Battery Station features a total of 12 battery ports and can charge up to eight TB60 Intelligent Flight Batteries, and four WB37 Intelligent Batteries. It also comes built in with integrated wheels that make the Battery Station easy to maneuver from one place to another. Warnings 1. Keep any liquids (oil, water etc.) away from the inside of the Battery Station. 2. DO NOT close the Battery Station during charging or discharging, and ensure it is well ventilated and able to dissipate heat. 3. The Battery Station is only compatible with the TB60 Intelligent Flight Battery, and WB37 Intelligent Battery. DO NOT use the Battery Station with any other battery models. 4. Place the Battery Station on a flat and stable surface when in use. Ensure the device is properly insulated to prevent fire hazards. - Page 28 MATRICE 300 RTK User Manual Overview 1. AC Power Cable Slot 2. Padlock Holes 3. Locks 4. Retractable Trolley Handle 5. Handles 6. Pressure Valve 7. Air Intake 8. WB37 Battery Port 9. Power Port 10. Air Vent 11. TB60 Battery Port 12. Warning LED 13. WB37 Battery Status LEDs 14. TB60 Battery Status LEDs 15. WB37 Charging Status LEDs 16. TB60 Charging Status LEDs 17. Firmware Update Port (USB-C) 18. Power Button / Power Indicator 12 13 15 17 14 16 © 2020 DJI All Rights Reserved.
- Page 29 MATRICE 300 RTK User Manual Activation Use DJI Pilot app and follow the instructions below to activate the Battery Station. 1. Connect the Battery Station to a power outlet and press the Power Button to turn on the Battery Station. Connect the Battery Station to the remote controller using a USB-C cable. 2. Turn on the remote controller and run the DJI Pilot app. 3. Follow the app instructions to activate the Battery Station. Using the Battery Station Charging 1. Connect the Battery Station to a power outlet (100-120 Vac, 50-60 Hz / 220-240 Vac, 50-60 Hz) via the AC power cable. Power Outlet 2. Press the Power Button once to turn on the Battery Station. 3. Insert the batteries into the Battery Ports to start charging. a. With a 100-120 V input, it takes about 70 minutes to fully charge the TB60 battery, and 40 minutes to charge from 20% to 90% battery level. b. With a 220-240 V input, it takes about 60 minutes to fully charge the TB60 battery, and 30 minutes to charge from 20% to 90% battery level.
- Page 30 MATRICE 300 RTK User Manual Refer to the “Battery Station LEDs Description” for more information about the various LEDs. DJI does not take any responsibility for damage caused by third-party chargers. To ensure safety, discharge the battery before transporting the aircraft. Fly the aircraft outdoors until its power level is from 20% to 30%. The battery has a capacity of 274 Wh. Please follow the regulations and guidelines for traveling with these batteries via air. Warming up and Charging in Low Temperature When the temperature falls between -20℃ to 5℃, the Battery Station will warm up the battery before charging it. Do not charge the battery frequently in low-temperature environments, as the charging time becomes longer, and the battery life may be shortened. Battery Station LEDs Description LED Indicators Descriptions Power Indicator Solid green Powered on. Battery Status LEDs Solid green Charging completed. Blinks green Charging.
- Page 31 MATRICE 300 RTK User Manual Buzzer Beeping Description Buzzer beeping is used to indicate errors as outlined below. 1. When the Battery Status LED is red, the buzzer is beeping to indicate a battery error. 2. When the Warning LED is red, the buzzer is beeping to indicate a Battery Station hardware error. Specifications Model BS60 Dimensions 501 × 403 × 252 mm Net Weight 8.37 kg Max Internal Load 12 kg TB60 Intelligent Flight Battery × 8 Compatible Stored Items WB37 Intelligent Battery × 4 AC Power Cable Input 100-120 Vac, 50-60 Hz / 220-240 Vac, 50-60 Hz TB60 Intelligent Flight Battery Port: Output 52.8 V, 7 A×2 @100-120 V, 8.9 A×2 @220-240 V WB37 Intelligent Battery Port: 8.7 V, 6 A 100-120 V, 750.0 W Output Power 220-240 V, 992.0 W Power without Load < 8 W Warming up the battery 52.8 V, 2 A Operating Temperature -20℃ to 40℃ (-4° F to 104° F)
- Page 32 MATRICE 300 RTK User Manual Battery Station Firmware Update Use the DJI Pilot App to update firmware of the Battery Station as well as up to 8 TB60 flight batteries at the same time. 1. Insert the batteries into the Battery Ports and turn on the Battery Station. 2. Connect the Battery Station to the remote controller using a USB-C cable. 3. Turn on the remote controller and make sure it is connected to the Internet. 4. Run the DJI Pilot app, tap to enter PILOT page. If it shows that there is a firmware update for the Battery Station, then tap into the HMS page. 5. Tap to enter the firmware update page. 6. Tap the update all button and wait for about 10 minutes to complete the firmware upgrade. During firmware update, do not insert or remove the battery to avoid battery update failure. During firmware update, do not unplug the USB-C cable to avoid battery update failure. During firmware update, do not charge the battery station. © 2020 DJI All Rights Reserved.
-
Page 33: Intelligent Flight Battery
MATRICE 300 RTK User Manual Intelligent Flight Battery Battery Introduction The TB60 Intelligent Flight Battery has high-energy cells, and a smart charge/discharge functionality. It should only be charged using appropriate DJI approved chargers. The Intelligent Flight Battery must be fully charged before using it for the first time. The battery firmware is included in the aircraft firmware. Make sure that all the batteries' firmware is up-to-date. DJI Intelligent Flight Battery Functions 1. Battery Level Display: The LED indicators display the current battery level. 2. Charge or discharge the battery to 40% ~ 60% if NOT intended to be used for 10 days or more. This can greatly extend the battery's overall life span. It takes approximately 6 days to discharge the battery to 60%. It is normal that you may feel moderate heat emitting from the battery during the discharge process. You can set the discharging thresholds in the DJI Pilot app. 3. Balanced Charging: Automatically balances the voltage of each battery cell when charging. 4. Overcharge Protection: Charging automatically stops when the battery is fully charged. 5. Temperature Detection: The battery will not be charged to avoid damage when the battery temperature is lower than -20 °C (-4°F) or higher than 45°C (113°F). - Page 34 Auto Heating: Insert the batteries into the aircraft and power it on. If a low battery temperature is detected, the battery will automatically heat up to maintain a temperature between 61° F (16° C) and 68° F (20° C). Low Temperature Notice: 1. The performance of the intelligent Flight Battery is significantly reduced when flying in low temperature environments (temperatures below 5℃). Ensure that the battery is fully charged and the cell voltage is at 4.4 V before each flight. 2. End the flight as soon as DJI Pilot displays the “Low Battery Level Warning” in low temperature environments. You will still be able to control the aircraft’s movement when this warning is triggered. 3. In extremely cold weather, the battery temperature may not be high enough even after warming up. In © 2020 DJI All Rights Reserved.
- Page 35 MATRICE 300 RTK User Manual these cases, insulate the battery as required. 4. To ensure optimal performance of the battery, keep the battery temperature above 16℃. 5. In low temperature environments, it will take a longer time for the batteries to warm up. It is recommended to keep the battery warm before use to reduce the warm-up time. Checking Battery Levels When the battery is turned off, press the Battery Level button once and the Battery Level Indicators LEDs will display the current battery level. High Battery Level Indicators display how much power remains. When the battery is turned off, press the Power button once and the Battery Level Indicators LEDs will display the current battery level. See below for details.
-
Page 36: D-Rtk
The aircraft has a built-in RTK, which can withstand magnetic interference from metal structures, ensuring stable flight. More accurate positioning data can be achieved when using a DJI D-RTK 2 High Precision GNSS Mobile Station. Enable / Disable RTK Ensure that the “Aircraft RTK” is enabled and RTK service type is correctly set (D-RTK 2 Mobile Station) before each use. Go to Camera View in the app > > RTK to view and set. Make sure to disable RTK function if not in use. Otherwise, the aircraft will not be able to take off when there is no differential data. Using the DJI D-RTK 2 Mobile Station 1. Refer to the D-RTK 2 Mobile Station User Guide to complete linking between the aircraft and the mobile station, including setup. 2. In the RTK Settings page in the app, select the RTK service type as “D-RTK 2”, connect the mobile station by following the instructions, and wait for the system to start searching for satellites. In the RTK Settings page, the status of the aircraft’s positioning in the status table will show “FIX” to indicate that the aircraft has obtained and used the differential data from the mobile station. -
Page 37: Expansion Ports
MATRICE 300 RTK User Manual On the precondition that connection between a DJI aircraft and the pilot remote controller is stable, when the system confirms the possibility of a collision, it will send a series of warnings based on the distance between drone and airplanes or helicopters. We recommended that the operator descend altitude immediately after the first warning to avoid a collision, choosing another flight path where necessary. Warning Escalation: The first (or "lowest") level warning occurs when the manned aircraft is detected. All detected aircraft will be displayed in the app (up to 10 aircraft at a time). Please pay attention to ensure flight safety. -
Page 38: Ip45 Protection Rating
MATRICE 300 RTK User Manual IP45 Protection Rating Under stable laboratory conditions, the M300 RTK achieves an IP45 protection rating by IEC60529 standards when equipped with TB60 Intelligent Flight Batteries. However, this protection rating is not permanent and may reduce over time after long-term use. DO NOT fly when the amount of rainfall exceeds 100 mm / 24 h. DO NOT fold the frame arms in the rain. Make sure the battery ports, battery compartment ports, battery surfaces, and battery compartment surfaces are dry before inserting the batteries. Make sure the battery ports and battery surfaces are free from any liquid before charging the batteries. Before packing the aircraft into the carrying case, ensure that it is free from any liquid by wiping it carefully. Product warranty does not cover water damage. The aircraft does not achieve IP45 protection rating in the following circumstances: Folded frame arms. You use batteries other than the M300 RTK's TB60 Intelligent Flight Batteries. The cover for the ports are not attached correctly. The weatherproofing top shell plug is not firmly attached to the top shell. The aircraft is broken due to various reasons, such as broken aircraft shell, failure of the waterproof adhesive, etc. - Page 39 Remote Controller This section describes the features of the remote controller that includes aircraft and remote controller operations. © 2020 DJI All Rights Reserved.
-
Page 40: Remote Controller
Remote Controller Profile The DJI Smart Controller Enterprise (hereinafter referred to as “Smart Controller”) features OcuSync Enterprise technology, capable of controlling aircraft that supports this technology, and providing a live HD view from the aircraft's camera. It can transmit image data at distances of up to 9.32 mi (15 km) and comes with a number of aircraft and gimbal controls as well as some customizable buttons. * The built-in 5.5-inch high brightness 1000 cd/m² screen has a resolution of 1920×1080 pixels, featuring an Android system with multiple functions such as Bluetooth and GNSS. In addition to supporting Wi-Fi connectivity, it is also compatible with other mobile devices for more flexible usage. The Smart Controller has a maximum working time of 2.5 hours with the built-in battery. When using the WB37 Intelligent Battery, the maximum working time can be e xtended to 4.5 hours. ** * The Smart Controller can reach maximum transmission distance (FCC) in an unobstructed area with no electromagnetic interference at an altitude of about 400 feet (120 meters). The actual maximum transmission... - Page 41 MATRICE 300 RTK User Manual External Battery 1. Connect the Battery Station to a power outlet (100-120 Vac, 50-60 Hz / 220-240 Vac, 50-60 Hz). 2. Press the Power Button once to turn on the Battery Station. 3. Insert the batteries into the Battery Ports to start charging. The Battery Station will charge the battery with the highest remaining battery power first. Power Outlet Mounting the WB37 Intelligent Battery Press and hold the battery release button. Insert the Intelligent Battery into the battery compartment. Make sure the bottom of the battery is aligned to the marking line in the compartment. Push the battery to the bottom. To remove the Intelligent Battery, press and hold the battery release button, then push the battery upward.
- Page 42 MATRICE 300 RTK User Manual Remove the dongle compartment cover. Insert the dongle into the USB port with the SIM card inserted into the dongle. Reattach the cover firmly. Adjusting the Antennas Lift the antennas and adjust them. The strength of the Smart Controller signal is affected by the position of the antennas. When the angle between the antennas and the back of the Smart Controller is 80° or 180°, the connection between the Smart Controller and aircraft can reach its optimal performance.
- Page 43 MATRICE 300 RTK User Manual Mounting the Mobile Device Ensure that Part B is Lock the Mounting Use a coin or the unlocked. Connect Bracket. screwdriver included to Part B to Part A. adjust the tightness of the tilt axis. Press the button to release the clamp. P l a c e y o u r m o b i l e device and adjust the clamp to secure.
-
Page 44: Remote Controller Operations
MATRICE 300 RTK User Manual Remote Controller Operations Checking the Battery Level and Turning On Checking the Internal Battery Level Check the internal battery level according to the Battery Level LEDs. Press the power button once to check it while turned off. Press the power button once, press again and hold for a few seconds to turn on / off the Smart Controller. - Page 45 Scroll to the bottom, tap “Remote Controller Linking” and tap “OK” to confirm. 4. The status LED blinks blue and the remote controller beeps twice to indicate the linking has started. 5. Press the linking button on the aircraft. The remote controller's status LED will be solid green if the linking is successful. Method 3: Using Quick Settings 1. Power on the remote controller and the aircraft. 2. Swipe down from the top of the screen to open Quick Settings. Tap to start linking. 3. The status LED blinks blue and the remote controller beeps twice to indicate the linking has started. 4. Press the linking button on the aircraft. The remote controller's status LED will be solid green if the linking is successful. Make sure the remote controller is within 1.6 ft (0.5 m) of the aircraft during linking. Make sure the remote controller is connected to the internet when logging in using a DJI account. © 2020 DJI All Rights Reserved.
- Page 46 MATRICE 300 RTK User Manual Operating the Aircraft Controlling the Aircraft This section explains how to control the orientation of the aircraft through the remote controller. Control can be set to Mode 1, Mode 2 or Mode 3, or to a custom mode. Mode 1 Left Stick Right Stick Forward Down Backward Left Right Turn Left Turn Right Mode 2 Left Stick Right Stick Forward Down Backward Left Right Turn Left...
- Page 47 MATRICE 300 RTK User Manual Remote Controller Aircraft Remarks (Mode 2) Moving the left stick up and down changes the aircraft’s elevation. Left Stick Push the stick up to ascend and down to descend. When both sticks are centered, the aircraft will hover in place. The more the stick is pushed away from the center position, the faster the aircraft will change elevation. Down Always push the stick gently to prevent sudden and unexpected elevation changes. Moving the left stick to the left or right controls the rudder and rotation of the aircraft. Push the sick left to rotate the aircraft counter clockwise, and push the stick right to rotate the aircraft clockwise. If the stick is centered, the aircraft will maintain its current orientation. Turn Left Turn Right The more the stick is pushed away from the center position, the faster the aircraft will rotate. Forward Moving the right stick up and down changes the aircraft’s...
- Page 48 MATRICE 300 RTK User Manual Flight Mode Switch Toggle the switch to select the flight mode. Choose between T-mode, P-mode, and S-mode. Position Flight Mode T-mode (Tripod) Position T P-mode (Positioning) Position P S-mode (Sport) Position S T-mode (Tripod): The aircraft utilizes GNSS and vision systems to locate itself, stabilize, and navigate between obstacles. In this mode, the maximum flight speed is limited to 15.7 mph (25.2 kph). The responsiveness to stick movements is also reduced for smoother, more controlled movement.
- Page 49 MATRICE 300 RTK User Manual Optimal Transmission Zone Try to keep the aircraft inside the optimal transmission zone. If the signal is weak, adjust the antennas or fly the aircraft closer. 80° Make sure the antennas are facing towards the aircraft. When the angle between the antennas and the back of the Smart Controller is 80° or 180°, the connection between the remote controller and the aircraft can reach its optimal performance. Note that the illustrations above do not reflect the actual distances between the user and aircraft and are for reference only. Avoid using wireless devices that use the same frequency bands as the Smart Controller. In real operation, the DJI Pilot app will issue a prompt to warn that the transmission signal is weak, and please adjust the antennas to ensure that the aircraft is back to the optimal transmission range.
-
Page 50: Advanced Dual Operator Mode
MATRICE 300 RTK User Manual The right dial controls the gimbal pan. Turn the dial to the right, and the gimbal will shift clockwise. Turn the dial to the left, and the gimbal will shift counter clockwise. The camera will remain in its current position when the dial is static. Advanced Dual Operator Mode Introduction The M300 RTK supports Advanced Dual Operator Mode, which allows two remote controllers to connect to the same aircraft. In this mode, two remote controllers are of the same priority and have no pre-assigned roles. During operation, two pilots compete for control based on their requirements and decide which onboard device such as aircraft, gimbal and camera can be operated currently, making it more flexible to operate. There are two types of control, including aircraft flight control and gimbal control. For the remote controller with aircraft flight control, it can control the orientation of the aircraft. For the remote controller... -
Page 51: Video Transmission Descriptions
MATRICE 300 RTK User Manual 4. When a user has aircraft flight control, press and hold the Control Lock icon to lock the aircraft flight control on the Camera page of the FPV camera. 5. If a remote controller can only control the gimbal, it can use control sticks. If a user has both aircraft flight control and gimbal control, he/she can use control sticks to control the orientation of the aircraft, and gimbal dial to control the gimbal. 6. When operating in Dual Remote Control Mode, control switching will be triggered if one remote controller is disconnected to an aircraft. At this point, gimbal control that the disconnected remote... -
Page 52: Display Interface
MATRICE 300 RTK User Manual Display Interface Homepage The screen displays the homepage when the Smart Controller is powered on. 11:30 11:30 MATRICE M300 RTK Pilot 1. DJI Smart Controller Expansion Kit Connection Status Displayed when the DJI Smart Controller Expansion Kit is connected. 2. Battery Level Displays the internal and external battery level of the remote controller. 3. Time Displays local time. 4. DJI Pilot Tap to enter DJI Pilot. The button is blue if the remote controller is linked to the aircraft. Users can tap to enter camera view after logging in using a DJI account. 5. Gallery Tap to check stored images and videos. 6. App Center Tap to check all applications including GEO Zone, DJI Pilot, Settings, File Manager, and any third- party apps that users have downloaded and installed. Refer to the App Center section for more... - Page 53 MATRICE 300 RTK User Manual App Center to enter App Center. Users can find default system apps and third-party apps that have been downloaded. Tap to find the System Settings and GEO Zone. The App Center is subject to change in future To move an app, hold the icon and move the app to where you wish to place it. To delete the app, hold the icon and drag it to the top of this page. Note that default system apps cannot be deleted. Flight Restriction Info provides related flight restriction information. Tips provides basic function introduction, aerial photography tips, view and share instructions. Manage videos, photos, files and SD card in File Manage. The system comes with the Lightning Browser. Press Settings to be able to configure settings such as button combinations, control stick navigation, date & time, languages, Wi-Fi, and Bluetooth. The remote controller comes with the DJI Pilot app. Tap Quick Start Guide to read related manuals. DJI bears no responsibility for the safe use of or compatibility support for third-party apps. If a third-party app is affecting the performance of the Smart Controller, try to delete the third-party apps or reset the Smart Controller to factory settings. To reset the Smart Controller to factory settings, go to Factory Data Reset under Settings. © 2020 DJI All Rights Reserved.
- Page 54 MATRICE 300 RTK User Manual Quick Settings Swipe down from the top of the screen to open Quick Settings. 8:13 PM Sat, Mar 30 Wi-Fi Bluetooth HDMI Linking Capture Record Recent M300 RTK The Quick Settings is subject to change in future 1 Tap an icon to enable or disable the corresponding function. Hold the icon to enter the settings of the function (if available).
- Page 55 MATRICE 300 RTK User Manual 5 Homepage : Tap to go back to the homepage. 6. Notifications : Tap to check system notifications. SRE (Sunlight Readable Enhancement) allows users to bump up the highlights or shadows of an image individually or together. This helps users see particular areas of the screen more clearly when sunlight is strong. Quick Settings vary depending on the aircraft model linked and the firmware version of the Smart Controller. Control Stick Navigation Tap Control Stick Navigation in Settings. Users can enable or disable the control sticks and 5D button to navigate on the remote controller. Control Sticks: Move up, down, right, or left to navigate. It is not possible to confirm a selection with the control sticks. 5D Button: Push up, down, right, or left to navigate. Press to confirm a selection. As the control sticks and 5D button may not be compatible with third-party apps, it is recommended to use the touchscreen to navigate when using third-party apps.
- Page 56 2. Power on the remote controller. Tap on USB data export mode. 3. Launch DJI Assistant 2, and log in using a DJI account. 4. Click the DJI Smart Controller Enterprise icon, and then“Firmware Update”. 5. Select and confirm the firmware version you want to update. 6. DJI Assistant 2 will download and update the firmware automatically. 7. The remote controller will restart after update. Using the DJI Pilot App 1. Power on the remote controller and make sure the Internet connection is functioning normally. 2. Launch DJI Pilot App, tap to enter the update page if the app shows that there is an ongoing firmware update. 3. DJI Pilot will download and update the firmware automatically. 4. The remote controller will restart after an update. Make sure the remote controller has more than 20% power before updating. DO NOT disconnect the USB cable during the update when using DJI Assistant 2. The update takes approximately 15 minutes. Make sure the remote controller or the computer is connected to the internet during the update.
- Page 57 MATRICE 300 RTK User Manual Button Combinations Some frequently-used features can be activated by using button combinations. To use button combinations, hold the back button and then press the other button. Checking the available button combinations Hold the Back button until the controller vibrates to check button combinations: 11:30 11:30 100% Press and then the corresponding button to perform an operation.
- Page 58 MATRICE 300 RTK User Manual Calibrating the Compass After the remote controller is used in places with electro-magnetic interference, the compass may need to be calibrated. A warning prompt will appear if the remote controller’s compass requires calibration. Tap the warning pop-up to start calibrating. In other cases, follow the steps below to calibrate your remote controller. 1. Enter the App Center, tap , and scroll down and tap Compass. 2. Follow the diagram on the screen to calibrate your remote controller. 3. The user will receive a prompt when the calibration is successful. Blocking Third-party Notifications To ensure safe flight, we recommend to disable third-party notifications before each flight. Follow the steps below to disable third-party notifications. 1. Enter the App Center, tap , and scroll down and tap Notifications. 2. Enable “Aerial Photography Do Not Disturb Mode”. HDMI A monitor can display the remote controller’s interface by connecting the remote controller to a monitor using a HDMI cable. Follow the steps below to enable the HDMI connection. 1. Swipe down from the top of the screen to open Quick Settings. 2. Follow the diagram on the screen to calibrate your remote controller. Tap HDMI to enable or disable the HDMI connection. Hold to enter settings and adjust HDMI resolution, rotation, output mode, and screen zoom.
- Page 59 Gimbal and Camera This section focuses on how to use the gimbal. © 2020 DJI All Rights Reserved.
-
Page 60: Gimbal And Camera
Single downward gimbal Dual downward gimbals Dual XT2+Z30, XT2+H20, XT S+Z30, XT S+H20, above single Single downward gimbals gimbal type+PSDK payload gimbal+Single upward gimbal Dual downward Triple gimbals+Single upward The above dual gimbal combinations+PSDK gimbals gimbal XT2 can only be mounted on the 1st gimbal port. It doesn't support upward gimbal/2nd gimbal port. Refer to the related gimbal and camera user manual to learn how to use the gimbal and camera. © 2020 DJI All Rights Reserved. - Page 61 DJI Pilot App This section introduces the main functions of the DJI Pilot app. © 2020 DJI All Rights Reserved.
-
Page 62: Dji Pilot App
DJI Pilot App The DJI Pilot app is specifically developed for enterprise users. Manual flight integrates a variety of professional features that make flying simple and intuitive. Mission flight supports flight planning, and allows you to control the drone automatically, making your workflow much simpler and more efficient. Mission Flight Manual Flight Album Manual Flight Camera View Enter the Camera View by tapping Manual Flight. The descriptions below use a H20T gimbal and camera as an example. The Camera View may vary when using other gimbals and cameras. - Page 63 MATRICE 300 RTK User Manual 1. Back : Tap this icon to return to the main menu. 2. System Status Bar : This icon indicates aircraft flight status and displays various warning messages. In-Flight (GPS) 3. Battery Level Indicator Bar : The battery level indicator provides a dynamic display of the battery level. The colored zones on the battery level indicator represent the power levels needed to carry out different functions.
- Page 64 MATRICE 300 RTK User Manual : Aircraft Battery Settings — Includes low battery warning thresholds, battery information, etc. : Gimbal Settings — Includes gimbal pitch and pan settings, TapZoom magnification (for the Z30 gimbal and camera), gimbal calibration, etc. RTK : RTK Settings — Includes RTK positioning function, RTK service type and their corresponding settings. : Common Settings — Includes flight route display, units of measurement, live stream, etc. 11. Message Box : Tap to read all warning messages. 12. Gimbal Oreintation Adjustment : Tap to select the Gimbal Orientation Adjustment as Gimbal Recenter, Recenter Gimbal Yaw, Gimbal Yaw Downward or Gimbal Downward. 13. Beacon : Tap to turn on / off the beacons. Will change to Discreet Mode icon once turned on. 14. Multiply Gimbal Control : Tap to enable Multiply Gimbal Control, you can control two or three gimbals’ Pitch and yaw. 15. Smart Track : Tap to enable Smart Track. Read the Smart PIN & Track section for more information. 16. PIN Point : Tap to record a location. Read the Smart PIN & Track section for more information. 17. Laser Ranging : Tap to enable Laser Rangefinder. Read the Smart PIN & Track section for more information.
- Page 65 MATRICE 300 RTK User Manual 26. Gimbal Slider : Displays the gimbal tilt angle. 27. Camera Settings Tap to enter the photo and video settings. Tap to configure photo settings such as photo mode and image format. Tap to configure video settings such as video size and format. Tap configure video caption, grid and smart LED settings (to enable/disable arm LEDs, beacon LEDs and status LEDs). The settings may vary according to different camera models. 28. Photo / Video Toggle : Tap to switch between photo and video recording modes. 29. Shutter / Record Button : Tap to shoot photos or start/stop recording. Users can also press the Shutter or Record...
- Page 66 MATRICE 300 RTK User Manual Primary Flight Display (PFD) Primary Flight Display (PFD) is a feature that can help users to fly more intuitively and easily, allowing users to see and avoid obstacles around the aircraft, as well as stop and adjust flight trajectory if necessary. 26.1v 2.4G In-Flight(GPS) 100% 26.1v 19:29 05.2 130.2 (m/s) 04.0 2.5 VS 1234.5 ASL...
- Page 67 MATRICE 300 RTK User Manual a. Aircraft: When the aircraft rotates, the navigation display rotates. b. Aircraft horizontal speed vector: Displays the aircraft direction and speed. c. Aircraft orientation: Displays the current orientation of the aircraft. d. The orientation of the three gimbals mounted on the aircraft: You can view the orientation of the gimbal relative to the aircraft in real time. When the gimbal rotates, the icon will rotate accordingly. e. Home point orientation: Displays the home position relative to the aircraft. When the home point distance exceeds 16 m, the home point resides on the edge of the navigation display. f. Home point distance: Displays the distance between the home point and the aircraft. Obstacle Avoidance Display 222m 222m 222m 222m 222m The light color areas are the obstacle avoidable areas of the aircraft, and the dark color areas are the blind spots. During flight, please avoid the aircraft speed vector line falling into the obstacle avoidance blind spot. In horizontal direction: a1. If the warning distance set in the app is greater than 16 m, once an obstacle is detected, it will...
- Page 68 MATRICE 300 RTK User Manual Laser Rangefinder (RNG) 1. Tap to enable the RNG. 2. If the center target turns red, this indicates that the laser rangefinder is currently aiming at the target, and the distance between the target and the aircraft, the latitude, longitude, and height of the target are measured. 3. The linear distance between the target and the aircraft. 4. The horizontal distance between the target and the aircraft. 26.1v 2.4G In-Flight(GPS) 100% 26.1v 19:29 Shutter Shutter AF-C ZOOM 5.0X 1/1000 1/1000 123456 123456 MENU 10 X ZOOM WIDE 1300m 300m +146.2365984, -122.1326590 05.2 130.2...
- Page 69 MATRICE 300 RTK User Manual Identifying and locking the object After entering the zoom view supporting the load in the app, Smart Track can be enabled. 1. Click to start or stop Smart Track. 2. Identify people, cars, and ships as candidate targets. You can also make gestures on the screen to select other objects as targets. 3. Click to switch target tracking to gimbal follow mode or gimbal free mode. When the user selecting other types of targets through gesturing on the screen, once a person, car or boat appears in the frame area, the person, car or boat will be selected as the target to start tracking. When selection through gestures, if the characteristics of the target are not clear, it will cause the selection to fail. 26.1v 2.4G In-Flight(GPS)...
- Page 70 MATRICE 300 RTK User Manual Tracking target (in gimbal follow mode) In gimbal follow mode, the orientation of the aircraft heading is always consistent with the gimbal, both aiming at the target. At this time, the attitude of the gimbal will be automatically adjusted so that the target can be in the center of the screen, and the user can fine-tune the field of view by triming the gimbal dial; the camera will automatically adjust the zoom to make the size of the target suitable. The Zoom Menu and the right dial on the remote control can also be used to adjust the size of the target. Target prediction: When a target is lost from the view in the app, it will predict the position of the target and display it on the screen based on the historical motion trajectory. Target search: When the target is lost from the view in the app, it will automatically search for the target based on the predicted position of the target. You can also manually control the the gimbal rotation and the camera zoom to find the target. Target positioning: The GNSS position of the target will be displayed in the navigation display and map (note that when the laser rangefinder of the H20 series gimbal and camera continues to be invalid, the target position is for reference only), the position of the target will also be displayed in the FPV view. Focus tracking: The camera focus will be actively enhanced according to the distance of the target object.
- Page 71 MATRICE 300 RTK User Manual When entering Smart Track, the camera will automatically switch to AF-C focus mode. In order to ensure the shooting effect of dynamic target, taking photos during the target tracking will not lock the gimbal. At this time, the static background may produce motion blur. Bellow scenes may have poor recognition or tracking effects: a. When used at night, the recognition may become worse. b. When the load is working at high magnification, the tracking effect may become worse. c. In an environment with poor visibility such as rain, fog and haze, the tracking effect may become worse.
- Page 72 MATRICE 300 RTK User Manual PinPoint PinPoint can only be used with the H20 series gimbal and camera. PinPoint can identify the location of the target, which is convenient for information synchronization. 1. Adjust the attitude of the aircraft and the gimbal to move the target to the center of the view. Tap on the target in the center of the view to record the point location. 2. Record the latitude, longitude and altitude of the point. Currently only one point is supported. When the next point is recorded, the previous point information will be overwritten. 26.1v 2.4G In-Flight(GPS) 100% 26.1v 19:29 Shutter Shutter AF-C ZOOM 5.0X 1/1000 1/1000 123456 123456 MENU 10 X ZOOM WIDE 05.2 130.2 WS 04.0 1234.5 222m 1. Tap to to record a point in the center of the map. The altitude of this point is the current aircraft altitude.
- Page 73 MATRICE 300 RTK User Manual Location Sharing The target point position identified by Smart Track, PinPoint and RNG can be synchronized to other video transmission of H20 series cameras, FPV video transmission of aircraft, navigation display, map page, and DJI FlightHub*, etc. for display. *Coming soon. A. Other video transmission of H20 series cameras 1. When Smart Track is enabled, the target point is marked in green in the center. 2. When Pinoint is enabled, the target point is displayed on the screen. 3. When RNG is enabled, the target point is marked in red in the center. If Smart Track and RNG are enabled at the same time, and the target point is in the center of the view, only the green mark of Smart Track will be displayed. 26.1v 2.4G In-Flight(GPS) 100% 26.1v 19:29 Shutter Shutter WIDE 1.0X 1/1000 1/1000 123456 123456 MENU 10 X ZOOM ZOOM...
- Page 74 MATRICE 300 RTK User Manual 2. The navigation display shows the orientation and distance of the target point relative to the aircraft. If the distance is too far (the target point is not in the camera view), the icon of the target point will reside on the edge of the navigation display. 3. View the target distance of Smart Track and RNG. 4. View the target distance of PinPoint. If Smart Track and RNG are enabled at the same time, and the target point is in the center of the view, only the green mark of Smart Track will be displayed. 26.1v 2.4G In-Flight(GPS) 100% 26.1v 19:29 05.2 130.2 (m/s) 04.0 2.5 VS 1234.5 ASL...
-
Page 75: Mission Flight
MATRICE 300 RTK User Manual Mission Flight Introduction Tap to enter the mission library. Users can view the created flight routes, or newly created Waypoint flight, Mapping or Oblique Photography missons. Among them, the Mapping or Oblique Photography missions are generated by App, and the Waypoint flight can be created through Set Waypoints or Live Mission Recording. Waypoint Mapping Oblique Set Waypionts Live Use Set Waypoints to create a route by adding edit waypoints on the map. Use Live Mission Recording to create a route by adding waypoints and edit the target in the photo on the route. Moreover, users can also edit the mission during flights, when in flight editing mode. There are two functions which can be achieved: Waypoints 2.0: Edit and save the waypoints before takeoff then start flying. AI Spot-check: Edit and save the waypoints during flight, the mission will be saved after flight. Mapping Oblique Set Waypionts Live Mission Recording © 2020 DJI All Rights Reserved. - Page 76 MATRICE 300 RTK User Manual Set Waypoint Tap Create a Route, Waypoint flight, and then Set Waypoints to create a new flight route and edit waypoints. 26.1v 2.4G In-Flight(GPS) 100% 26.1v 19:29 Flight Route Name The building of mapping Select Aircraft...
- Page 77 MATRICE 300 RTK User Manual 9. Perform : Tap the button and then check the settings and status of the aircraft in the pop-up checklist. Tap the “Start to Fly”button to perform the mission. 10. Save : Tap to save current settings. Live Mission Recording Tap Create a Route, Waypoint flight, and then Live Mission Recording to record actions such as photo capture, start / stop recording and more. 26.1v 2.4G In-Flight(GPS) 100% 26.1v 19:29 Shutter Shutter ZOOM 5.0X AF-C 1/1000 1/1000 123456 123456 Waypiont 2 Photos 1 10 X ZOOM WIDE 130.2...
- Page 78 MATRICE 300 RTK User Manual 3/12 Gimbal I - H20T - wide AI Spot-check can only be used with the H20 series payload in zoom camera view. AI Spot-check takes pictures at 10 times the focal length. AI Spot-check takes pictures and flight using RTK, and the RTK base station coordinates of the taking picture and flying must be the same. AI Spot-check can support up to 750 photos. The ratio of the selection box size of the photo to the area of the whole photo cannot be less than 1/25 when using AI Spot-check. The selection box position must be in the middle of the view and the size needs to be the same as the target size. If Advanced Dual Operator Mode is in use, Controller A must be used to complete the Demo Flight and mission upload. H20 and H20T gimbal and camera should be installed on the gimbal connector port 1. In-Flight Editing Enter the mission library, select a created flight route, tap to start the mission, or tap to edit the flight route. 1. Tap to enter In-Flight Editing page. The editions will be merged into the original route after saved. 2. Tap to enter Set Waypoints page. 3. Tap to enter AI Spot-check page. 4. Flight limit infomation : Tap to see the flight limit information.
- Page 79 MATRICE 300 RTK User Manual 7. Map Mode : Tap to switch between Standard and Satellite mode. 8. Clear Screen : Tap to clear the flight path currently shown on the map. 26.1v 2.4G In-Flight(GPS) 100% 26.1v 19:29 Distance Estimated Time Waypoints Photos 0000 m 00 m 00 s 0000 0000 UAV Health Management System (UHMS) UHMS can provide error displays, error records, manage logs and maintenance instructions. Aircraft Health Management System...
-
Page 80: Album
MATRICE 300 RTK User Manual 1. Error displays Check the current health status of each module of the aircraft, and the user can solve the corresponding abnormality according to the prompt. Color Status Color Status Green Normal Orange Caution Yellow Notice Warning 2. Error records Records of historical data of the aircraft are used to confirm whether there are any serious problems during the use of the aircraft. This makes it convenient for the user to evaluate the stability of the aircraft and assist after-sales when conducting an analysis. - Page 81 Flight This section describes safe flight practices and flight restrictions. © 2020 DJI All Rights Reserved.
-
Page 82: Flight
6. The compass and GNSS will not work in Polar Regions. Fly carefully. GEO (Geospatial Environment Online) System Introduction DJI’s Geospatial Environment Online (GEO) System is a global information system committed to providing real-time airspace information within the scope of international laws and regulations. GEO provides flight information, flight times and location information to assist Unmanned Aerial Vehicle (UAV) users in making the best decisions related to their personal UAV use. It also includes a unique Regional Flight Restrictions feature which provides real-time flight safety and restriction updates and blocks UAVs from flying in restricted airspace. While safety and obeying air traffic control laws is a paramount... -
Page 83: Flight Restrictions
Restricted Zones: Flights are completely prohibited. UAVs cannot fly in these zones. If you have obtained permission to fly in a Restricted Zone, please go to https://www.dji.com/flysafe or contact flysafe@dji.com to unlock the zone. DJI GEO Zones aim to ensure the user’s flight safety, but it cannot be guaranteed to be in full compliance with local laws and regulations. Users should check local laws, regulations, and regulatory requirements before each flight and are responsible for the flight safety. - Page 84 MATRICE 300 RTK User Manual Maximum Flight Altitude Max Radius Home Point Height of aircraft when turned on Strong GNSS Signal Restriction Description DJI Pilot App Message Aircraft's altitude cannot exceed Maximum Flight Altitude reached. Adjust Max Altitude the specified value. your altitude using FC Settings if required. Flight distance cannot exceed Maximum Flight Distance reached. Adjust Max Radius the specified value. your distance using FC Settings if required. Weak GNSS Signal Restriction Description DJI Pilot App Message Altitude is restricted to 26 ft. (8 m) when GNSS signal is weak and the Vision Maximum Flight Altitude reached. Max Altitude System is activated. Altitude is restricted Adjust your altitude using MC to 98 ft. (30 m) when GNSS signal is weak Settings if required. and the Vision System is deactivated.
- Page 85 MATRICE 300 RTK User Manual GEO Zone Flight Restrictions GEO Zone Description Takeoff: The aircraft’s motors cannot be started. In-flight: When GNSS signal changes from weak to strong, DJI Pilot starts a countdown. Once the countdown is over, the aircraft immediately lands in Restricted Zone semi-automatic descent mode and turns off its motors after landing. In-flight: When the aircraft approaches the boundary of the Restricted Zone, it automatically decelerates and hovers. Takeoff: The aircraft’s motors cannot be started. Takeoff is only available after submitting an unlock request with the user’s phone number. Authorization Zone In-flight: When GNSS signal changes from weak to strong, DJI Pilot starts a countdown. Once the countdown is over, the aircraft immediately lands in semi-automatic descent mode and turns off its motors after landing. Enhanced Warning Zone The aircraft flies normally but the user is required to confirm the flight path. Warning Zone The aircraft flies normally but the user receives warning messages. When GNSS signal is strong, the aircraft cannot exceed the specified altitude. In-flight: When GNSS signal changes from weak to strong, if the aircraft is higher than the height limit, the aircraft will descend and hover below the altitude limit. Altitude Zone When the GNSS signal is strong, the aircraft approaches the boundary of the Altitude Zone. If it is higher than the altitude limit, the aircraft decelerates and hovers in place. When the GNSS signal changes from weak to strong, if the aircraft is higher than the height limit, DJI Pilot app starts a countdown. Once the countdown is over, the aircraft will descend and hover below the altitude limit.
-
Page 86: Geo Unlocking
9. DO NOT face the battery connector downwards to the ground to avoid getting dust or water into the battery connector. 10. Make sure that the gimbal dampener is without obvious wear and tear, and the gimbal anti-drop rope has been fastened. Calibrating the Compass Only calibrate the compass when the DJI Pilot app or the status indicator prompts you to do so. Observe the following rules when calibrating your compass: DO NOT calibrate your compass where there is a chance of strong magnetic interference, such as near magnets, parking structures, or steel reinforcements underground. DO NOT carry ferromagnetic materials with you during calibration such as cellular phones. - Page 87 MATRICE 300 RTK User Manual Calibration Procedures Choose an open area to carry out the following procedures. 1. Tap the Aircraft Status Bar in the app and select Calibrate, then follow the on-screen instructions. 2. Hold the aircraft horizontally and rotate it 360 degrees. The Aircraft Status Indicators will go solid green. 3. Hold the aircraft vertically, with the nose pointing downward, and rotate it 360 degrees around the center axis. Re-calibrate the aircraft if the aircraft status indicators blink red. If the Aircraft Status Indicator blinks red and yellow after the calibration procedure, move your aircraft to a different location and try again. DO NOT calibrate the compass near metal objects such as a metal bridge, cars, scaffolding. If the aircraft status indicators are blinking red and yellow alternately after placing the aircraft on the ground, the compass has detected magnetic interference. Please change your location. © 2020 DJI All Rights Reserved.
-
Page 88: Flight Test
MATRICE 300 RTK User Manual Starting/Stopping the Motors Starting Motors The Combination Stick Command (CSC) is used to start the motors. Push both sticks to the bottom inner or outer corners to start the motors. Once the motors start spinning, release both sticks simulta- neously. Stopping the Motors There are two ways to stop the motors: 1. When the aircraft has landed, push and hold the left stick down. The motors will stop after three seconds. (Recomended). 2. When aircraft has landed, push the left stick down , then conduct the same CSC that was used to start the motors, as shown above . Motors will stop immediately. Release both sticks once motors stop. Method 1... -
Page 89: Three-Propeller Emergency Landing
Once such a failure occurs, please move the aircraft immediately away from people and valuables, and land on a level and soft surface (e.g. grass) to reduce damaging the aircraft. If a propeller is damaged but the motor is still working normally, the aircraft will not enter the Three-propeller Emergency Landing Mode. Three-propeller Emergency Landing is only used as an emergency protection function when the propulsion system fails. Please do not actively trigger it. Make sure that all firmware is up-to-update. After landing, contact DJI support for the propulsion system maintenance as soon as possible. © 2020 DJI All Rights Reserved. - Page 90 Appendix © 2020 DJI All Rights Reserved.
-
Page 91: Appendix
±1.5 m (P-mode with GPS) ±0.1 m (D-RTK) Max Angular Velocity Pitch: 300°/s, Yaw: 100°/s Max Pitch Angle 30° (P-mode and Forward Vision System enabled: 25°) Max Ascent Speed 6 m/s Max Descent Speed (vertical) 5 m/s Max Descent Speed (tilt) 7 m/s Max Horizontal Speed 23 m/s Max Service Ceiling Above Sea Level 5000 m (with 2110 Propellers, and takeoff weight ≤7 kg) / 7000 m (with 2195 High Altitude Low Noise Propellers, and takeoff weight ≤7 kg) Max Wind Resistance 15 m/s Max Forward Flight Time (Sea level) 45 minutes (Load weight 700 g) Max Hover Time (Sea level) 43 minutes (Load weight 700 g) Motor Model 6009 Propeller Model 2110 Supported DJI Gimbals Zenmuse XT2 / XT S / Z30 / H20 / H20T Supported Gimbal Configurations Dual Downward Gimbals, Single Upward Gimbal, Single Downward Gimbal, Single Downward Gimbal+Single Upward Gimbal, Dual Downward Gimbals+Single Upward Gimbal © 2020 DJI All Rights Reserved. - Page 92 MATRICE 300 RTK User Manual Other Supported DJI Products CSM Radar, Manifold 2 Ingress Protection Rating IP45 GNSS GPS+GLONASS+BeiDou+Galileo Operating Temperature -20° to 50°C (-4° to 122° F) Smart Controller OcuSync Enterprise Operation 2.400 - 2.4835 GHz; 5.725 - 5.850 GHz* Frequency Range Max Transmission Distance NCC / FCC: 15 km (Unobstructed, free of CE / MIC: 8 km interference) SRRC: 8 km Transmitter Power (EIRP) 2.400 - 2.4835 GHz: 29.5 dBm (FCC); 18.5 dBm (CE) ; 18.5 dBm (SRRC); 18.5 dBm (MIC) 5.725 - 5.850 GHz: 28.5 dBm (FCC); 12.5 dBm (CE); 20.5 dBm (SRRC) External Battery Name: WB37 Intelligent Battery Capacity: 4920 mAh; Voltage: 7.6 V Battery Type: LiPo; Energy: 37.39 Wh Charge Time (Using BS60 Intelligent Battery Station): 70 min (15° to 45° C); 130 min (0° to 15° C) Built-in Battery Battery Type: 18650 Li-ion (5000 mAh @ 7.2 V) Charge Type : Supports USB charger rated 12 V / 2 A...
- Page 93 MATRICE 300 RTK User Manual Intelligent Flight Battery Capacity 5935 mAh Voltage 52.8 V Battery Type LiPo 12S Energy 274 Wh Net Weight (Single One) Approx. 1.35 kg Operating Temperature -4° to 122°F (-20° to 50°C) Storage Temperature 71.6° to 86°F (22° to 30°C) Charging Temperature 41° to 104°F (5° to 40°C) Max Charging Power 470 W Auxiliary Light Effective Illumination Distance Illumination Mode 60 Hz, solid on FPV Camera Resolution 960p 145° Frame rate 30fps * Local regulations in some countries prohibit the use of the 5.8 GHz and 5.2 GHz frequencies and in some regions the 5.2 GHz frequency band is only allowed for indoor use.
-
Page 94: Firmware Update
Use the DJI Pilot app or the DJI Assistant 2 for Matrice to update the remote controller, aircraft and other connected DJI devices. For the Zenmuse H20, H20T, Z30, XT S and XT2, only aircraft firmware can be updated via DJI Assistant 2 for Matrice or the DJI Pilot app. Gimbal firmware must be updated via a microSD card. Using DJI Pilot 1. Ensure that there is good connection between the aircraft and remote controller and other DJI devices used with the aircraft, and that all the devices are powered on. 2. Go to the app. A prompt will appear if new firmware is available for download. Follow the on-screen instructions to update the firmware. Make sure to connect to the Internet when downloading the firmware. For the Zenmuse H20, H20T, and DJI ENTERPRISE X-Port, updates are supported via the app. -
Page 95: Using The Upward Gimbal Connector
MATRICE 300 RTK User Manual Using the Upward Gimbal Connector The Matrice 300 RTK Upward Gimbal Connector is used to mount a compatible payload to the top of the Matrice 300 RTK aircraft. Its design gives it an IP45 Ingress Protection (only when equipped with a waterproof payload), in accordance with the global IEC 60529 standard. Using the Dual Gimbal Connector The Matrice 300 RTK Dual Gimbal Connector is used to mount a compatible payload to the bottom of the Matrice 300 RTK aircraft. Its design gives it an IP45 Ingress Protection (only when equipped with a waterproof payload), in accordance with the global IEC 60529 standard. 1. Remove the single downward gimbal connector. © 2020 DJI All Rights Reserved. - Page 96 MATRICE 300 RTK User Manual 2. Attach the Dual Gimbal Connector, and connect the cables. Torque: 0.48±0.05 kg 1st gimbal port © 2020 DJI All Rights Reserved.
-
Page 97: Using The Csm Radar
MATRICE 300 RTK User Manual Using the CSM Radar Installing and Connecting CSM Radar can be used with M300 RTK. Follow the steps below to install and connect it. Using For an added safety measure, a Circular Scanning Millimeter-Wave (CSM) Radar with a detection range between 1 to 30 m can be mounted on top of the aircraft. Detection Range Detection angle: 360 ° in horizontal direction, ± 15 ° in vertical direction, and ± 12 ° in upper direction Detection distance: 1.5-30 m. ±12° ±15° ±15° © 2020 DJI All Rights Reserved. - Page 98 MATRICE 300 RTK User Manual Note that the aircraft cannot sense obstacles that are not within the detection range. Fly with caution. The effective detection distance varies depending on the size and material of the obstacle. For example, when sensing strong reflective objects (such as buildings), the effective detection distance is around 15 m. When sensing weak reflective objects (such as dry tree branches), the distance is around 10 m. Obstacle sensing may malfunction or be invalid in areas outside of the effective detection distance. Obstacle Avoidance Function Usage The radar obstacle avoidance function should be enabled in the DJI Pilot App. Set the aircraft safety distance (recommended to be greater than 2.5 meters) in app. It is recommended to fly higher than 4 meters to obtain better obstacle avoidance performance. DO NOT touch or let your hands or body come in contact with the metal parts of the radar module when powering on or immediately after flight as they may be hot. In Manual operation mode, users have complete control of the aircraft. Pay attention to the flying speed and direction when operating. Be aware of the surrounding environment and avoid the blind spots of the radar module. If another device is installed on the aircraft (such as Manifold 2), please avoid blocking the radar FOV. If the radar FOV is blocked, the obstacle avoidance performance radar may decrease. Please fly with caution.
- Page 99 MATRICE 300 RTK User Manual Carrying Case Description 1. Propeller ×4 2. Landing Gear 3. Aircraft Protector 4. Remote Controller 5. Remote Controller Lanyard 6. Upward Gimbal Connector 7. WB37 Intelligent Battery 8. USB Charger 9. Aircraft Body 10. CSM Radar 11. iPad 12. Gimbal and Camera (H20 / H20T) 13. TB60 Intelligent Flight Battery © 2020 DJI All Rights Reserved.
- Page 100 DJI Support https://www.dji.com/support This content is subject to change. Download the latest version from https://www.dji.com/matrice-300/downloads If you have any questions about this document, please contact DJI by sending a message to DocSupport@dji.com. Copyright © 2020 DJI All Rights Reserved.
Need help?
Do you have a question about the MATRICE 300 RTK and is the answer not in the manual?
Questions and answers