Advertisement
Quick Links
Advertisement

Related Manuals for RTA Techni Mobili RTA-0039LC


Summary of Contents for RTA Techni Mobili RTA-0039LC
- Page 1 RTA-0039LC ASSEMBLY INSTRUCTIONS Thank you for purchasing one of our products. Please no not discard this manual, the cartons or the packaging material until the unit has been completely assembled. Please read carefully the assembly instructions before the installation.
-
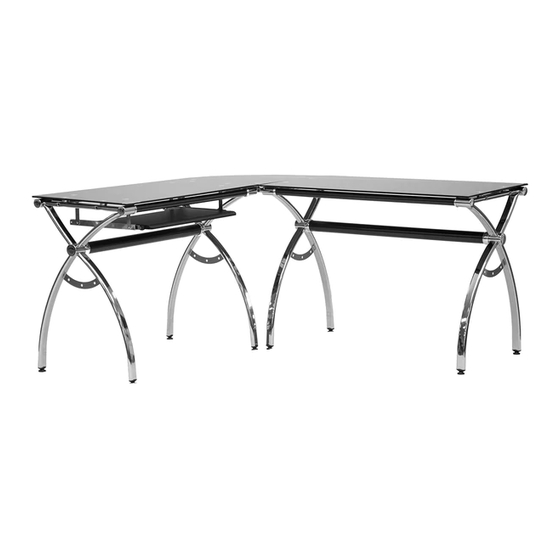
Page 2: Product Dimensions
RTA-0039LC PRODUCT DIMENSIONS GENERAL DIMENSIONS: SHORT SIDE: 55” LONG SIDE: 60.75” HEIGHT: 30” NET WEIGHT: 100 Lbs. SHIPS IN 2 BOXES. 8mm thick Floor to bottom tempered of keyboard glass tray: 25.75” MAXIMUM WEIGHT CAPACITIES (DO NOT EXCEED THESE LIMITS) 66 Lbs. -
Page 3: Main Parts List
RTA-0039LC MAIN PARTS LIST Right Short Glass. Left Left Right Structure 35.5” x 19.5” Structure Structure Structure (90cmx50cm) Corner Glass Long Glass Keyboard Corner r = 19.5” 41.25” x 19.5” Panel Structure (50cm) 105cm x 50 cm) Short Central Tube... - Page 4 SKU 86333 MAIN PARTS LIST Screw Screw Screw Screw 12mm 8x80mm 6x65mm 6x25mm Screw Screw 6x9mm 4x5mm Stud O’ ring Washer Cap nut #6, Ø 30mm. Ø 8mm Ø 8mm Allen Key Allen Key Wrench 10mm You will also need a screwdriver that is not included with the product.
- Page 5 RTA-0039LC ⚠ BEFORE YOU START THE ASSEMBLY, PLEASE READ THE FOLLOWING TIPS AND WARNINGS. ☛ Do a quick inventory to make sure the product contains all the parts and hardware. ☛ Missing, damaged and defective parts can be replaced at no cost to you. Please refer to the CONTACT and the WARRANTY cards included with the product.
-
Page 6: Assembly Steps
RTA-0039LC ASSEMBLY STEPS Insert the studs (1) into the bottom of all the structures (A), (B), (C) and (D) as shown. 1: x8 #6, Ø30mm Using screws (U) and O’ rings (2), assemble the structure (A) to the central tube (J) and top tubes (L), with connectors (Q) and (R) in between as shown. - Page 7 RTA-0039LC Using screws (U) and O’ rings (2), assemble the structure (B) to the tubes (J) and (L), with the connectors (Q) and (R) in between as shown. U: x3 8x80mm 2: x3 Ø8mm Q: x2 R: x1 Insert the covers (S) to the top tubes, and the covers (T) to the central tube as shown.
- Page 8 RTA-0039LC Using screws (U) and O’ rings (2), assemble the top tubes (M) and central tube (K) in between the structures (C) and (D), with the connectors (Q) y (R) in between as shown, and in the same way as in steps 2 and 3.
- Page 9 RTA-0039LC THIS DESK CAN BE ASSEMBLED 3 WAYS: 1) WITH THE SHORT SECTION (KEYBOARD) TO THE LEFT. 2) WITH THE SHORT SECTION (KEYBOARD) TO THE RIGHT. 3) AS 2 SEPARATE TABLES (WITHOUT THE CORNER SECTION). STEP #7 EXPLAINS HOW TO DO THE CONFIGURATIONS.
- Page 10 P.10 RTA-0039LC P.10 Once you have decided which configuration you will use for your desk, place the structures close to each other as shown: To have the short section (keyboard) on the RIGHT: To have the short section (keyboard) on the LEFT: To leave as 2 separate tables, just skip the steps 8 and 9, and continue with step 10.
- Page 11 P.11 RTA-0039LC P.11 Assemble loosely the corner glass (G) to the corner structure (I) using screws (W) and washers (3) for the holes on the arc, and use screw (Y) for the inside corner hole as shown. Do not tighten any screws yet!
- Page 12 P.12 RTA-0039LC P.12 Assemble loosely the short rectangular glass (F) to the long section using screws (W) and washers (3) as shown. Do not tighten any screws yet! W: x4 6x25mm 3: x4 Ø 8mm Please keep in mind that the glasses won’t necessarily align perfectly, and might look a little uneven or small gaps might occur.
- Page 13 P.13 RTA-0039LC P.13 Assemble the supports (N) to the sliders (O) and (P) using screws (Z) as shown. N: x4 PAY ATTENTION TO THE ORIENTATION OF THE PARTS. Z: x4 4x5mm (LEFT) THE TABS GO FACING DOWN. (RIGHT) Assemble the supports (N) to the metal discs on the short rectangular glass (E) using screws (Y) as shown.
- Page 14 P.14 RTA-0039LC P.14 Place the keyboard panel (H) over the tabs of the sliders (O) and (P), and assemble the panel using screws (X) as shown. X: x4 12mm PAY ATTENTION TO THE ORIENTATION OF THE PANEL.
- Page 15 P.15 RTA-0039LC P.15 ⚠ AFTER THE ASSEMBLY IS DONE, PLEASE READ THE FOLLOWING WARNINGS AND ADVISES FOR CARE AND MAINTENANCE: ☛ Do not exceed the weight limits. ☛ Do not expose the surfaces to direct sunlight or to extreme environmental conditions.
Need help?
Do you have a question about the Techni Mobili RTA-0039LC and is the answer not in the manual?
Questions and answers