Advertisement
INSTALLATION – ASSEMBLY INSTRUCTIONS
TOOLS REQUIRED:
Phillips Screwdriver
PARTS and MOUNTING HARDWARE:
QTY
DESCRIPTION
1
Pentax Printer mount Housing
(Printer Housing to Armrest bracket)
4
¼ x ¾" Carriage Bolt
4
¼ Nylock Nut
4
¼ Flat Washer
1
Anti roll bracket
1
Arm Rest and bracket assembly
(Hardware for Bracket to Console or Tunnel Mount Extrusion)
4
¼ x ½ PPHMS
4
¼ Nut
4
¼ Flat Washer
Reinforcement
1
(Arm Pad to Printer Housing)
4 ¼" x ¾" Phillips flat head machine screw
2
¼ x ½" Carriage Bolt
2
¼" Nylock nut
Check for obstructions (Wires, brake lines, fuel tank, etc.) before drilling any holes!
BROTHER / PENTAX POCKET JET
PRINTER / ARM REST MOUNTS
Models - C-ARPB-101, 102, 103 and 110
¼ Drive Ratchet wrench
Plate (for Arm Pad)
Read all instructions before installing any Havis, Inc. products.
Use hardware provided with install kit
Always
!
Socket Set
PART #
C‐PM‐101
GSM32000
GSM30016
GSM31005
CM005189
C‐ARM‐103, 104 or 105
GSM33123
GSM30005
GSM31005
CM007618
GSM33087
GSM31999
GSM30016‐1
C‐ARPB‐101_INST_5‐16
Advertisement
Table of Contents

Subscribe to Our Youtube Channel
Related Manuals for Havis C-ARPB-101

Summary of Contents for Havis C-ARPB-101
- Page 1 2 ¼ x ½” Carriage Bolt GSM31999 2 ¼” Nylock nut GSM30016‐1 Always Read all instructions before installing any Havis, Inc. products. Check for obstructions (Wires, brake lines, fuel tank, etc.) before drilling any holes! Use hardware provided with install kit C‐ARPB‐101_INST_5‐16...
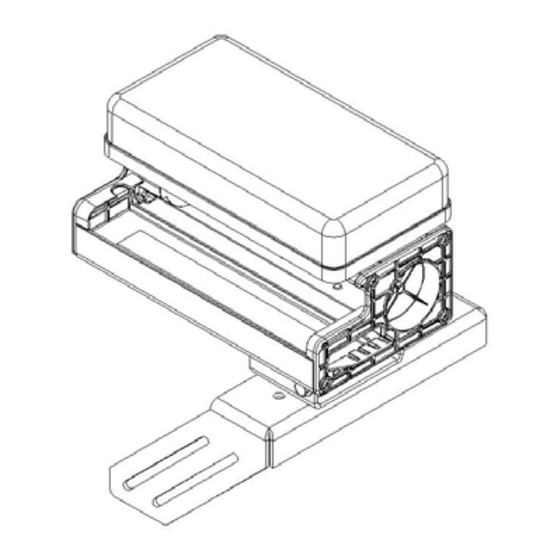
- Page 2 C-ARPB-101, 102, 103 and 110 ASSEMBLY DRAWING Arm Pad from C-ARM-XXX CM007618 Reinforcement Plate Two (2) ¼ x ½” Carriage bolts and ¼” Nylock nuts Arm Pad C-PM-101 ¼ x ¾ Flat head Printer Mount Housing machine screws End Cap and four (4) self threading Anti‐roll bracket screws CM005189 ¼ x ¾” Carriage Bolts & nuts (not shown) For attaching printer mount housing to flip up arm rest bracket C-ARM-105 C-ARM-104 C-ARM-103 Side Mount Platform Console Mount C‐ARPB‐101_INST_5‐16...
- Page 3 Installation and Assembly Notes: C-ARPB-110 does not have a C-ARM Bracket 1. Remove one end cap from the extruded printer housing. 2. Place Pentax printer into extruded housing and connect wires. 3. Reattach printer housing end cap. 4. Bolt the complete Arm Rest Printer Mount assembly to the console sides or flat surface as desired with ¼...
- Page 4 C‐ARPB‐101 C‐ARPB‐102 Console mount Tunnel or Flat Platform mount C‐ARPB‐103 C‐ARPB‐110 Side mount Flat Surface mount C‐ARPB‐102 shown in a Ford Crown Victoria. The arm rest bracket is bolted to a C‐TMW‐CV‐01 Tunnel Mount. C‐ARPB‐101_INST_5‐16...
Need help?
Do you have a question about the C-ARPB-101 and is the answer not in the manual?
Questions and answers