Table of Contents
Advertisement
Quick Links
ASSEMBLY INSTRUCTIONS
ATTENTION: THIS PRODUCT IS NOT FOR COMMERCIAL USE
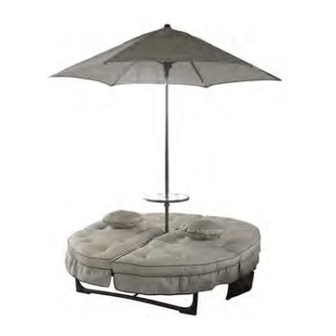
PARTS LIST
PART
MATERIAL CODE
NO.
1
KSS1008-CS01
2
KSS1008-CS02
3
KSS1004-CS02
4
KSS1008-CS04
5
KSS1008-CS05
6
KSS1004-CS03
7
KSS1004-CS04
8
KSS1008-CS08
9
17C01A0844061Y4
10
17C01A0756131Y4
11
17C01A0716072Y4
12
17C17A1306001Y4
13
17FA05040301-Y4
14
17FA08060601-Y4
!
Do not discard any of the packaging until you have checked that you have all the parts and pack of fittings.
!
Keep children away during assembly. This item contains small parts which can be swallowed by children. Children should always
be under direct adult supervision while using the product.
!
Retain the assembly instructions for future reference.
!
Please quote following FQC NO. when contacting service center.
INTENDED FOR RESIDENTIAL USE ONLY.
KSS100V
PART
SEAT BASE
SEAT BASE
MIDDLE SEAT
BACK A
BACK B
MIDDLE LEG
LEG
SEAT CROSS BRACE
BOLT M8*95
BOLT M6*48
BOLT M6*45
SCREW ST4.2*16
WASHER d6.5*D13*1.0
WASHER d8.5*D17*1.6
SERVICE CENTER TOLL FREE NO.
TEL: 1-877-539-7436
FAX: 1-877-539-7439
DON'T RETURN TO STORE!
STOP
PAGE 1 OF 5
-WM
PART
Q'TY
MATERIAL CODE
NO.
2
15
1800C23001
2
16
17D03A040401-Y4
2
17
1800337002
2
18
17KAB1101----Y4
2
19
17KAA0201----Y4
1
20
61K100VC00001BA
2
21
61K100VC50001BA
4
22
61K100VJ00001BA
2
23
61K100VG00008IA
8
24
61K100VQ00008IA
10
25
KSS1004-CS05
4
26
KSS100V-CS01
18
27
KSS1004-CS07
4
28
KSS1004-CS08
PART
PLASTIC NUT M6*P1.0
JAM NUT M8*1.25
BOLT CAP M6
NUT WRENCH 10 & 13MM
HEX.KEY WRENCH 6MM
LEFT CUSHION
RIGHT CUSHION
PILLOW
COVER BAG
COVER
LOWER CENTER PLUG
UMBRELLA
BOTTOM POLE
TABLE TOP
COURTYARD CREATIONS INC.
Q'TY
8
2
10
1
1
1
1
2
1
1
1
1
1
1
Advertisement
Table of Contents

Related Manuals for Courtyard Creations KSS100V-WM


Summary of Contents for Courtyard Creations KSS100V-WM
- Page 1 Retain the assembly instructions for future reference. Please quote following FQC NO. when contacting service center. SERVICE CENTER TOLL FREE NO. TEL: 1-877-539-7436 FAX: 1-877-539-7439 DON’T RETURN TO STORE! STOP COURTYARD CREATIONS INC. PAGE 1 OF 5...
- Page 2 You will need the following tools FIGURE 1 - Phillips Screwdriver (Not Included) - Nut Wrench (See Part #18) - Hex.Key Wrench (See Part #19) Attention: Make sure that each bolt needed for all steps match the corresponding figure to ensure proper assembly. Step 1: Fasten the middle leg (#6) in the center of the middle seats (#3) by...
- Page 3 FIGURE 5 Step 5: Fasten the back A (#4) to the middle seat (#3) by using bolts (#10). See Figure 5. NOTE: The label mark “A” on back A (#4) should be facing upwards to ensure proper assembly. #10 BOLT M6*48 FIGURE 6 Step 6: Fasten the seat cross brace (#8) to the back...
- Page 4 FIGURE 8 Step 7: Insert the bottom pole (#27) into the upper center plug on the table top (#28). See Figure 8. NOTE: The labelled arrow mark on the bottom pole (#27) should coincide with Figure 8 to ensure proper assembly. FIGURE 9 Step 8: Insert the bottom pole (#27) into the lower...
- Page 5 FIGURE 12 Step 11: Insert the umbrella (#26) into the bottom pole (#27). Make sure the spring clips on the umbrella (#26) come through the holes on the bottom pole (#27). See Figure 12. Step 12: Put the cushions (#20, #21) and the pillows (#22) on to the lounge.
Need help?
Do you have a question about the KSS100V-WM and is the answer not in the manual?
Questions and answers
I would like to replace the cushions on this product. Specifically, they are part numbers: 61K100VC00001BA & 61K100VJ00001BA. Can you help?
To replace the cushions for the Courtyard Creations KSS100V-WM:
1. Identify the cushions:
- Part number 61K100VC00001BA is the left cushion.
- Part number 61K100VJ00001BA refers to the pillows (2 pieces).
2. Place the left cushion (61K100VC00001BA) and the right cushion (61K100VC50001BA, not mentioned in the question but paired) onto the lounge.
3. Place the pillows (61K100VJ00001BA) on top of the cushions.
4. Secure the cover bag (part 61K100VG00008IA) onto the seat base using Velcro if needed.
No tools are required for cushion replacement. Simply position the cushions and pillows correctly on the lounge.
This answer is automatically generated
@Mr. Anderson Where can I order replacement cushions for the left and the right? 61K100VC00001BA & 61K100VC50001BA?