Advertisement
Quick Links
Assembly Instructions
CONTACT US FIRST
parts@prepacmfg.com
1-877-PREPAC1
1-877-773-7221
Mon - Fri
7am - 4pm PST
10am - 7pm EST
•
For help with assembly
•
If you have received a damaged or defective
part or are missing hardware.
We will process replacement parts in 2 business
days or less.Parts are shipped via UPS Ground or
mail.
Before you call please:
1)
Record the following information from the
shipping label on the outside of the box.
You will need it for warranty purposes:
Ship To Name
Sales Order Number
2)
Note the product model number.
3)
Review the contents of your shipment to
determine what you are missing.
Online Option
Fill out the Replacement Parts Order form in the Product
Support section of our website: www.prepacmfg.com
Required Tools
Optional Tools
Using a power screwdriver will
speed up assembly.
Caution
Do not over tighten any screw.
The last few turns of each screw
should be done very slowly or by
hand.
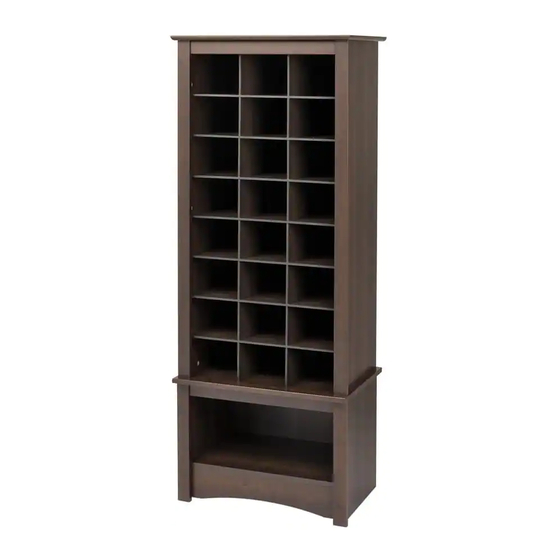
Tall Shoe Cubbie
Model # USR-0008-1
This product is shipped in
1 carton
Prepac Manufacturing Ltd.
6705 Dennett Place
Delta, BC V4G 1N4
LB-0715
2012-09-27
Advertisement

Summary of Contents for Prepac USR-0008-1
- Page 1 Tall Shoe Cubbie Assembly Instructions Model # USR-0008-1 This product is shipped in 1 carton CONTACT US FIRST parts@prepacmfg.com 1-877-PREPAC1 1-877-773-7221 Mon - Fri 7am - 4pm PST 10am - 7pm EST • For help with assembly • If you have received a damaged or defective part or are missing hardware.
-
Page 2: Hardware Identification
Hardware Identification Blue Rapid Rod (6) Large Zinc Cam (22) 24mm Green Double Ended Twister Dowel (8) Connecting Rod (4) Tige rapide bleu Ferruure en zinc grande RM-0583 RM-0103 Goujon de torison vert Vis d’assemblage double RM-0501 RM-0567 2” Confirmat Screw (4) Screw Cover Caps (4) Cam Cover Cap (14) Plastic Dowel (10) - Page 3 Tall Shoe Cubbie Parts Top (1) TP-10034-B black / noir TP-10034-E espresso Top Moulding (2) Moulure supérieure TR-10034-B black / noir TR-10034-E espresso Upper Sides (2) Côtés supérieur SG-10031-B black / noir SG-10031-E espresso Lower Left Side (1) Côté gauche inférieur SL-10036-B black / noir SL-10036-E espresso Lower Right Side (1)
- Page 4 Step 1 Estimated Time: 5 Minutes Screw green twister dowels into the lower left (C6) and right sides (C7) where shown Vissez les goujons de torison vert aux côtés gauche (C6) et droit (C7) inférieur comme montre Green Twister Dowel Goujon de torsion vert Step 2 Estimated Time: 10 Minutes...
- Page 5 Step 3 Estimated Time: 10 Minutes Gently hammer plastic dowels into the short side moldings (C9). Doucement martelez les goujons en plastique dans les moulures latérale courtes (C9) Attach the short side moldings (C9) Using your hands, apply even pressure to moldings and press firmly Attachez les moulures latérale courtes (C9) Utiliser vos mains, s’appliquer même de la pression...
- Page 6 Step 4 Estimated Time: 5 Minutes Gently hammer plastic dowels into ONE of the top moldings (C4). Then, attach it to the middle shelf (C10) . Doucement martelez les goujons en plastique dans UNE des moulures supérieur (C4). Puis, l’attacher une à l’étagère du milieu (C10) Tightening Cams Step 5...
- Page 7 Step 6 Estimated Time: 5 Minutes Tightening Cams Serrez les ferrures Attach UPPER sides (C5) to the middle shelf (C10) and tighten cams. Attacher les côtés SUPERIEURE (C5) à l’étagère du milieu (C10) et serrez les ferurres Unlocked Locked Turn 210º verrouillé...
- Page 8 Step 8 Estimated Time: 5 Minutes Attach the second top molding (C4) to the top (C3) Attachez la deuxième moulure supérieur (C4) au dessus (C3). Screw green twister dowels into the Top (C3) Vissez les goujons de torison vert au dessus (C3) Insert cams into upper sides (C5), attach the top (C3) then, tighten cams.
- Page 9 Step 9 Estimated Time: 10 Minutes Push blue rapid rods into the long side moldings (C8) Poussez les tiges rapides bleues aux moulures latérale longues (C8) Blue Rapid Rods Tiges rapides bleues Attach the long side moldings (C8) to upper sides (C5) and tighten cams Attachez une les moulures latérale longues (C8) aux côtés supérieur (C5) et serrez les...
- Page 10 Step 10 Estimated Time: 5 Minutes Interlock the horizontal (C1) and vertical (C2) dividers as shown Finished Edges Enclenchez les diviseurs horizontaux Côtés fini (C1) et verticaux (C2) comme montré. Finished Edges Côtés fini Taller at the top plus grands au dessus Stand the assembled dividers upright.
- Page 11 Step 11 Estimated Time: 5 Minutes Attach both backers (C13) & (C14) with nails Attachez les deux dos (C13) & (C14) avec les clous ¾” Nail Clou ¾” Step 12 Estimated Time: 2 Minutes Cover all cams on top section with cam covers Couvrez toutes les cames sur la section supérieure avec les couvertures de cames Page 11 of 12...
- Page 12 Step 13 Estimated Time: 15 Minutes Attaching the Cable Tie Attacher et Utilisation de l’Attache de Câble We strongly recommend using a cable tie on all Nous recommandon utilisant fortement une attache furniture, especially if small children have access de câble sur tous les meubles, surtout si les petits enfants ont accès.


Need help?
Do you have a question about the USR-0008-1 and is the answer not in the manual?
Questions and answers