Table of Contents
Advertisement
Quick Links
Advertisement
Table of Contents

Subscribe to Our Youtube Channel
Related Manuals for Vacron CDR-E06


Summary of Contents for Vacron CDR-E06
- Page 1 Vehicle Digital Video Recorder Manual 2011 JAN. V1.0 Optional...
-
Page 2: Table Of Contents
CONTENTS A. Features ................. 1 B. Specifications ................ 2 C. Front Panel ................ 3 D. Rear Panel ................ 3 E. Dimension ................ 4 F. Recording and Stop Recording .......... 4 G. Playback ................ 5 H. CF Card Record Files Illustration ........ 10 I. Format CF Card .............. 11 ... -
Page 3: Features
Features The image quality is clear and uninterrupted at speed 120km/Hr. Video Output Switch: Select Rear view camera or camera for DVR to display on LCD. Recording formats: D1. With external Noise-canceling microphone, video and audio can be recorded synchronously. The video player is built in the CF card. -
Page 4: Specifications
Specifications Items Specifications 1 Vp-p composite video input, 75 ohms Video signal Input 1 Vp-p composite video output, 75 ohms Video signal output 11V~ 14.5V (Suitable for Motorcycles and Cars) Voltage Range Power consumption: +12V @ 400mA (Without cameras) Operating ℃... -
Page 5: Front Panel
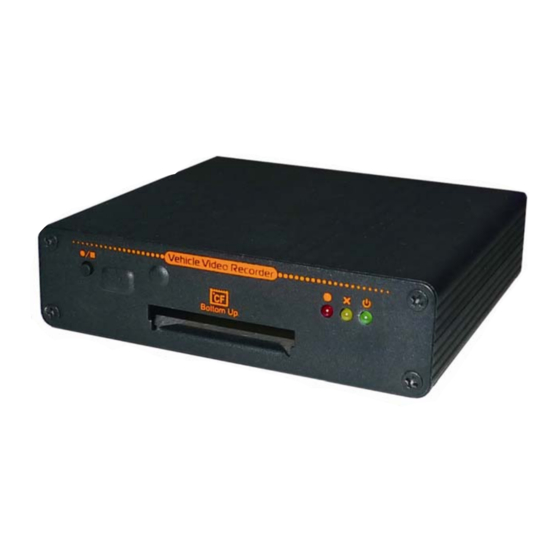
Front Panel Yellow LED (Error) Audio Record / Stop Green LED (Power On) CF Card Slot RED LED (REC) Slow Flashing: Recording video and audio Fast Flashing: Recording video only. Rear Panel Video Out Audio In Video In Power In Camera Input GPS Mouse 1. -
Page 6: Dimension
Dimension UNIT: mm Recording and Stop Recording Yellow LED (Error) Green LED (Power On) Red LED (REC) 1. Turn on/Recording: Turn on the power and wait for 1 minute. When the buzzer beeps (one long and two short beeps), System Initialization is completed. During the recorder booting up, the three LED lights will light up at the same time. -
Page 7: Playback
Playback 1. How to read the files from CF card? a. Take out the CF card, then insert into card reader. b. Connect the CF card to PC USB port. c. Loading all data from the CF card; or copy all data into sub- directory of PC 2. - Page 8 Stop Fast Forward Play/Pause Slow Forward Frame Rate Bit Rate ON/OFF Settings Audio ON/OFF Backup Exit Google Map Minimize Snapshot Image Rotate Play/Pause Compound key: First Click will show to choose files from CF card or Hard Disk. Click to play the selected files. When it is in playing process, the play key will be changed to pause key Stop key.
- Page 9 Step 2: Remove the CF Card from the CF card reader and install the card in the video recorder. ★ Remark: If G-MOUSE is installed, the System Time will be synchronized automatically. Recording frame rate Recording speed setup: 25 / 20 / 10 / 5 / 4 / 2 / 1fps, please choose the suitable frame Rate.
- Page 10 iv.Version Information: Player version, Firmware version and Date. Info for Frame Rate: Fps of Playing display (ON/OFF). Info for Bite Rate: (ON/OFF). Audio (ON/OFF). Backup. i. Backup format can be .REC or .AVI up to your selection. ii. The default Video compression format is Microsoft Video 1.
- Page 11 (11) 180 degree upside down. Press to display upside Normal display down images. Press the again to go back to right side up images. (12) MAP: Launch Google Map to show the driving tracks. (PC should be connected to internet) Google Map (13) Minimize the window.
-
Page 12: Cf Card Record Files Illustration
CF Card Record Files Illustration There are 3 folder on CF card when we review it on PC. 1.Car Player 2.Records 3.System (1) The content of Car Player folder SnapShot folder is for the snapshot images. Car Player.exe , is the Video Player, Double click the .exe file to launch the software and then choose the『event list』to playback. -
Page 13: Format Cf Card
The reason system automatically divide into several pre-video recording files depending on the CF card capacity in order to avoid the data losing when power failure suddenly happened which the data can still be recorded to the last second without worry regrettable matter of the data losing. - Page 14 Step 4. Insert the CF card into the reader and connect the reader to the USB port of the PC. Step 5. Click「Browse」to select the right CF drive (For example, Drive G:), then click「Format」to format the CF card. Step 6. The system will ask if you are sure to format the CF card. Then click “Yes”...
Need help?
Do you have a question about the CDR-E06 and is the answer not in the manual?
Questions and answers