Wallbox COMMANDER 2 User Manual
Hide thumbs
Also See for COMMANDER 2:
- Installation manual (112 pages) ,
- Service manual (12 pages) ,
- Installation and user manual (7 pages)
Table of Contents
Advertisement
Advertisement
Table of Contents

Related Manuals for Wallbox COMMANDER 2


Summary of Contents for Wallbox COMMANDER 2
-
Page 1: User Guide
User Guide COMMANDER 2 ENGLISH... -
Page 2: Table Of Contents
Contents Safety Recommendations Legal Notice Safety Instructions Connector Recommendations Welcome to Wallbox Get to know your Wallbox Commander 2 Charger Screen Start screen Login Charger Menu Dashboard Ready state Connected state Charging state Error State Action buttons Schedules Current session info... - Page 3 Modify charger name Charger info Interact with the charger Statistics / Sessions User list Statistics Users Add a user to your group User info User details User account menu Modify Commander 2 PIN Maintenance Troubleshooting General Updates Connection Charging logs Service...
-
Page 4: Safety Recommendations
Wallbox device. Any damage resulting from such actions is excluded from the warranty. The installation of the Wallbox device must be performed by a qualified electrician in accordance with the applicable regulations. -
Page 5: Connector Recommendations
• If the connector emits smoke or begins to melt, do not touch the charging cable under any circumstances. If possible, stop the charging process. In all cases, disconnect the power supply from the Wallbox device. • Keep the charging cable out of reach of children. -
Page 6: Welcome To Wallbox
This user guide will show you how to charge your electric vehicle and also explain the basic functionalities for your interaction with the Wallbox Commander 2. -
Page 7: Get To Know Your Wallbox Commander 2
Get to know your Wallbox Commander 2 Before you start, please take a quick look over your Wallbox Commander 2. RFID CARD BODY RFID READER TOUCHSCREEN FRONT COVER PRODUCT INFO STICKER CLOCK INTERNET CURRENT USER CONNECTION STATUS SCREEN MENU BAR... -
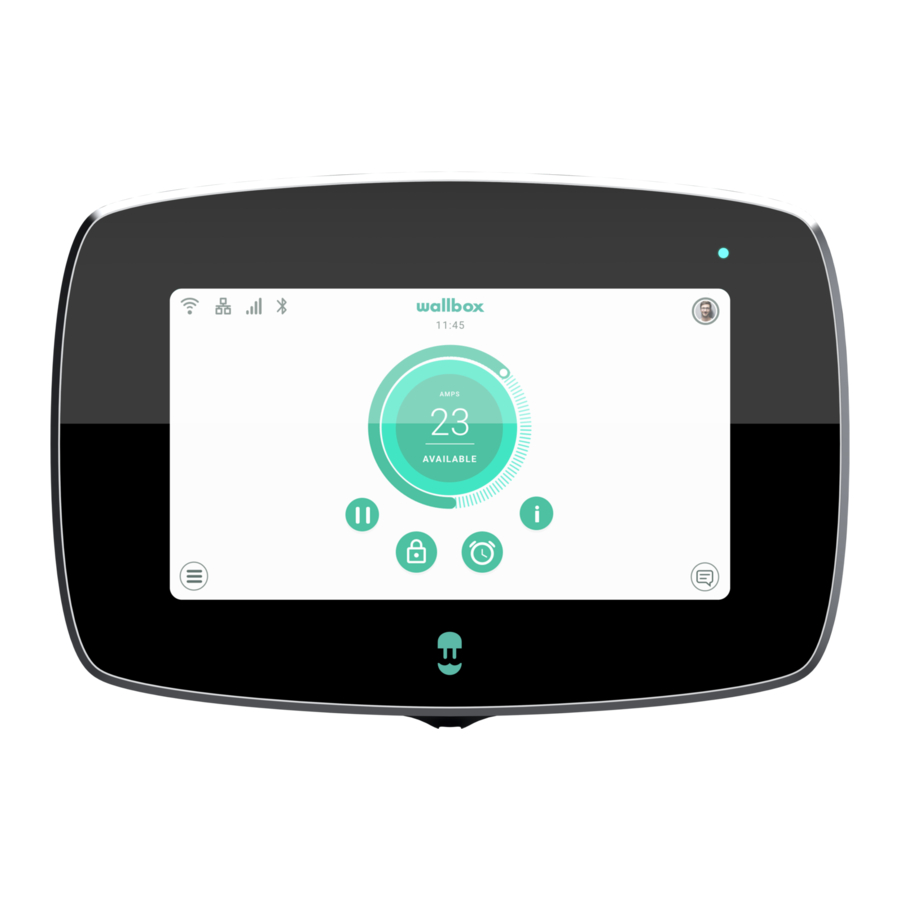
Page 8: Charger Screen
Charger screen This section will guide you through the user interface of the Commander 2. START SCREEN This screen is displayed on start up. Touch any point on the screen to start using the interface. LOGIN The first time you start the charger the default user called 'Wallbox' will log in automatically. -
Page 9: Charger Menu
If multiple users are authorized to use the charger the login screen will show all the authorized users. Scroll to the sides to find and select the user. Use the Filter feature to speed up the search of users. Once selected, the PIN code of the user will be requested. -
Page 10: Dashboard
DASHBOARD This screen shows at-a-glance information about the state of the charger . The state can be easily identified thanks to the colour signalling code in which each colour has a specific meaning. Additionally, the state of the charger can be found in the Notification area after pressing the Notification button. READY STATE The charger stays in ready state when it is not connected to a... -
Page 11: Charging State
Charge paused: the user has paused the charge with the app or the touchscreen. Schedule programmed: If there is a schedule programmed within the next 12 hours or the charging was stopped because a schedule has ended. CHARGING STATE The charging process has started and the car is being recharged for the next ride. This is shown in dark blue. -
Page 12: Error State
When the charger detects a system error or a fault, the screen turns red and a notification message will appear in the notification area. Do not try to charge in this state. Contact Wallbox Service so they can advise you. ACTION BUTTONS... -
Page 13: Current Session Info
CURRENT SESSION INFO You can view updated information on the current charging session by clicking on the Info button. The information is displayed in a popup side window and includes accumulated cost, accumulated energy and instant power. CHARGER SCREEN Information about the connectivity state and specific status on the charger is displayed as icons in the top left corner. -
Page 14: Current User
CURRENT USER The name of the user currently logged in is displayed in a popup side window when the User button at the top right corner of the screen is pressed. Only the PIN code of the default user can be changed from the screen. -
Page 15: Settings
SETTINGS In this section you can configure all configurable aspects of your charger: • Charger information • Connectivity • Options • Multi User • Power Boost • Power Sharing CHARGER INFORMATION You can check specific infor- mation on the charger in this section such as its serial number, the software version and the maximum available current per... - Page 16 Ethernet Automatic network configuration is enabled by default in this option via DHCP so the charger will obtain and set the network parameters automatically, provided that the net- work has an active DHCP server. It is also possible to set these network parameters manually.
- Page 17 The network parameters are obtained automatically from the network’ s DHCP server and can be entered manually. 3G/4G If the charger is equipped with a 3G/4G modem it can be configured in this screen. Switch on the 3G/4G connection and enter the configuration parameters provided by the SIM provider. Then press the Save button to save the configuration and start the connection process.
- Page 18 Proxy The charger can be configured to use a proxy server. By default this option is disabled. To ena- ble this feature press Auto or Manual. For Auto, you only need to enter the proxy Server address. For Manual, you will also need to enter the proxy server port.
-
Page 19: Options
Energy Manually adjust the tariff price to get a more precise summary of your expenses. Select your local currency from the drop-down menu. The currency and energy cost settings are not synchronized with the myWallbox portal or the Wallbox app. - Page 20 Press the Save button to save the configuration. Appearance Use this screen to change the language of the interface and the country. Select your country to see the local Wallbox Service phone number in the Help section. Restore Restore your charger to factory settings.
- Page 21 Restart Restart your charger to clear your charger’ s system. No data or personalised configurations will be lost. Updates Check if any software updates are available in order to get the most out of your charger. We recommend you update your charger as soon as a new software version is available.
-
Page 22: Multi User
This screen allows you to configure the Power Boost functionality (optional feature, requires an accessory). The charger must be correctly connected to the power meter provided by Wallbox before starting the configuration. Switch on the Enable button and set the maximum current allowed by the electrical installation. -
Page 23: Power Sharing
Dashboard to view the status of Power Sharing Smart. For more information about the installation and setup of Power Sharing Smart please download the Power Sharing Smart manual from www. w allbox.com. HELP Enter this section to obtain the Wallbox Service contact details. -
Page 24: Rfid Authentication
RFID Authentication... - Page 25 Every authorised user must be provided with a RFID card. In order to enable this feature, you only need to enter the RFID code printed on the Wallbox RFID card provided with your charger into your myWallbox account through the myWallbox portal (see “myWallbox portal”...
-
Page 26: Discover Mywallbox
Discover myWallbox. -
Page 27: Wallbox App
Wallbox App Download the App Before you start using your Wallbox charger, we recommend that you download the Wallbox app on your smartphone and create a myWallbox account for managing the charger remotely. The Wallbox app is available on PlayStore and AppStore. -
Page 28: 3-Adding Your First Charger
Please remember that Wallbox Standard customers are allowed a maximum of five users and two chargers. Wallbox Pro customers can add an unlimited number of users and chargers. -
Page 29: 5-Sync With Your Charger
Wallbox App Sync with your charger When you connect to a charger the charging sessions are synchronized with the myWallbox cloud through the app. The percentage of sessions synchronized is displayed. Managing the charger This screen is shown when you are connected to the charger. -
Page 30: Schedules
Wallbox App SCHEDULES The lower half of the screen shows the schedules programmed. In order to edit or delete a schedule, tap the three vertical points to the right of the schedule. In order to set a new schedule tap on the clock button. -
Page 31: 7-Configuration
Wallbox App Configuration In the charger configuration link button, you will find the active configuration options for the charger: POWER SHARING CHARGER INFO POWER BOOST CONNECTIVITY INSTALLATION OPTIONS ADVANCED OPTIONS FIRMWARE UPDATE (IF AVAILABLE) CHARGER INFO This shows information on the charger. -
Page 32: Connectivity
Wallbox App CONNECTIVITY Our chargers have three internet connection methods that you can configure: • Wi-Fi • Ethernet • 3G/4G with dongle and mobile SIM card Wi-Fi Ethernet The charger's Wi-Fi connection can be activated or It is possible to configure the IP deactivated. -
Page 33: Advanced Options
Wallbox App ADVANCED OPTIONS In Advanced Options you can change the energy cost for the charger to make an estimated cost with its sessions. Also, you can perform a system restore on your charger from this screen. You can also restart the charger here. -
Page 34: Mywallbox Portal
First access to the myWallbox portal. URL: https://my. w allbox.com/login NOTE: If you have already created an account using the Wallbox App, you can use the same username and password to log on to the website. Otherwise, you can create a new account now via the website. - Page 35 After clicking “Confirm”, you are redirected to a license registration pop-up. If you have not purchased a licence you are a Wallbox Standard user, click on “Continue with this plan”. If you have purchased a Wallbox Pro license, click on “Activate Upper Plan”...
-
Page 36: Access To The Website
myWallbox Portal Once your account has been created, you will belong to a group in which you are the super-administrator. When other users invite you to join their groups, you will not be the super-administrator. You will be just an administrator or user, depending on their group invitation specifications. -
Page 37: First Access
myWallbox Portal You will then receive an email with instructions on how to create a new password. If you do not see the email in your inbox, please check the spam folder. Having opened the email, click After clicking on this link, you A confirmation popup appears. - Page 38 The charger will then appear automatically in your chargers list. Please remember that Wallbox Standard customers are allowed a maximum of five users and two chargers. Wallbox Pro customers can add an unlimited number of users and chargers.
-
Page 39: Charger Info
myWallbox Portal CHARGER INFO Once the charger is linked to the account, it is possible to check the current charger info from the myWallbox user account. The information that appears includes: Locking status: When yellow, the charger is locked. When green, the charger is unlocked. Charger image. -
Page 40: Chargers
myWallbox Portal Chargers Access the charger details by clicking on the charger in charger list. Here you can carry out the following: • Modify the “charger name”. • See charger info. • Interact with the charger. • See statistics graphs for the current year. •... -
Page 41: Interact With The Charger
myWallbox Portal INTERACT WITH THE CHARGER From the charger details page you can interact with your charger in the following ways: • Lock/unlock charger. Locked charger, action available. Unlocked charger, action available. AMPS If it is not available, the icon is displayed in grey but still displays if the charger is locked/unlocked. -
Page 42: User List
myWallbox Portal USERS LIST List of users who have access to the current charger. The list shows which users are able to use the chargers and enables users to be assigned/unassigned to/from the charger. Only super administrators and administrators are able to see this list and interact with it. Colour meaning: Not possible to modify the charger assignment as it is an admin user. -
Page 43: Users
myWallbox Portal You can generate an Excel report at any time simply by clicking on “Generate report”. Users Manage the users that have access to the chargers. ADD A USER TO YOUR GROUP Add a new/existing user to the group to give them access to the chargers. Fill in the user information and set user or administrator permissions. -
Page 44: User Info
Admin User Sessions count: Number of sessions completed by said user. Identifiers: RFID, facial recognition and Commander 2 PIN. Enabled / Disabled value is given by saved data in the details of every user account. All enabled Just Commander 2 PIN enabled Registration date. -
Page 45: User Details
myWallbox Portal USER DETAILS A user's account details can be accessed by clicking on the user on the user list. Here you can carry out the following: • See the user’ s main details. • See the list of the chargers assigned/not assigned to the user from the group, assign/unassign chargers to/from the user. -
Page 46: User Account Menu
User account menu On the top-right hand side of the screen you can access the user configuration. Here you can modify your user configuration. MODIFY COMMANDER 2 PIN Only necessary for locking/unlocking Commander 2 by PIN. Set by default to 1234. -
Page 47: Maintenance
• Remember to ensure that the power supply is turned off before you start cleaning your charger. • If you want to clean your Wallbox we recommend that you use a soft and dry or damp cloth. Do not use a spray or direct water stream to clean your Wallbox charger. -
Page 48: Updates
The screen is completely black and does not react to touch If the screen is completely black but the Commander 2 is turned on, start with a “clean state” by restoring and reinstalling the firmware using the Wallbox app on your phone. -
Page 49: Connection
There is no Wi-Fi coverage where the charger is installed If it is not possible to install the Wallbox Commander 2 anywhere else, a Wi-Fi extender could be the solution. The charger can also be connected to the internet with an Ethernet cable. -
Page 50: Charging Logs
The charging logs do not appear on the myWallbox website or the Wallbox App In order for the charging statistics to appear in the app or the myWallbox portal, the Commander 2 must be connected to the internet. First check the internet connection.
Need help?
Do you have a question about the COMMANDER 2 and is the answer not in the manual?
Questions and answers