
Subscribe to Our Youtube Channel
Related Manuals for vogel's PFW 6852


Summary of Contents for vogel's PFW 6852
- Page 1 PFW 6852 Installation Guide Installationsanleitung, Guía de Instalacíon, Guida de Installazione, Guide d’Installation, Installatie gids Max: 136kg/300lbs MOUIN_PFW6852_V03...
-
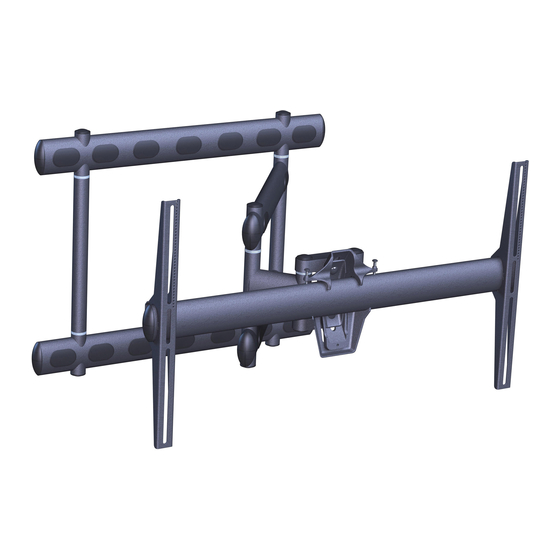
Page 2: Included Components
PFW 6852 Installation Guide Installationsanleitung, Guía de Instalacíon, Guida de Installazione, Guide d’Installation, Installatie gids Maximum Flat Panel Weight: Included Components: 300 lb. / 136 kg. x1 Pair Swingout Mount Mounting Universal Bracket Extension M10 x 30mm Bracket Adapter M4 x 16mm... -
Page 3: Mount Orientation
PFW 6852 PFW 6852 Installation Guide Installation Guide Installationsanleitung, Guía de Instalacíon, Guida de Installazione, Guide d’Installation, Installatie gids Installationsanleitung, Guía de Instalacíon, Guida de Installazione, Guide d’Installation, Installatie gids Mount Orientation Swingout Arm can be oriented to open from either the left-hand or right-hand side. Simply invert and re-orient the Nose Piece. - Page 4 PFW 6852 PFW 6852 Installation Guide Installation Guide Installationsanleitung, Guía de Instalacíon, Guida de Installazione, Guide d’Installation, Installatie gids Installationsanleitung, Guía de Instalacíon, Guida de Installazione, Guide d’Installation, Installatie gids Wood Installation Minimum of two (2) 2 x 4 wood stud to be used Secure the mount to two (2) wall studs with all six (6) 5/16"...
- Page 5 PFW 6852 PFW 6852 Installation Guide Installation Guide Installationsanleitung, Guía de Instalacíon, Guida de Installazione, Guide d’Installation, Installatie gids Installationsanleitung, Guía de Instalacíon, Guida de Installazione, Guide d’Installation, Installatie gids Place the Mount against the wall and align it with the pilot hole.
-
Page 6: Concrete Installation
PFW 6852 PFW 6852 Installation Guide Installation Guide Installationsanleitung, Guía de Instalacíon, Guida de Installazione, Guide d’Installation, Installatie gids Installationsanleitung, Guía de Instalacíon, Guida de Installazione, Guide d’Installation, Installatie gids Concrete Installation Two people are recommended for this step: one person to level the wall plate and another person to mark the mounting locations. -
Page 7: Selecting The Mounting Hardware
PFW 6852 PFW 6852 Installation Guide Installation Guide Installationsanleitung, Guía de Instalacíon, Guida de Installazione, Guide d’Installation, Installatie gids Installationsanleitung, Guía de Instalacíon, Guida de Installazione, Guide d’Installation, Installatie gids Selecting the Mounting Hardware 1) Insert a small straw or toothpick into the threaded inserts found on the back of the flat panel. -
Page 8: Griplate™ Washer Installation
PFW 6852 PFW 6852 Installation Guide Installation Guide Installationsanleitung, Guía de Instalacíon, Guida de Installazione, Guide d’Installation, Installatie gids Installationsanleitung, Guía de Instalacíon, Guida de Installazione, Guide d’Installation, Installatie gids Top Griplate Bottom Griplate ™ ™ Griplate Griplate™ Washer Installation ™... -
Page 9: Universal Bracket Installation
PFW 6852 PFW 6852 Installation Guide Installation Guide Installationsanleitung, Guía de Instalacíon, Guida de Installazione, Guide d’Installation, Installatie gids Installationsanleitung, Guía de Instalacíon, Guida de Installazione, Guide d’Installation, Installatie gids Does the flat panel have a mount pattern for the mount points greater than 506mm high x 876mm wide? If No, proceed to the “Universal Bracket Installation”... -
Page 10: Adapter Plate Installation
PFW 6852 PFW 6852 Installation Guide Installation Guide Installationsanleitung, Guía de Instalacíon, Guida de Installazione, Guide d’Installation, Installatie gids Installationsanleitung, Guía de Instalacíon, Guida de Installazione, Guide d’Installation, Installatie gids Set Screws 1) Center the Universal Bracket Bar. 2) Use the 5/32" Allen wrench to tighten the set screws that are located on the back of each Universal Bracket. - Page 11 PFW 6852 PFW 6852 Installation Guide Installation Guide Installationsanleitung, Guía de Instalacíon, Guida de Installazione, Guide d’Installation, Installatie gids Installationsanleitung, Guía de Instalacíon, Guida de Installazione, Guide d’Installation, Installatie gids 1) Place the Universal Bracket assembly on the back of the display, with the threaded mount studs on the Adapter Plates passing through the mount slots on the Universal Brackets.
-
Page 12: Attaching The Flat Panel To The Swingout Arm
PFW 6852 PFW 6852 Installation Guide Installation Guide Installationsanleitung, Guía de Instalacíon, Guida de Installazione, Guide d’Installation, Installatie gids Installationsanleitung, Guía de Instalacíon, Guida de Installazione, Guide d’Installation, Installatie gids Attaching the Flat Panel to the Swingout Arm Caution ! The following procedure requires two people. -
Page 13: Cable Management
PFW 6852 PFW 6852 Installation Guide Installation Guide Installationsanleitung, Guía de Instalacíon, Guida de Installazione, Guide d’Installation, Installatie gids Installationsanleitung, Guía de Instalacíon, Guida de Installazione, Guide d’Installation, Installatie gids Tilting Positioning Before making any tilt adjustments, loosen both tension bolts nut one-half turn.
Need help?
Do you have a question about the PFW 6852 and is the answer not in the manual?
Questions and answers