Table of Contents
Advertisement
Advertisement
Table of Contents

Related Manuals for Elmo OX-1


Summary of Contents for Elmo OX-1
- Page 1 VISUAL PRESENTER OX-1 INSTRUCTION MANUAL...
-
Page 2: Important Safeguards
IMPORTANT SAFEGUARDS ■ Read Instructions All the safety and operating instructions should be read before the appliance is operated. ■ Retain Instructions The safety and operating instructions should be retained for future reference. ■ Heed Warnings All warnings on the product and in the operating instructions should be adhered to. ■... - Page 3 • If the product does not operate normally by following the operating instructions. Adjust only those controls that are covered by the operating instructions as an improper adjustment of other controls may result in damage and will often require extensive work by a qualified technician to restore the product to its normal operation.
- Page 4 WARNING TO REDUCE THE RISK OF FIRE OR ELECTRIC SHOCK, DO NOT EXPOSE THIS PRODUCT TO RAIN OR MOISTURE. The connection of a non-shielded equipment interface cable to this equipment will invalidate the FCC Certification or Declaration of this device and may cause interference levels which exceed the limits established by the FCC for this equipment.
-
Page 5: Usage Precautions
■ Do not look directly into the LED light. If you look directly into it at pointblank range, your eyes may be injured. ■ ELMO is not liable for any damage caused by the loss or damage of the data transferred to a computer by using the USB cable and recorded by using a capturing software. -
Page 6: Handling Precautions
HANDLING PRECAUTIONS The followings are special precautions against mishandling of the product. Pay close attention to them. ①Installation ②Setting up Do not place the product on an When setting up the product, hold the unstable place. body around the operating panel. Be careful not to pinch your fingers. -
Page 7: Table Of Contents
■ TABLE OF CONTENTS IMPORTANT SAFEGUARDS ·········································································· 2 USAGE PRECAUTIONS HANDLING PRECAUTIONS ■ TABLE OF CONTENTS ············································································· 7 ➊ PREPARATION ······················································································· 8 ◆PACKAGE CONTENTS ➋ BASIC OPERATIONS ··············································································· 9 ◆THE NAME OF EACH PART ■OPERATING BUTTONS ◆RESOLUTION/FRAME RATE ➌ PREPARATION AND CONNECTION ························································· 11 ◆SETTING UP ◆CONNECTING TO A COMPUTER ◆TURNING ON OR OFF THE POWER... -
Page 8: ➊ Preparation
➊ PREPARATION ◆PACKAGE CONTENTS The items below are included with this product. If any item is missing, contact the dealer from whom you purchased this product. OX-1 USB2.0 cable Warranty Card IMPORTANT Quick Start Guide (For Japan/ North SAFEGUARDS America only)... -
Page 9: ➋ Basic Operations
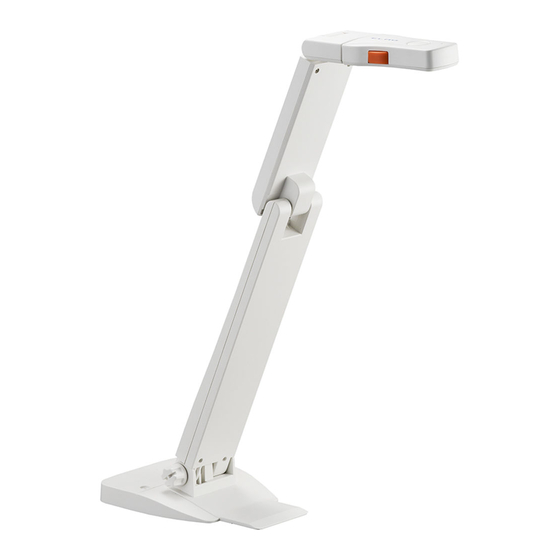
➋ BASIC OPERATIONS ◆THE NAME OF EACH PART ② ⑧ ① ⑨ ⑦ ④ ③ ⑤ ⑥ Name AF button ① ② LED lighting button Adjustment screw ③ USB port ④ LED lighting ⑤ Camera lens ⑥ Camera head ⑦ ⑧... -
Page 10: Operating Buttons
■OPERATING BUTTONS ② ① Name Description AF button ① To focus automatically. (⇒P.14) LED lighting ② To on or off the LED lighting. (⇒P.14) button ◆RESOLUTION/FRAME RATE The following table shows the output resolution and frame rate. Aspect Default Output Resolution MJPEG[fps] YUY2[fps]... -
Page 11: ➌ Preparation And Connection
➌ PREPARATION AND CONNECTION ◆SETTING UP STEP1 Raise the camera head as indicated by an arrow while holding the base. STEP2 Raise the upper arm as indicated by an arrow. STEP3 Set the camera head horizontally. STEP4 Rotate the camera head to adjust the shooting angle. STEP4 STEP3 Camera head... -
Page 12: Connecting To A Computer
※The product will not turn on until the viewer is launched. About the viewer software The image can be viewed by using the Elmo "Image Mate+C" or a free viewer software. Go to the following website when using the "Image Mate +C". -
Page 13: Turning On Or Off The Power
◆TURNING ON OR OFF THE POWER Power ON After connecting the product to a computer with the USB2.0 cable, launch the viewer software and select the product. The product will turn on and the image will be displayed. Power OFF Turn off the product from the viewer software. -
Page 14: ➍ Using The Product
➍ USING THE PRODUCT ◆ADJUSTING THE FOCUS Press the AF button to automatically focus on the subject. ◆TURNING THE LED LIGHTING ON/OFF Press the LED lighting button to turn on the LED lighting. Press this button again to turn off the LED lighting. CAUTION •... -
Page 15: ➎ Trouble Shooting
➎ TROUBLE SHOOTING ◆SYMPTOMS AND CONFIRMATION Check the following items. If any abnormality is found, consult the dealer from whom you purchased this product or our nearest branch/office. Symptom Possible cause / remedy Cannot turn on the ・The power of the connected computer is not turned on. product. - Page 16 A software error ・If it is taking too much time for the preparation of the image output, the message appears and software may determine this to be an error. Restart the product, the image is not reconnect it to the computer, and then start the software. displayed.
-
Page 17: ➏ Specification
ON/OFF Default setting : OFF ✔ AF(focus) Manual(One-push) ✔ Zoom Possible with Image Mate +C/ ✔ ✔ ✔ Image Mate 4(IM4) /ELMO Interactive Toolbox (EIT) Image pause ✔ ✔ ✔ Resolution Possible to change ※1 ✔ ✔ Flicker 60Hz / 50Hz(Default setting : 60Hz)... -
Page 18: Illumination Device
Exposure Auto/manual(Manual:Set value -8〜1) ✔ ✔ Default setting:Auto Focus Auto/manual Default setting: Manual ✔ ✔ Low-light ON/OFF ✔ ✔ compensation Default setting: OFF ※1 To obtain high-resolution image output, select the resolution (ex.1920x1080) with 15fps. Some electronic whiteboards do not support 15fps. In that case, select the default resolution of 1280x720. -
Page 19: Trademarks And Licenses
■ TRADEMARKS AND LICENSES and Image Mate are registered trademarks of ELMO Co., Ltd. HDMI and High-Definition Multimedia interface are trademarks or registered trademarks of HDMI Licensing LLC. Windows, or names of other Microsoft products are trademarks or registered trademarks of Microsoft Corporation in the United States and other countries. - Page 20 株式会社エルモ社 OVERSEAS SUBSIDIARY COMPANIES 〒457-0078 ELMO USA CORP. 名古屋市南区塩屋町⼀丁⽬3番地4 □Headquarters Web:https://www.elmo.co.jp 6851 Jericho Turnpike Suite 145 製品のお問い合わせは、下記営業所へ Syosset, NY 11791 Tel. (516) 501-1400 □ 東⽇本営業所 Fax.(516) 501-0429 E-mail: elmo@elmousa.com □札幌オフィス Web:https://www.elmousa.com/ 〒001-0021 札幌市北区北 21 条⻄ 8 丁⽬ 3 番 8 号 バックスビル...
Need help?
Do you have a question about the OX-1 and is the answer not in the manual?
Questions and answers