
Related Manuals for Elmo HV-5000XG


Summary of Contents for Elmo HV-5000XG
- Page 1 VISUAL PRESENTER INSTRUCTION MANUAL Please read this instruction manual carefully before using this Visual Presenter and keep it for future reference.
-
Page 2: Important Safeguards
IMPORTANT SAFEGUARDS Read Instructions - All the safety and operating instructions should be read before the appliance is operated. Retain Instructions - The safety and operating instructions should be retained for future reference. Heed Warnings - All warnings on the product and in the operating instructions should be adhered to. - Page 3 Object and Liquid Entry - Never push objects of any kind into this product through openings as they may touch dangerous voltage points or short-out parts that could result in a fire or electric shock. Never spill liquid of any kind on the product.
-
Page 4: Before You Use
BEFORE YOU USE Use the Visual Presenter under the rated electrical conditions. Do not leave the Presenter under direct sunlight or by heaters, or the Presenter may be discolored, deformed, or damaged. Do not place the Presenter in any humid, dusty, windy or vibrating location. Use the Presenter in the following environmental conditions: Temperature: 5 C~40 C (41 F~104 F) Humidity:... -
Page 5: Table Of Contents
Connection to the monitor and the projector ........ - Page 6 6. RS-232C SPECIFICATIONS ..........25 Setting up .
-
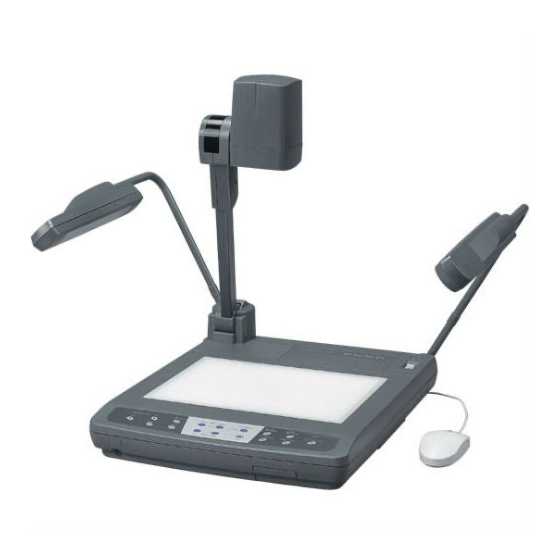
Page 7: Part Names And Functions
1. PART NAMES AND FUNCTIONS Appearance 7. Lighting Unit Arm 2. Column 8. Lighting Unit 5. Column Lock Release Button Press this button to raise/fold the Column. 1. Stage 3. Camera Head 7. Lighting Unit Arm 4. Close-up Lens Holder Attach this holder for normal use. -
Page 8: Front Operation Panel
Front Operation Panel 15. Lighting Buttons 16. Input Selection Buttons 20. Monitor output Buttons Part Name Lighting Buttons Input Selection Buttons Zoom Buttons Focus Buttons Auto Focus Button Monitor output Buttons 18. Focus Buttons Function To turn ON/OFF the lighting unit. To change the input line. -
Page 9: Rear Panel
To supply power up to 400W (Not interlocked with the power switch). To output 12VDC. The LCD Color Monitor (LM-5011N) or ELMO Desk-top Presenter (HD-80XG) can be connected with the supplied DC cable. Note: Do not connect any equipment other than LM-5011N and HD-80XG. -
Page 10: Head
ON when connecting to the CRT monitor; use OFF when connecting to the LCD projector. The luminance shade may not match depending on the type of projector. Use ON in such a case. In an area where power frequency is 50Hz, using the unit with... - Page 11 Wireless Remote Control 35. MAIN 38. TELE 39. WIDE 43. IRIS NORMAL Button Name POSITION UPPER BASE MAIN RGB1 RGB2 TELE WIDE NEAR IRIS NORMAL IRIS OPEN IRIS CLOSE 45. IRIS CLOSE 44. IRIS OPEN Function To adjust the screen position and image size of the video output. To turn ON/OFF the upper lighting unit.
-
Page 12: Wireless Remote Control
2. WIRELESS REMOTE CONTROL Point the infrared emitting part of the wireless remote control unit at the infrared sensor of the Presenter, located at the front, and the rear panel, and press the button for the desired function. The infrared sensor at the front can receive the infrared light if it comes from the wireless remote control within 7 meters at an angle of 30 degrees or less right and left. -
Page 13: Setting Up
3. SETTING UP (1) Unfold the lighting unit arms fully until they come to the dead end. Unfold arm 1 and then arm 2 as illustrated. (2) Press the column lock release button, and raise the column until the column lock release button returns to the original position. -
Page 14: Connection To The Monitor And The Projector
If the display image shifts from the center, manually adjust the horizontal/vertical positions through the connected equipment. If vertical stripes appear on the screen with the use of video projector, it may be improved by manually adjusting the dot-clock frequency of the projector. -
Page 15: Rgb Input Signal
RGB input signal Signal assignment 10 9 DSUB 15P shrinking terminal (Female) Pin arrangement Pin No. Name Video input (Red) Video input (Green) Video input (Blue) RGB output signal Signal assignment (DSUB 15P shrinking terminal) Pin No. Name Video output (Red) Video output (Green) Video output (Blue) Input signal... -
Page 16: Connection To Dc Out Terminal
Connection to DC OUT Terminal Use the DC OUT terminal to connect ELMO Desk-top Presenter (HD-80XG) and the LCD Monitor (LM-5011N). AC IN RS-232C OUTLET UNSWITCHED AC120V~60Hz (MAX. 3.2A) OUTPUT 0.9A DC OUT terminal Notes: - When using the DC cable (supplied), AC adapter supplied with HD-80XG/LM-5011N is not used. -
Page 17: Operation Procedures
4. OPERATION PROCEDURES Simple steps for presenting printed material (1) Turn ON the power switch. Note: - Before turning ON the power switch, connection to the monitor should have been completed. - The indication lamp (green LED) on the front operation panel shows the initial setting condition of each function of the Presenter. -
Page 18: Simple Steps For Showing Transparent Material, Such As Overhead Transparency
Simple steps for showing transparent material, such as overhead transparency (1) Press the base button [BASE] on the front operation panel or wireless remote control. The indicator of the base button [BASE] will blink, and the built-in baselight will light up. (3) To turn OFF the baselight, press the base button [BASE] on the front operation panel or wireless remote control. -
Page 19: Storing The Presenter
Storing the Presenter Note: The Presenter can not be stored with the LCD monitor (optional) attached. Before storing, detach the LCD monitor (optional) and monitor bracket (optional), if connected. (1) Turn OFF the power switch, and unplug the power cord and the video cable. -
Page 20: Various Functions
Input selection The respective images from two different AV sources, such as PC and ELMO Presenter [HD-80XG], connected to Video-in Terminal 1 [INPUT] [RGB1] and Video-in Terminal 2 [INPUT] [RGB2] respectively, can be alternately presented on the Monitor by simply selecting the AV source by pressing the input selection button without changing cable connections. -
Page 21: Monitor Output
Monitor output The signal to be outputted to the NTSC/PAL monitor is selected. When the input has been set to RGB1 or RGB2 and the monitor output button [RGB1/RGB2] on the front operation panel is pressed, the indicator lamp is switched accordingly, and the images by the equipment connected to the external input terminals [RGB1] and [RGB2] are presented on the NTSC/PAL monitor. -
Page 22: Table Of Signal Correspondence
Table of signal correspondence Signal Mode VGA1 37.861 37.861 VGA2 37.927 VGA3 31.469 VGA@60Hz VGA@72Hz 37.861 VGA@75Hz 37.500 VGA@85Hz 43.269 SVGA@56Hz 35.156 SVGA@60Hz 37.879 SVGA@72Hz 48.077 SVGA@75Hz 46.875 SVGA@85Hz 53.674 48.363 XGA@60Hz 56.476 XGA@70Hz 60.023 XGA@75Hz XGA@85Hz 68.677 SXGA1 67.500 SXGA2 60.000 SXGA3... -
Page 23: Position Adjustment
Position adjustment To adjust the display position of the image outputted on the NTSC/PAL monitor. Press the buttons [POSITION] ( the image to the proper position. Notes: - The adjusted position is memorized in the Presenter. However, if the frequency of the signal to be inputted into the external input terminal [RGB1] or [RGB2], readjust the position. -
Page 24: Focus
Focus Auto Focus To operate Auto-Focus, press the auto focus button [AF] on the front operation panel or wireless remote control, and the Auto-Focus will be activated. While the auto-focus is in operation, the indication lamp blinks until the object is brought into focus. The Presenter features a one-push auto focus function. -
Page 25: Powered Manual Focus
Powered Manual Focus To focus on any part of the material, such as 3-D material, press the focus button [NEAR] or [FAR] on the front operation panel or wireless remote control. Note: The manual focus works up to approx. 10cm above the stage surface. -
Page 26: Rs-232C Specifications
6. RS-232C SPECIFICATIONS The Presenter can be controlled by a PC connected to the Presenter through the RS-232C terminal [RS-232C]. Setting up Connect the Presenter to a PC with an RS-232C connection cable. Notes: - When using an RS-232C cable available in the market, make sure of the connection shown in the page. - To protect the Presenter and the PC, be sure to turn OFF all the power switches of all equipment before connecting. -
Page 27: Table Of The Communication Commands
Table of the communication commands Command Function Auto Focus Focus + (NEAR) adjustment – (FAR) 0 (STOP) Zoom + (TELE) adjustment – (WIDE) 0 (STOP) Iris adjustment + (OPEN) – (CLOSE) 0 (STOP) 1 (AUTO) Lighting 0 (OFF) selection 1 (BASE) 0 (UPPER) Input selection 0 (MAIN) -
Page 28: Data Format Specifications
Data format specifications This command is executed in the form of 1-command/1 packet. The next command is not accepted until the previous processing is completed. The communication command always starts with STX (Start of Text), and ends with ETX (END of Text). If the communication format or command name is wrong, NAK (Negative Acknowledgement) will be sent from the Presenter as a result of failing to receive correctly. -
Page 29: Troubleshooting Hints
Moire pattern appears on the screen image Brightness tone is off the setting If the trouble still remains after checking the above, consult your dealer or an authorized ELMO service center. Possible cause/countermeasure Cable is not properly connected to the video-in terminal of monitor. -
Page 30: Specifications
8. SPECIFICATIONS General Item Power source AC120V 60Hz Power consumption Power 43W AC outlet 1 pce. (Max. 400W/Unswitched) DC output terminal DC12V (Max. 0.9A) Outside dimensions 400mm(W) X 660mm(D) X 168mm(H) (15.7 X 26.0 X 6.6 in.) - When folded 700mm(W) X 542mm(D) X 625mm(H) (27.6 X 21.3 X 24.6 in.) - When set up Weight 10 kgs (22.1 lbs) (main body only) -
Page 31: Lighting
The specifications are subject to change without notice. Dimensions and weight are approximate. Trademark Acknowledgements VESA is a registered trademark of Video Electronics Standards Association. ELMO, VISUAL PRESENTER/Visual Presenter, FOCUSFREE are registered trademarks of Elmo Co., Ltd. Specifications Name Quantity... - Page 32 1478 Old Country Road, Plainview, NY 11803-5034 Tel : ( 516 ) 501-1400 E-mail : elmo@elmousa.com Web : http://www.elmousa.com/ Canada Elmo Canada Mfg. Corp. 44 West Drive, Brampton, Ontario L6T 3T6 Tel : ( 905 ) 453-7880 E-mail : info@elmocanada.com Web : http://www.elmocanada.com/ Germany Elmo (Europe) G.m.b.H...
Need help?
Do you have a question about the HV-5000XG and is the answer not in the manual?
Questions and answers