Table of Contents
Advertisement
Quick Links
Advertisement
Table of Contents

Related Manuals for Keysight N4376D


Summary of Contents for Keysight N4376D
- Page 1 Keysight N4376D Lightwave Component Analyzer Getting Started...
- Page 4 Certification one year from date of shipment. During the warranty period, Keysight will, at its option, Keysight Technologies certifies that this either repair or replace products that prove product met its published specifications at to be defective.
-
Page 5: Table Of Contents
Accessing the User’s Guide............. . . 27 Keysight N4376D Lightwave Component Analyzer, Getting Started... - Page 6 Keysight N4376D Lightwave Component Analyzer, Getting Started...
-
Page 7: Introduction
General Safety Considerations......7 Optical Test Set Front and Rear Panels....14 Keysight N4376D Lightwave Component Analyzer, Getting Started... -
Page 8: Documentation
Introduction Documentation The documentation for the Keysight N4376D Lightwave Component Analyzer consists of • The documentation for the Keysight network analyzer. This documentation is on the hard disk of the network analyzer. Refer to it for using the network analyzer for electrical to electrical measurements, or for the configuration of the network analyzer. -
Page 9: General Safety Considerations
Do not proceed beyond a warning sign until the indicated conditions are fully understood and met. Keysight N4376D Lightwave Component Analyzer, Getting Started... - Page 10 To prevent electrical shock, disconnect the instrument from mains WA R N I N G before cleaning. Use a dry cloth or one slightly dampened with water to clean the external case parts. Do not attempt to clean internally. Keysight N4376D Lightwave Component Analyzer, Getting Started...
- Page 11 Failure to ensure adequate earth grounding by not using this cord may cause instrument damage. This instrument has autoranging line voltage input. Be sure the C A U T I O N supply voltage is within the specified range. Keysight N4376D Lightwave Component Analyzer, Getting Started...
- Page 12 Numerical aperture 0.15 μ Beam waist diameter < 50 a CW output power is defined as the highest possible optical output power that the laser source can produce at the output connector Keysight N4376D Lightwave Component Analyzer, Getting Started...
-
Page 13: Line Power Requirements
AC power receptacle, this cable earths the instrument cabinet. The type of power cable shipped with each instrument depends on the country of destination. Please refer to the User’s Guide for the part numbers of available power cables. Keysight N4376D Lightwave Component Analyzer, Getting Started... - Page 14 Keysight Technologies Service Center. Do not operate the instrument in the presence of flammable gases or fumes. Operation of any electrical instrument in such an environment constitutes a definite safety hazard. Keysight N4376D Lightwave Component Analyzer, Getting Started...
- Page 15 Product Category: With reference to the equipment types in the WEEE Directive Annex I, this product is classed as a "Monitoring and Control instrumentation" product. Do not dispose in domestic household waste. To return unwanted products, contact your local Keysight http://about.keysight.com/en/companyinfo/ office, or see environment/takeback.shtml for more information.
-
Page 16: Optical Test Set Front And Rear Panels
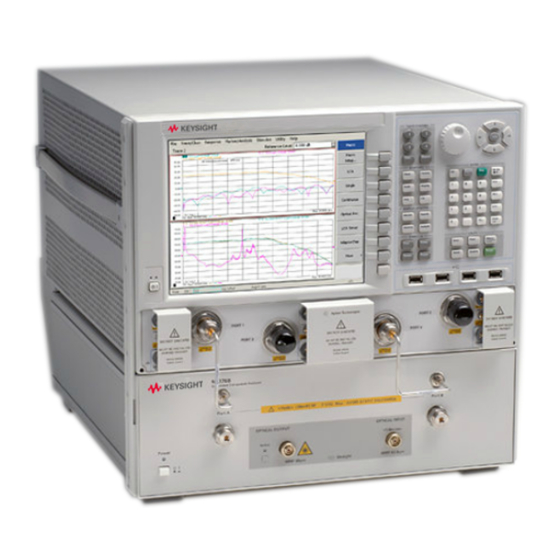
Optical Test Set Front and Rear Panels 2-port PNA version Figure 1 Front Panel (-312) For further information on the front panel of the network analyzer, please refer to the documentation supplied with the network analyzer. Keysight N4376D Lightwave Component Analyzer, Getting Started... - Page 17 Caution: Do not apply more than Optical Input 1 +3 dBm (maximum safe average (low power) input power). This input is the standard optical input to the optical test set for optical powers up to 0 dBm. Keysight N4376D Lightwave Component Analyzer, Getting Started...
- Page 18 • : Perform continuous sweep measurements with the current measurement setup • : Start the optical power meter • : Start the LCA server (if not already running) Keysight N4376D Lightwave Component Analyzer, Getting Started...
-
Page 19: 4-Port Pna Version
RF power values and DC levels noted on the front panel of the instrument. This is the RF port used for electrical calibration and to connect to single- ended or differential E/O or E/E device. Keysight N4376D Lightwave Component Analyzer, Getting Started... - Page 20 0 dBm. Port B This is the RF port used for electrical calibration and to connect to single- ended and differential O/E and E/E devices. Keysight N4376D Lightwave Component Analyzer, Getting Started...
- Page 21 Network analyzer This is an S parameter Port 2 measurement port of the Network analyzer. This is the RF port used for electrical calibration and to connect to differential EO, OE and EE devices. Keysight N4376D Lightwave Component Analyzer, Getting Started...
-
Page 22: Rear Panel
The software on the network analyzer uses the USB port to control the optical test set. Line power cable Plug in your power cable here. connector Line fuse Replace only with same type. Keysight N4376D Lightwave Component Analyzer, Getting Started... -
Page 23: Getting Started
Getting Started Getting Started Unpacking the Lightwave Component Analyzer ..22 Setting Up the Lightwave Component Analyzer ..24 Keysight N4376D Lightwave Component Analyzer, Getting Started... -
Page 24: Unpacking The Lightwave Component Analyzer
• - 024 2x LC 62.5 μm to FC/APC 0.5 m patch cord • - 025 2x SC 50 μm to FC/APC 0.5 m patch cord • - 026 2x SC 62.5 μm to FC/APC 0.5 m patch cord Keysight N4376D Lightwave Component Analyzer, Getting Started... - Page 25 (N5222A or N5242A) with any configuration and RF cables If anything is missing or defective, contact your nearest Keysight Technologies sales office. If the shipment was damaged, contact the carrier, then contact the nearest Keysight Technologies sales office. Keysight N4376D Lightwave Component Analyzer, Getting Started...
-
Page 26: Setting Up The Lightwave Component Analyzer
Component Analyzer, please ensure it has been properly cleaned. Fiber-optic connectors are easily damaged when connected to dirty or damaged cables and accessories. When you use improper cleaning and handling techniques, you risk expensive instrument repairs, damaged cables, and compromised measurements. Keysight N4376D Lightwave Component Analyzer, Getting Started... -
Page 27: Using The Correct Connectors
Component Analyzer, please ensure it has been properly cleaned. Fiber-optic connectors are easily damaged when connected to dirty or damaged cables and accessories. When you use improper cleaning and handling techniques, you risk expensive instrument repairs, damaged cables, and compromised measurements. Keysight N4376D Lightwave Component Analyzer, Getting Started... -
Page 28: Enabling And Disabling The Laser Output
Getting Started The optical input and output of the Keysight N4376D Lightwave Component Analyzer use angled connectors. Depending on the option you ordered, you will also have received two patchcords with an angled and a straight connector • option 023 includes 50 μm patchcords with an angled and an LC connector •... -
Page 29: Performance Check
Accessing the User’s Guide 1. If it is not already started, start the LCA as described above. 2. Press in the LCA user interface to get to the electronic Version of the users guide. Keysight N4376D Lightwave Component Analyzer, Getting Started... - Page 30 Getting Started Keysight N4376D Lightwave Component Analyzer, Getting Started...
- Page 31 www.keysight.com...
- Page 32 This information is subject to change without notice. © Keysight Technologies 2009 – 2014 Edition 2, December 2014 *4376D-90A01* 4376D-90A01 www.keysight.com...
Need help?
Do you have a question about the N4376D and is the answer not in the manual?
Questions and answers