Table of Contents
Advertisement
Quick Links
WARNING:
FIRE OR EXPLOSION HAZARD
Failure to follow safety warnings exactly could result in serious injury,
death, or property damage.
— Do not store or use gasoline or other flammable vapors and
liquids in the vicinity of this or any other appliance.
— WHAT TO DO IF YOU SMELL GAS
•
Do not try to light any appliance.
•
Do not touch any electrical switch; do not use any
phone in your building.
• Leave the building immediately.
• Immediately call your gas supplier from a neighbour's
phone. Follow the gas supplier's instructions.
• If you cannot reach your gas supplier, call the fire
department.
— Installation and service must be performed by a qualified
installer, service agency or the gas fitter.
Installation & Maintenance Manual
PVVEX58-200 & PVVEX510-300
5/8 AND 5/10 EXTERNAL ROOF
POWER VENT
• The installation of this fireplace must be done by a
®
• Check local codes and read all instructions prior to
C
US
qualified and certified gas appliance installer.
installation.
NOTICE
Installer: Leave this manual with the appliance.
Consumer: Retain this manual for suture reference.
CAUTION
Installation and service must be performed by a qualified installer,
service agency or the gas fitter.
DANGER
Read and understand this manual. Improper installation, adjustment,
alteration, service or maintenance can cause serious injury, property
damage or even death. For assistance or additional information
consult a qualified installer, service agency or the gas supplier.
WARNING
Some materials used in the manufacturing process of this product can
expose you to Benzene which is known in the State of California to
cause cancer and birth defects or other reproductive harm. For more
information go to www.P65warnings.ca.gov
XG0518 - 100319
Advertisement
Table of Contents

Subscribe to Our Youtube Channel
Related Manuals for Montigo PVVEX58-200


Summary of Contents for Montigo PVVEX58-200
- Page 1 Installation & Maintenance Manual PVVEX58-200 & PVVEX510-300 5/8 AND 5/10 EXTERNAL ROOF POWER VENT • The installation of this fireplace must be done by a qualified and certified gas appliance installer. ® • Check local codes and read all instructions prior to installation. NOTICE WARNING: FIRE OR EXPLOSION HAZARD Failure to follow safety warnings exactly could result in serious injury, Installer: Leave this manual with the appliance.
-
Page 2: Safety Alert Key
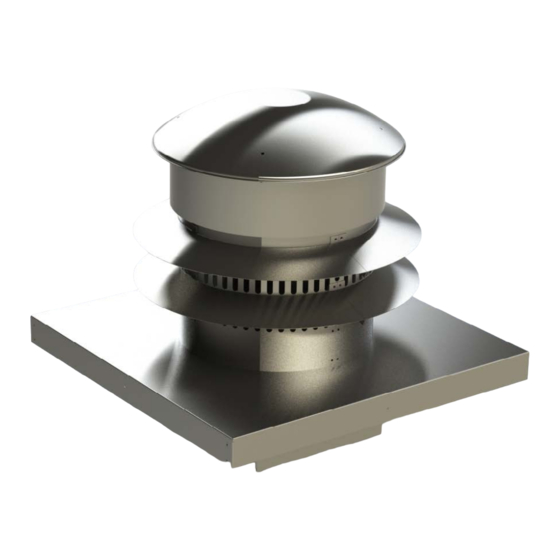
2700 RPM as it must also be adhered to. Power Cord Harnesses: Figure 1 PV Specifications The Montigo warranty will be voided by, and Montigo disclaims any responsibility for, the following actions: • EPVH10 - 10 foot power cord and harness •... -
Page 3: Table Of Contents
Section A: Before You Begin ...............3 applicable codes. Section 1: Dimensions ............... 4 PVVEX58-200 Product Dimensions ............4 NOTICE PVVEX510-300 Product Dimensions ............5 Section 2: Installing the power vent ..........6 Do not use this appliance if any part has been under water. -
Page 4: Section 1: Dimensions
General REV. DESCRIPTION DATE APPROVED WAS 24" BASE NOW 18" BASE 09/30/2019 Section 1: Dimensions PVVEX58-200 Product Dimensions [203] [126] 18.000 [457] ROUGH IN KIT 4.950 18.000 7.918 DIMENSIONS SECTION A-A 18.000 PVVEX58-200 !IMPORTANT! MAINTAIN AT LEAST NAME DATE DIMENSIONS ARE IN INCHES TOLERANCES: 2.00"... -
Page 5: Pvvex510-300 Product Dimensions
Installation PVVEX510-300 Vertical Power Vent Termination PVVEX510-300 Product Dimensions 10" 24" 5" 24" " " " 13" 18" 18" XG0518 - 100319... -
Page 6: Section 2: Installing The Power Vent
2a. Figure 3.e Unscrewing control cable cover Note: Follow local Step 5: Unscrew 2 screws and/or national code PVVEX58-300 PVVEX58-200 securing strain relief plate and requirements for roof 17½" MAX. " remove it. clearances. PVVEX58-200 PVVEX510-300 20"... -
Page 7: Conduit And Wiring Clearances
20" chase box around the Installation ation with the dimensions ere. " Step #4 Step #2 Place termination head over chase and fasten with 4 screws on the vertical sides of the base plate. Step 8: Push the molex Install the vent pipe female end up 2" Step 13: Place power vent Silicone or seal the base plate in... - Page 8 Installation Vacuum Switch Replace Vacuum Switch Replacement [REC1226] Turn off power and gas before servicing. Step 1: Disconnect 2 red wires connected to the vacuum switch. Figure 5.aa Step 2: Unscrew vacuum switch from top seperator. Remove silicone hose from nipple. Figure 5.bb Step 3: Connect new vacuum switch to existing wires, do not connect a wire to the center terminal.
-
Page 9: Capacitor Removal And Servicing
Installation Capacitor Removal and Servicing Step 5: Strip ends of all cut wires and new capacitor. Screw new capacitor and ground wire to the motor using the existing screw you saved. Using a small bell connector, connect the blue wire from the Capacitor Replacement [REC1252] motor to the black fibre wire from the power cable. -
Page 10: Motor And Capacitor Replacement
Installation Step 5: Cut the black fibre wire from the power cable. Cut the white Motor and Capacitor Replacement fibre wire from the power cable. [REC 1253] Turn off power and gas before servicing. PVVEX58-300 Top Cover Motor Removal / Servicing Step 1: Remove the 4 outer PVVEX58-300 Top Cover... - Page 11 Step 1: Screws x 4 plcs a) Remove the 4 outer screws that fasten the Top Cover to the termination b) Remove the Cover. Installation Step 2: a) Remove the 4 outer screws Screw Locations that fasten the Wind Baffle to x 4 plcs the termination.
-
Page 12: Wiring Schematic For Proflame 2 With Power Vent
Installation Wiring schematic for Proflame 2 with power vent SPARK GREEN WHITE BLACK MAIN SENSOR Power 120VAC 60 Hz MAIN ON/OFF 6 Amps SWITCH ELLOW ELLOW CPI/IPI SWITCH WHITE ELLOW/GREEN ORANGE PILOT GREEN BLACK BROWN ELLOW ORANGE VARIABLE SPEED BLACK COMFORT FANS WHITE POWER VENT GREEN GREEN BLACK BLACK BROWN... -
Page 13: Appendix A: Venting Terminations
Appendix Appendix A: Venting Terminations Covered Covered Alcove Detail Alcove Detail Vinyl Siding 2’ 2’ 2’ 2’ 17.5’’ 29.5’’ 11.5’’ 17’’ Must use Vinyl Siding Termination Shield Location Canada* USA** clearance to the termination frame above grade, veranda, porch, deck, or balcony 12 inches 12 inches clearance to top of doors or operable windows... -
Page 14: Appendix B: Warranty
(collectively referred to herein as "The Companies"), warrants the are found to be defective within the time frame stated (see The Montigo gas appliance (referred to herein as 'the appliance') to Companies investigation of claims), The Companies will, at its... -
Page 15: Appendix B: Warranty Continued
Montigo dealer (www.Montigo.com) or contact Montigo direct at techsupport@ montigo.com. Ensure you have your sales receipt and the model and serial number of your appliance. DO NOT ATTEMPT TO DO ANY SERVICE WORK YOURSELF If you cannot locate the installing dealer, or nearest dealer/ distributor, you must notify The Companies in writing. -
Page 16: Appendix C: Amendment
Appendix Appendix C: Amendment (Gas Fireplace / Equipment sold in the State of Massachusetts) 5.08: Modifications to NFPA-54, Chapter 10 (1) Revise NFPA-54 section 10.5.4.2 by adding a second exception as 4. INSPECTION. The state or local gas inspector of the side wall follows: horizontally vented gas fueled equipment shall not approve the installation unless, upon inspection, the inspector observes... - Page 17 Notes XG0226 - 180904...
- Page 18 Installation & Maintenance Manual PVVEX58-200 PVVEX510-300 Roof Power Vent XG0518 - 100319...
Need help?
Do you have a question about the PVVEX58-200 and is the answer not in the manual?
Questions and answers