
Related Manuals for Eneo MPC-52C0000M0A


Summary of Contents for Eneo MPC-52C0000M0A
-
Page 1: Quick Installation Guide
Quick Installation Guide 1/2.8” HD Camera, Day&Night, 1920x1080, WDR, C/CS, 12/24V MPC-52C0000M0A... -
Page 2: Table Of Contents
Table of content Parts supplied ......................5 Part names .........................6 Installation instructions ...................7 Setting the back focus adjustment ...........................8 Operating instructions .................... 9 Using OSD controller ..............................9 Description of the joystick operation ...................... 9 OSD menu startup ..............................10 OSD menu table ................................. 10 Further information .................... -
Page 3: Safety Instructions
Safety instructions General safety instructions • Before switching on and operating the system, rst read this safety advice and the operating instructions. • Keep the operating instructions in a safe place for later use. • Installation, commissioning and maintenance of the system may only be carried out by authorised individuals and in accordance with the installation instructions - ensuring that all applicable standards and guidelines are followed. - Page 4 Class A device note This is a Class A device. This device can cause malfunctions in the living area; in such an event, the operator may need to take appropriate measures to compensate for these. WEEE (Waste Electronical & Electronic Equipment) Correct Disposal of This Product (Applicable in the European Union and other European countries with separate collection systems).
-
Page 5: Parts Supplied
Parts supplied • Box camera • C-mount adaptor • Dust protection cap • Torque wrench 3mm • Operating instructions... -
Page 6: Part Names
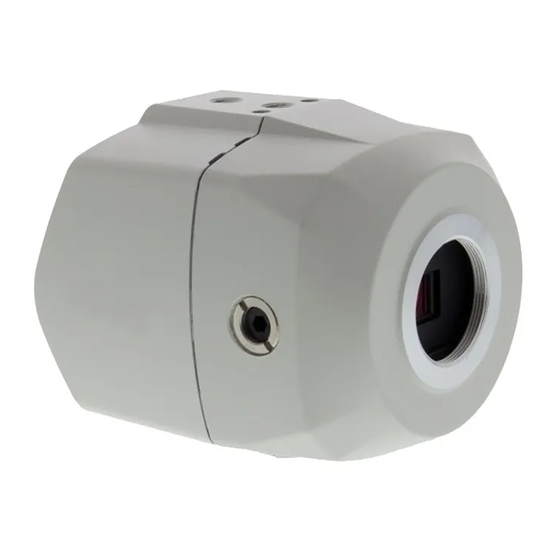
Part names Mount Holes (Top / Bottom) Body Case Dust Protection Cap Torque PIN 4 PIN 2 Wrench DC Iris Damp(-) Back focus Damp(+) adjustment Drive(+) PIN 3 PIN 1 ③ CONTROL ① ④ CVBS HD-A ⑤ POWER ② ⑥ OSD Control Joy stick Power input terminal (AC24V/DC12V) Video format selection Switch... -
Page 7: Installation Instructions
CAUTION: The camera has a built-in 1/2.8” sensor so using a quali ed 1/2.8” C/CS mount lens is recommended. Some unquali ed lenses may have a smaller image circle even if the speci cation is 1/2.8” so it may cause vignetting on the video. Please ensure the correct image circle size of the lens before installation to prevent vignetting on the video. -
Page 8: Setting The Back Focus Adjustment
Setting the back focus adjustment The proper back focus adjustment is essential for the motorized zoom lens to get the all time sharp focus when zooming in and out by the remote control. For easier and better adjustment, this camera provides FOCUS ASSIST menu which prevents mistakes during the focus adjustment. -
Page 9: Operating Instructions
Operating instructions Using OSD controller Setup menu can be accessed and controlled by OSD control joy stick on the rear of the camera unit. Five commands are available with the joy stick. CVBS/HD-A CONTROL CVBS HD-A OSD Control Joy Stick POWER Description of the OSD control operation 1. -
Page 10: Osd Menu Startup
OSD menu startup Press the ‘OSD menu SET key’ down to access the setup menu mode. • EXIT : Enters ‘EXIT’ menu with save current setting or without save. • RETURN : Returns to the previous menu. MENU V0. XX 1. -
Page 11: Further Information
SYSTEM TV SYSTEM US(NTSC), EU(PAL) LANGUAGE ENG, CHN(S), CHN, JPN, KOR, GER CAM TITLE OFF, RIGHT UP, LEFT DOWN RESET EXIT SAVE, CANCEL (*) Not Available Further information The manual is also available from the eneo web site at www.eneo-security.com. - Page 12 Inhaltsverzeichnis Lieferumfang ......................15 Bezeichnungen von Gerätekomponenten ............. 16 Installationsanweisungen ..................17 Au agemaßregler einstellen ........................... 18 Betriebsanleitung ....................19 Bildschirmmenü-Steuerung verwenden ....................... 19 Beschreibung der Joystick-Bedienung ....................19 Bildschirmmenü starten .............................. 20 Bildschirmmenü-Übersicht ............................20 Weitere Informationen ..................... 21...
- Page 13 Sicherheitsanweisungen Sicherheitshinweise allgemein • Bevor Sie das System anschließen und in Betrieb nehmen, lesen Sie zuerst diese Sicherheitshinweise und die Betriebsanleitung. • Bewahren Sie die Betriebsanleitung sorgfältig zur späteren Verwendung auf. • Montage, Inbetriebnahme und Wartung des Systems darf nur durch dafür autorisierte Personen vorge- nommen und entsprechend den Installationsanweisungen - unter Beachtung aller mitgeltenden Normen und Richtlinien - durchgeführt werden.
- Page 14 • Bei abgedunkelter Umgebung und direktem Blick in den IR-Scheinwerfer ist ein Sicherheitsabstand von > 1 m zum Scheinwerfer einzuhalten. • Unsichtbare LED Strahlung nicht direkt mit optischen Instrumenten (z.B. Lupe, Vergrößerungsglas oder Mikroskop) betrachten, da sie eine Augengefährdung verursachen kann, LED Klasse 1M. •...
-
Page 15: Lieferumfang
Lieferumfang • Boxkamera • C-Mount-Adapter • Staubschutzkappe • Inbusschlüssel 3mm • Betriebsanleitung... -
Page 16: Bezeichnungen Von Gerätekomponenten
Bezeichnungen von Gerätekomponenten Montagelöcher (Oben / Unten) Hinteres Gehäuse Staubschutzkappe Vorderes Gehäuse PIN 4 PIN 2 Inbusschlüssel DC-Blende Damp(-) Damp(+) Auflagemaßregler Drive(+) PIN 3 PIN 1 ③ CONTROL ① ④ CVBS HD-A ⑤ POWER ② ⑥ Joystick zur Bildschirmmenü-Steuerung Stromversorgungsanschluss (24V AC / 12V DC) Videoformat-Schalter FBAS/HD-Analog Ausgangsbuchse LED-Stromanzeige... -
Page 17: Installationsanweisungen
ACHTUNG: Die Kamera verfügt über einen eingebauten 1/2,8” Sensor. Es wird daher die Verwendung eines 1/2,8” C/CS -Mount Objektivs empfohlen. Manche ungeeignete Objektive besitzen einen kleineren Bildkreis, selbst wenn sie für 1/2,8” spezi ziert sind. Dies kann zu Abschattungen auf dem Video führen. Bitte stellen sie die Eignung des Objektivs vor der Installation sicher, um Abschattungen auf dem Video zu vermeiden. -
Page 18: Au Agemaßregler Einstellen
Au agemaßregler einstellen Die korrekte Au agemaßeinstellung ist für motorisierte Zoomobjektive entscheidend, um beim Heran- und Herauszoomen mittels Fernsteuerung zu jedem Zeitpunkt eine scharfe Fokussierung zu erhalten. Für eine einfachere und bessere Einstellung verfügt diese Kamera über ein FOCUS ASSIST-Menü, um Fehler bei der Fokuseinstellung zu verhindern. -
Page 19: Betriebsanleitung
Betriebsanleitung Bildschirmmenü-Steuerung verwenden Zugri und Steuerung des Kon gurationsmenüs können über den OSD Joystick am hinteren Teil der Kamera erfolgen. Fünf Befehle stehen mit dem Joystick zur Verfügung. CVBS/HD-A CONTROL Joystick zur CVBS HD-A Bildschirmmenü-Steuerung POWER Beschreibung der Joystick-Bedienung 1. SET-Taste( ) : Zum Zugreifen auf das Menü... -
Page 20: Bildschirmmenü Starten
Bildschirmmenü starten Drücken Sie die Taste ‘SET-Taste für Bildschirmmenü’, um in das Setup-Menü zu gelangen. • EXIT : Öffnet das EXIT-Menü mit der Möglichkeit die aktuellen Einstellungen zu speichern oder zu verwerfen. • RETURN (ZURÜCK): Kehrt zum vorherigen Menü zurück. MENU V0. -
Page 21: Weitere Informationen
1080 30P(25P), 720 30P(25P), 720 60P(50P) SYSTEM TV-SYSTEM US(NTSC), EU(PAL) SPRACHE ENG, CHN(S), CHN, JPN, KOR, GER KAMERATITEL AUS, RECHTS OBEN, LINKS UNTEN WERKSEINSTELLUNGEN EIN EXIT SPEICHERN, ABBRECHEN (*) Nicht verfügbar Weitere Informationen Dieses Handbuch ist auch auf der eneo-Webseite unter www.eneo-security.com verfügbar. - Page 22 Contenu Matériel livré ......................25 Noms des pièces ..................... 26 Instructions d'installation ..................27 Réglage du verrou de mise au point arrière ....................28 Mode d'emploi ....................... 29 Utilisation d'une commande OS ........................29 Description du fonctionnement de la manette de contrôle ............29 Démarrage du menu OSD ............................
- Page 23 Instructions de sécurité Consignes de sécurité générales • Avant de brancher et de mettre en service le système, veuillez lire d'abord ces consignes de sécurité ainsi que la notice d'instructions. • Conservez soigneusement la notice d'instructions en vue d'une utilisation ultérieure. •...
- Page 24 • Une distance de sécurité > 1 m doit être respectée par rapport au projecteur dans un environnement sombre, quand on regarde directement dans le projecteur IR. • Les rayons invisibles des LED ne doivent pas être observés directement avec des instruments optiques (par ex.
-
Page 25: Matériel Livré
Matériel livré • Caméra Box • Adaptateur monture C • Capuchon de protection contre la poussière • Clé Torx 3 mm • Mode d'emploi... -
Page 26: Noms Des Pièces
Noms des pièces Pas de vis (haut et bas) Panneau arrière Capuchon de protection contre la poussière Panneau avant PIN 4 PIN 2 Clé Torx N° DC Iris Affaiblissement(-) Réglage de Affaiblissement(+) la distance focale Commande(+) Terre PIN 3 PIN 1 ③... -
Page 27: Instructions D'installation
ATTENTION: L’appareil photo dispose d’un capteur intégré de 1/2,8 “, de sorte qu’il est recommandé d’utiliser un objectif de montage C / CS quali é de 1/2,8”. Certaines lentilles non quali ées peuvent avoir un cercle d’image plus petit, même si la spéci cation est de 1/2.8 “a n de provoquer un vignettage sur la vidéo. -
Page 28: Réglage Du Verrou De Mise Au Point Arrière
Réglage du verrou de mise au point arrière Il est essentiel de régler la mise au point arrière a n qu'une mise au point optimale au moyen de la télécommande soit garantie. Pour un réglage plus facile et de meilleure qualité, cette caméra est équipée d'un menu FOCUS ASSIST (assistant de mise au point) qui empêche les erreurs pendant le réglage de la mise au point. -
Page 29: Mode D'emploi
Mode d'emploi Utilisation d'une commande OS L'accès et la commande du menu de con guration peut s'e ectuer par le biais du joystick de commande OSD situé à l'arrière de la caméra. Cinq fonctions de commande sont disponibles avec la manette. CVBS/HD-A CONTROL CVBS... -
Page 30: Démarrage Du Menu Osd
Démarrage du menu OSD Appuyez sur la touche SET du menu OSD pour accéder au mode menu de con guration. • EXIT (SORTIE) : active le menu 'EXIT' avec enregistrement du réglage actuel ou sans enregistrement. • RETURN (RETOUR) : retourne au menu précédent. MENU V0. -
Page 31: Complément D'information
ENG, CHN(S), CHN, JPN, KOR, GER Titre de la caméra ARRÊT, EN HAUT À DROITE, EN BAS À GAUCHE Réinitialiser MARCHE QUITTER SAUVER, ANNULER (*) Indisponible Complément d'information Le manuel complet est également proposé sur le site Web d’eneo : www.eneo-security.com... - Page 32 Indice Parti fornite ......................35 Denominazione dei componenti ................36 Istruzioni per l'installazione .................. 37 Impostazione della profondità di fuoco ......................38 Istruzioni per l'uso ....................39 Utilizzo del controller OSD ........................... 39 Descrizione del funzionamento del joystick ..................39 Avvio del menu OSD ..............................
- Page 33 Istruzioni per la sicurezza Istruzioni generali per la sicurezza • Prima di collegare e mettere in funzione il sistema, leggete le istruzioni per la sicurezza e le istruzioni per l'uso. • Conservate con cura le istruzioni per l'uso per un eventuale utilizzo futuro. •...
- Page 34 • Deve essere mantenuto un margine di sicurezza di > 1 m dal proiettore se si guarda direttamente nel proiettore IR in un ambiente buio. • Non guardare direttamente le radiazioni LED invisibili utilizzando strumenti ottici (ad es. lente, lente di ingrandimento o microscopio) per prevenire danni agli occhi ( LED classe 1M).
-
Page 35: Parti Fornite
Parti fornite • Telecamera in box • Adattatore montaggio a C • Copertura parapolvere • Chiave dinamometrica da 3 mm • Istruzioni per l'uso... -
Page 36: Denominazione Dei Componenti
Denominazione dei componenti Fori di montaggio (superiore / inferiore) Scatola posteriore Copertura parapolvere Scatola anteriore PIN 4 PIN 2 Chiave a bussola DC Iris Damp(-) Regolazione della Damp(+) profondità di fuoco Drive(+) TERRA PIN 3 PIN 1 ③ CONTROL ① ④... -
Page 37: Istruzioni Per L'installazione
ATTENZIONE: La fotocamera è dotata di un sensore integrato da 1/2.8 “, quindi è consigliabile utilizzare una lente di montaggio adattata da 1/2.8” C / CS. Alcune lenti non quali cate possono avere un cerchio di immagine ridotto anche se la speci ca è di 1/2.8 “in modo che potrebbe causare vignettatura sul video. -
Page 38: Impostazione Della Profondità Di Fuoco
Impostazione della profondità di fuoco Una regolazione corretta della profondità di fuoco è essenziale a nché l'obbiettivo a zoom motorizzato garantisca una messa a fuoco sempre nitida quando si aumenta e riduce lo zoom con il telecomando. Per una regolazione migliore e più semplice, questa telecamera offre il menu FOCUS ASSIST (Assistenza per la messa a fuoco) che impedisce errori durante la regolazione della messa a fuoco. -
Page 39: Istruzioni Per L'uso
Istruzioni per l'uso Utilizzo del controller OSD Si può accedere al menu di con gurazione e gestirlo tramite il joystick di comando dell'OSD nella parte posteriore della telecamera. Tramite il joystick sono disponibili cinque comandi. CONTROL CVBS/HD-A CVBS HD-A Joystick di comando dell'OSD POWER Descrizione del funzionamento del joystick 1. -
Page 40: Avvio Del Menu Osd
Avvio del menu OSD Premere il tasto 'OSD menu SET' verso il basso per accedere alla modalità del menu di impostazione. • EXIT: consente di accedere al menu 'EXIT' con l'impostazione di salvataggio corrente o senza salvataggio. • RETURN (Indietro): ritorna al menu precedente. MENU V0. -
Page 41: Altre Informazioni
TV SYSTEM US(NTSC), EU(PAL) LANGUAGE ENG, CHN(S), CHN, JPN, KOR, GER CAM TITLE OFF, RIGHT UP, LEFT DOWN RESET EXIT (Esci) SAVE, CANCEL (*) Non disponibile Altre informazioni Il manuale è disponibile anche sul sito web di eneo all'indirizzo www.eneo-security.com. - Page 44 VIDEOR E. Hartig GmbH Exclusive distribution through specialised trade channels only. VIDEOR E. Hartig GmbH Carl-Zeiss-Straße 8 63322 Rödermark/Germany Tel. +49 (0) 6074 / 888-0 Technical changes reserved Fax +49 (0) 6074 / 888-100 www.videor.com...
Need help?
Do you have a question about the MPC-52C0000M0A and is the answer not in the manual?
Questions and answers