Table of Contents
Advertisement
Quick Links
Advertisement
Table of Contents

Summary of Contents for Ashun Sound Machines HYDRASYNTH
- Page 1 Owner’s Manual OUTPUT L/MONO...
-
Page 2: Special Thanks
Information contained in this manual is subject to change without notice and does not represent a commitment on the part of Ashun Sound Machines. The software described in this manual is provided under the terms of a license agreement or non-disclosure agreement. -
Page 3: Important Safety Instructions
The information contained in this manual is believed to be correct at the time of printing. However, Ashun Sound Machines reserves the right to change or modify any of the specifica- tions without notice or obligation to update the hardware that has been purchased. -
Page 4: Table Of Contents
....... . 14 ..... . . 24 Top Panel: Hydrasynth Keyboard Octave Transpose . - Page 5 The Amp Module Amp module ......31 ....46 FX group .
- Page 6 The CV / Gate Section How does Analog Feel? ....61 ... . . 77 Stereo mode .
- Page 7 PolyAT Transmit ......87 Hydrasynth Specifications MIDI: Page 6 ......88 .
-
Page 8: Welcome To Hydrasynth
Main Features This chapter will only list the main features of the Hydrasynth. But there are many more, and each feature and its related parameters will be described in the pages ahead. Advanced users... -
Page 9: Effects
Effects Hardware • Delay: five types, including Left-Right- • MIDI In/Out/Thru Center and reverse • USB type B port, class-compliant • All delays can sync to tempo • CV/Gate inputs and outputs for integration • Reverb: four types, with pre-delay and with modular synthesizers damping parameters •... -
Page 10: Quick Start Guide
Quick Start Guide Inside the Box Your Hydrasynth was carefully packed at the factory with the following items: • The Hydrasynth • The power supply (12VDC / 1A) • This manual • Rack ears (Hydrasynth desktop only) Save Your Receipt! Ashun Sound Machines designed and constructed your Hydrasynth with extreme attention to detail. -
Page 11: Make Some Noise
By now you’ve already played the instrument and tweaked the controls. Now let’s take a quick tour of some of the main features. To get started, press the Home button. This will exit any page and take the Hydrasynth to the top level of the patch. -
Page 12: Tweaking The Sounds
Keyboard-specific controls The following controls are present on the top panel of the Hydrasynth keyboard, not the desktop model. However, these parameters are available for both units: see Arp parameters: page 2 (p. 67). Control Function Tempo Turn this to adjust the tempo, or use the Tap Tempo button. -
Page 13: Check For Updates
Be sure to visit www.AshunSoundMachines.com soon, and often! It’s your source for important things such as: • Firmware updates for your Hydrasynth • Tutorial videos to help you master the intricacies of the Hydrasynth • An interactive version of this manual •... -
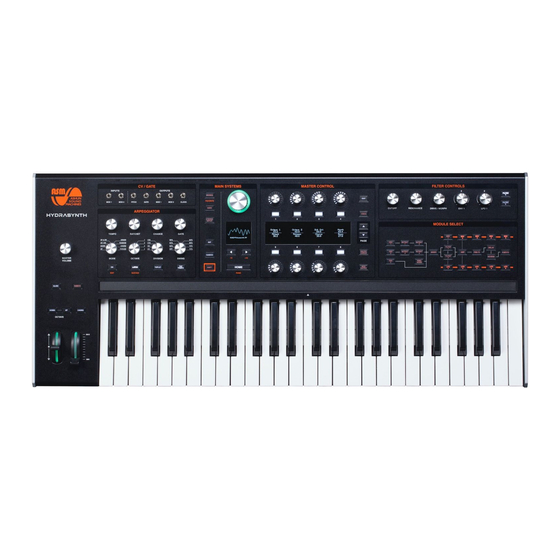
Page 14: Overview
Module Select section Main Systems section Master Control section Pads The majority of the features of the Hydrasynth keyboard and desktop models are identical, and most sections of this manual apply to both. Please refer to Hydrasynth Desktop (p. 24) for more information about the features specific to that unit. -
Page 15: General Concepts
General Concepts Access buttons Control buttons The orange-lettered Access buttons are Each Control knob is paired with a Control located in several areas of the top panel. All of button. Their function also depends on the the buttons in the Module Select section and page that has been accessed. -
Page 16: Knob Types
Variable knobs most-used parameters. The Page up/down buttons put all other parameters within easy Hydrasynth uses two types of variable knobs: reach. • 270° encoders: The range has an upper and lower limit. Examples: Master Volume, Filter Cutoff •... -
Page 17: The Home Button
Module using a similar method: the top panel. It provides a quick way to get • Hold [INIT]. back to the top level of the Hydrasynth, where the Macro controls are. This is known as the • Press the Access button for the desired Home page. -
Page 18: The Shift Button
There’s nothing wrong row of orange text under the control. with that; we’re glad you like the sound of the Hydrasynth! But if you’re looking for In some cases [SHIFT] is used to accelerate something different, let the Hydrasynth select value selection. -
Page 19: Page Up / Down Buttons
You may have noticed that the Arpeggiator sections are different on the Hydrasynth keyboard and desktop models. But their capabilities are identical; the only difference is the number of controls on the top panel. -
Page 20: Filter Controls
This is especially true during an But again, all of the same features are available arpeggio or a sequenced passage. in the pages of the Filter modules. For details, Hydrasynth offers several controls for exactly refer to The Filters and their Controls (p. 42). -
Page 21: Chord Mode (Keyboard Only)
• Chord mode puts the keyboard into mono mode (last note priority) Front Panel (keyboard only) The Hydrasynth keyboard model has its headphone connectors on the front panel under the keyboard. Headphone jacks Phones volume control The two most common sizes for headphone Moving the level dial to the right will increase connectors are provided. -
Page 22: Rear Panel
Rear Panel 23 24 25 26 27 Rear panel of the Hydrasynth desktop model is pictured Section Name Description Phones output (desktop only) Keyboard: see Front panel description above Outputs Left (mono), Right (for stereo) Sustain pedal input Polarity sensing on startup... -
Page 23: Midi
We or CV / Gate connectors. encourage you to take advantage of this • MIDI Out sends data from the Hydrasynth additional level of protection for the power to another MIDI device supply cord. -
Page 24: Hydrasynth Desktop
Attaching the Rack Ears We’ve included rack ears with the Hydrasynth desktop model so you can put it into a rack if you prefer. It’s easy to attach them: 1. -
Page 25: Changing The Pad Key
Changing the Pad Key We’ll describe this first before getting into the Pad Modes. In addition to selecting scales and Pad Modes it’s also possible to define the root key for the pads. The default key is C, but you can choose any note in the chromatic scale. -
Page 26: Pad Modes
Pad Modes • Octave Row makes each row of pads into its own octave, with the root note assigned Each Pad Mode changes the pad colors visible to the first and last pad in each row. The last pad in row 1 plays the same note as the on the Home page. -
Page 27: Pad Mode Examples
Pad Mode examples Chromatic: C Pad # 17-24 9-16 Pad Mode = Chromatic, Pad Key/Scale = C Chromatic; = root (yellow), # = red, all others = blue A Chromatic scale contains all 12 notes, so none of the pads are grey. Instead, red pads are the equivalent of the black keys on a piano, and blue keys are the equivalent of the white keys. - Page 28 Fretboard: C Major x2 Pad # 17-24 9-16 Pad Mode = Fretboard, Pad Key/Scale = C Major; Voice Scale = Major = root (yellow), CAPS = in scale (blue), lower case = quantized to note in scale (grey) In this case the pads look the same, but the grey pads are forced to play notes within the Voice Scale.
-
Page 29: Pad Scale Vs. Voice Scale
Octave: C Major Pad # 17-24 9-16 Pad Mode = Octave, Pad Key/Scale = C Major; = root (yellow), in-scale notes = blue Octave: C Maj Pent Pad # 17-24 9-16 Pad Mode = Octave, Pad Key/Scale = C Chromatic; = root (yellow), # = red, all others = blue Pad Scale vs. -
Page 30: Understanding The Modules
Understanding the Modules The orange-lettered Access buttons select particular modules for editing, and can also be used to create new mod routes. They are arranged in the order of signal flow, from left to right: [Osc] > [Mixer] > [Filter] > [Amp] > [FX]. The front panel graphics indicate this, and also show the interactions and independence of the modules. -
Page 31: Amp Module
The front panel buttons can do a lot more If you’ve chosen valid components for the than access parameters for editing. They can route the Hydrasynth will jump directly into be used to create a mod route within seconds, the Mod Matrix at the first empty modulation... -
Page 32: Select Macro Destinations
Oscillator cannot be pasted to one of the buttons make it easy to set these up. Filters, for example. Here’s a table that shows First the Hydrasynth must be on the Macro the possible combinations. Assign page, where the module buttons... -
Page 33: The Oscillator Group
Mutants, Filters, Envelopes, etc. Hydrasynth has 3 oscillators per voice. Oscillators 1 and 2 can operate in two different modes: Single and WaveScan. Oscillator 3 operates only in Single mode. The same waveforms are available in both modes, but the features of each mode are very different. -
Page 34: Wavescan Mode
When a WAV is set to OFF, any WAV after it is treated as if it were located in an earlier position. For example, if WAV 7 = OFF but WAV 8 = Pulse4, the Hydrasynth handles Pulse4 as if it were WAV 7. -
Page 35: Mutants 1-4
2-operator stack, with a carrier and a modulator. Unlike the most famous synth of the mid-1980s, which used only sine waves, the Hydrasynth can use any of its 219 waveforms as both the carrier and the modulator. The FM Source can also be generated by the Mutant itself (Sine or Triangle), another Mutant module, or the CV inputs (Mod In 1 or Mod In 2). -
Page 36: Wavstack
Traditionally this is done with simple waveforms, and with the second oscillator affecting the first. Hydrasynth provides many more options, including the use of all 219 waveforms in either position, the ability to sync Osc 1 and/or Osc 2, and the ability for any of the three oscillators to be used as the sync source. -
Page 37: Pw-Orig
PWM parameter Range Description Ratio 0.250-64.000 in How many times PWM happens in a single cycle. varying increments Hold [SHIFT] to jump by whole numbers. Depth 0-128 in increments Controls harmonic range of PWM of 0.1 Feedback 0-150% Feeds the PWM output back into itself Custom Edit (access) Press Control button 7 to access Warp points. -
Page 38: Ring-Noise Module
Harmonic parameter Range Description Ratio 0.250-64.000 in varying Selects initial harmonic for emphasis. increments Hold [SHIFT] to jump by harmonics. Depth 0-128 in increments of 0.1 Controls harmonic range Feedback 0-150% Feeds the harmonic output back into itself; can tame effect due to phase cancellation Dry/Wet 0-100% Mix raw waveform + harmonic;... -
Page 39: Waveform List
Parameter Pertains to... Range Description Source 1 Osc 1-3, Noise, Mutant 1-4, Select the first input source Mod In 1, Mod In 2 Source 2 Same as Source 1 Select the second input source RM Depth 0-128 in increments of 0.1 Depth of Ring Modulation Ring Vol 0-128 in increments of 0.1... -
Page 40: The Mixer Module
When creating a patch you may want to hear one of the sources on its own while making adjustments to that source. Rather than setting the other levels to zero temporarily and restoring them later, Hydrasynth includes a Solo function. It’s easy to use: •... -
Page 41: Set The Pan Positions
Set the Pan Positions Osc 1-3 Pan To set the stereo placement of the oscillators, access [MIXER] and use the Page Down arrow to select page 2. In the top row are the pan positions for Oscillators 1-3. Use the appropriate Control knob to adjust the pan position of each item, and use [SHIFT] + Control knob X to fine-tune the value. -
Page 42: The Filters And Their Controls
But we didn’t want Hydrasynth to sound like a clone of any instrument, so we took some of the flavor of the original filters and made something new. As with the oscillators, you will find that the Hydrasynth filters add their own signature to the sound. - Page 43 Control knob Parameter Range Description Control (type = Vowel only) 0.0-128.0 Formant control Cutoff 0.0-128.0 Cutoff frequency for most; vowel control for Vowel filter Resonance 0.0-128.0 Controls resonance or Q ENV 1 amount +/- 64.0 Sets amount & polarity of Envelope 1 effect on filter LFO 1 amount +/- 64.0...
-
Page 44: Filter 1 Parameters
Keytrack This parameter scales the filter response value means that notes above the center across the keyboard, with C2 as the center note decrease the filter cutoff frequency, and note. A positive value means that notes above notes below the center note increase the filter the center note increase the filter cutoff cutoff frequency. -
Page 45: Filter 2
Filter 2 Filter 2 is our adaptation of a classic 2-pole state-variable filter. It is the only filter type offered by Filter 2, and it provides a perfect complement to Filter 1. The filters can be used in Series or Parallel. This setting is found on page 2 of Filter 1. -
Page 46: The Amp Module
The Amp Module The Amp module is relatively simple, and has only three parameters. Control knob Parameter Range Description LFO 2 amount +/- 64.0 Sets amount and polarity of LFO 2 amplitude modulation Velocity +/- 64.0 Adjusts amplitude velocity response Amp Level 0.0-128.0 Controls pre-FX level of patch How the Parameters Interact... -
Page 47: The Envelopes
An envelope defines the shape of a modulation: how it begins, how it ends, and how big it will be in the middle. Hydrasynth has 5 envelopes that can be used to shape any available parameter through the Mod Matrix. All 5 have identical parameters, so every description applies equally to all. -
Page 48: Envelope Parameters
Envelope parameters: page 1 Control knob Parameter Range Description Attack BPM = Off: 0 ms to 36.0 seconds After the delay period, this BPM = On: 0, 1/64T to 64’ (16 is the length of time the measures) envelope takes to reach its full amplitude. -
Page 49: Envelope Parameters
Envelope parameters: page 2 Control knob Parameter Range Description AtkCurve Log (-64) > Lin (0) > Defines the curve for the attack segment. Exp (64) DecCurve Log (-64) > Lin (0) > Defines the curve for the decay segment. Exp (64) (blank) RelCurve Log (-64) >... -
Page 50: Envelope Shortcuts
Freerun 9. Play the 8th note and listen as the filter sweeps through all frequencies An envelope set to Freerun passes through all 10. Wait until the filter stabilizes for voice 8, segments, even if the note is released before then play C again. -
Page 51: The Lfos
Voice module chapter. LFOs 1 and 2 Hydrasynth has pre-wired connections linking LFO 1 to the Filters and LFO 2 to the Amp module. More LFOs can be routed to these destinations as needed through the The Mod Matrix (p. 73). - Page 52 Delay BPM = Off: 0 ms to 32.0 seconds Length of time before LFO BPM = On: 0, 1/64T to 64’ (16 bars) begins Fade In BPM = Off: 0 - 5943 ms Length of time LFO takes to BPM = On: 0, 1/64T to 64’ (16 bars) rise to maximum amplitude Phase 0°...
-
Page 53: Lfo Parameters
LFO parameters: page 2 Control Parameter Range Description knob Steps (only visible when Wave = Step) Specific LFO points can be defined Smooth 0-127 Slows waveform changes (hidden for Triangle waveform) One-Shot Off, On On = LFO completes 1 cycle and stops Step Edit... -
Page 54: Lfo Shortcuts
Here are more ideas for using the Step LFO: • To hold a pitch for one or more steps, use the same value as previous step or the next • The maximum Step values are +/- 64.0, one. so the total range is a little wider than an octave above and below the root pitch. -
Page 55: The Effects
Swiss Army knives. Any tool you need for your music, Hydrasynth has it. Some parameter names are shown below in [brackets]. These are available as mod desti- nations for Macros and the Mod Matrix. -
Page 56: Flanger
Flanger Control knob Parameter Range Description Preset Selects preset template [Rate] 0.02-10.0 Hz Controls the flanger rate [Depth] 0.0-128.0 Controls the flanger depth Offset +/- 180° Sets initial phase of effect relative to input Feedback +/- 63 Feeds flanger back into itself (positive or negative polarity) Mono/St Mono, Stereo Selects mono or stereo output... -
Page 57: Lo-Fi
Lo-Fi Control knob Parameter Range Description Preset Selects preset [Cutoff ] 160-20,000 Hz Filter cutoff frequency [Resonance] 1.0-12.0 Filter resonance Filter Type Thru, PWBass, Radio, Selects filter model Tele, Clean, Low Output - 6 / + 36 dB Gain compensation control Sampling 44,100-2,756 Hz Sets downsampling rate... -
Page 58: Compressor
Blends unaffected and affected signals Delay Types Hydrasynth offers 5 delay types, each with distinct characteristics: • Basic Mono combines the stereo input signal and produces a mono delay. • Basic Stereo preserves the stereo positioning of the input signal. -
Page 59: Reverb Types
Reverb Types Hydrasynth provides 4 reverb types, each with distinct characteristics: • Hall • Room • Plate • Cloud Reverb Parameters All of the reverbs have identical parameters, so we’ll describe them once. Control knob Parameter Range Description PreDelay 0.5-250 ms... -
Page 60: The Voice Module
The Poly setting allows all eight of the Detune value. Hydrasynth voices to trigger independently. When the ribbon is set to Theremin mode, Random Phase one voice is reserved for that purpose and the other seven are available from the keyboard. -
Page 61: How Does Analog Feel
Rotate This setting arranges the 8 voices in an orderly 7 5 3 1 2 4 6 8 fashion across the stereo field. The Hydrasynth Alter will change voices every time a note is played, even if the same note is repeated. The voices... -
Page 62: Pitch Bend
Pitch Bend Glide settings This parameter enables the pitch bend wheel Glide causes the pitch to slide between notes to cover as much as a four-octave range: two rather than changing in chromatic steps. octaves up and two octaves down (+/- 24 When the Glide effect is enabled it reveals semitones). -
Page 63: Select A Scale
Select a Scale Quick assign To assign notes quickly to the custom scale, There are 38 preset scales available. It is hold Control button 1 and play the desired possible to create a custom scale if you don’t notes on the keyboard or pads. The existing find the one you want (see the next section). -
Page 64: Ribbon Controller (Keyboard Only)
When the ribbon controller is in Theremin mode it reserves a voice for itself. This reduces the number of voices available on the Hydrasynth keyboard from 8 to 7. Theremin mode offers the Hold and Lock Global settings described above, and several more. -
Page 65: The Ribbon As A Mod Source
The Ribbon can be in Pitch Bend mode or Theremin mode and be a mod source in the Mod Matrix at the same time. The Ribbon as a Mod Source There’s a separate chapter that describes how to use The Mod Matrix (p. 73), so you’ll want to read that too. -
Page 66: The Arpeggiator Section
A well-designed arpeggiator can make someone who’s new to music sound like a pro. Add a bit of music theory and some sound design chops to the mix and the results can be amazing. The presets make an ironclad case for that. An overview of the Hydrasynth arpeggiator features was provided in the Arpeggiator basics (p. 11) section of the Quick Start Guide. -
Page 67: Arp Parameters
Mode • Increase Length to 5. The lowest note of the chord will appear in the second octave. Control knob 7 is used to specify the direction • Increase Length to 6, then 7, then 8. of the arpeggio and other behaviors. For the Gradually each note of the chord will following descriptions we’ll use a 3-note chord appear in the second octave. -
Page 68: Additional Arp Features
Additional Arp Features Latch and Sustain Latch Sustain [LATCH] LED status Button lit constantly Press [LATCH] to activate Latch mode. This Flashing cycle: 0.8s lit, 0.2s enables you to take your fingers off the keys or unlit pads and use both hands to adjust parameters while an arpeggio is running. -
Page 69: Mastering The Macros
Mastering the Macros Macros are powerful, expressive tools for song creation and live performance. Every factory patch has up to 8 Macros that maximize their creative potential. Each Macro is a combination of one of the Control knob / button pairs and a list of destinations, sort of like a private Mod Matrix grouped around the Right display. -
Page 70: Name The Macro
9. Hold a note and use Control knob 5 and 10. With these settings the knob sweeps an Control button 5 to audition the Macro. octave; the button jumps a whole step. All 8 routes will respond. The MacroBtn parameter on System The Macro knob/button pair you are Setting page 2 defines the behavior of the editing will behave this way on the Home... -
Page 71: Macro Button Response
Macro Button Response There’s a separate chapter for The System Setup Pages (p. 84), but this information affects how the Macro buttons behave on the Home page and while auditioning a Macro during editing. To access the Macro Button settings, press [SYSTEM SETUP] and press the Page Down arrow once to reach page 2. -
Page 72: Preset Macro Name List
Preset Macro Name List These are the preset Macro names found on Macro Edit page 4. You can also create your own Macro names; see Name the Macro (p. 70). Macro name Macro name Macro name Macro name Macro name Crystal Harmony Phrase Stretch... -
Page 73: The Mod Matrix
The Mod Matrix Modular synthesizers use cables to make connections. Hydrasynth has a much neater solution: an easy-to-use internal patch bay with 32 sets of modulation sources and destinations. Creating Mod Routes There are two ways to create a new mod route in the Mod Matrix. The first one is to access the Mod Matrix page directly. -
Page 74: Notes About Mod Routes
Ribbon Controller (keyboard only) (p. 64). If all 32 modulation routes are occupied and you try to add another, the Hydrasynth will show a message for two seconds that says “Mod Matrix Slots Full!” More Shortcuts Copy Mod X to Mod Y... -
Page 75: Modulation Sources
Modulation Sources These the mod sources available in the Hydrasynth. A few may need explanation; see below the chart. Group Modulators Env 1, Env 2, Env 3, Env 4, Env 5 LFO [1] LFO 1, LFO 2, LFO 3, LFO 4, LFO 5, LFO 1+, LFO 2+, LFO 3+, LFO 4+, LFO 5+... - Page 76 Pre-FX Param1, Param2, Dry/Wet Delay Time, Feedback, Wet Tone, FeedTone, Dry/Wet Reverb PreDelay, Time, Tone, HiDamp, LoDamp, Dry/Wet Post-FX Param1, Param2, Dry/Wet Env 1 Attack, Hold, Decay, Sustain, Release Env 2 Attack, Hold, Decay, Sustain, Release Env 3 Attack, Hold, Decay, Sustain, Release Env 4 Attack, Hold, Decay, Sustain, Release Env 5...
-
Page 77: The Cv / Gate Section
21st century has brought these connection protocols back to the forefront of the music creation process for many musicians. Hydrasynth is well-stocked in this area too, with two CV inputs and three CV outputs, plus a Gate Out connector and another that transmits clock signals. Each of the CV/Gate connectors can be configured to match the voltages and signal types of the most popular formats. -
Page 78: Compatibility
Compatibility There are several voltage standards that companies use, so the Hydrasynth allows you to set the voltage ranges to match the source device. Those are defined on System Setup pages 7-9. More later about that. Output Connectors The output connectors (Pitch, Gate, Mod 1, Mod 2, and Clock) convert data from the Hydrasynth into voltages, which can then be used to trigger notes and control parameters on an external device. -
Page 79: Esoteric Uses
CVs and Arpeggios Page 9 (p. 90). CV Inverter The Hydrasynth arpeggiator can be used to modulate external devices, too. When You can also use the CV/Gate section as a CV the arpeggiator plays notes it’s the same as inverter, though this involves both Mod 1 and playing the keys or pads manually: each note Mod 2. -
Page 80: Patch Management
Patch Management The process of saving a patch and finding it later are closely related, so both are covered in this chapter. Using the Browser Whether you’re hunting for a specific patch or looking for something in a particular category, the Browser has several features that will help you quickly locate what you need. -
Page 81: Compare
The Left display indicates which of the 4 patch with its unedited version (the default groups is selected. selection) or with any other Hydrasynth patch. Control knob 5 is used to scroll through the 5. Return to the Home page to select... -
Page 82: Save The Patch
So the first time the [SAVE] remembered when power is turned off. button is pressed the Left display might show If you know you’ll be using the Hydrasynth the message “Protection is On!” This will need somewhere that a curious person might have to be disabled before a patch can be saved. -
Page 83: Macro Options
Macro knobs and the status of all Macro hate to lose something you’ve created on the buttons (On or Off ). Hydrasynth, be it a patch or a list of Favorites, that’s the time to back them up to your Convert computer. -
Page 84: The System Setup Pages
The System Setup Pages Operational Notes Navigation Saving the Settings The System Setup pages work the same way Press [EXIT] or any module button to save all other modules do, but here are some System Setup changes. The message “System reminders: saving... -
Page 85: Master
Absolute). be displayed. Knob Speed Note: This does not prevent Hydrasynth from responding to MIDI program changes. This determines the response speed of the Control knobs only. It also affects the finer [SHIFT] + scroll movements. With a setting of Slow a full turn is required to cover the full parameter range;... -
Page 86: Keys / Pads
Keys / Pads: Page 3 Control knob Function Settings Description Velocity On, Off Toggle velocity sensitivity Velocity Curve Very Soft, Soft, Medium, Select velocity response Hard, Very Hard Aftertouch Delay 0-400 ms (see description) Aftertouch Fade 0-400 ms (see description) Aftertouch On, Off Toggle aftertouch sensitivity [1]... -
Page 87: Clock Sync
Clock Sync Local • INT RUN: selects Hydrasynth as the master When working with a DAW, setting Local to Off tempo clock. Sync signals are sent to MIDI, can prevent a MIDI loop. Most DAWs have the USB, and the CV Clock output. -
Page 88: Midi
You can also send those items to another Arp TX Hydrasynth. Note that doing that over MIDI requires two MIDI cables. Ideally both units Set this parameter to On if you want the would be connected to the same computer... -
Page 89: Cv - Pitch Gate
CV – Pitch Gate: Page 7 These settings are compatible with most modular synthesizer equipment. Please refer to the specifications of other devices and match those settings on the Hydrasynth. Control knob Function Range Control Voltage Range [1] Octave 0-10V, -/+5V... -
Page 90: Cv - Mods: Page 9
CV – Mods: Page 9 These settings enable the use of devices with different CV standards. For example, Input / Output Mod 1 can be set to +/- 5V while Input / Output Mod 2 are set to 0-10V. The Offset ranges are independent in each direction, which allows the voltages to be fine-tuned to compensate for the idiosyncrasies of individual devices. -
Page 91: System: Page 10 (Desktop) / System: Page 11 (Keyboard)
There’s only one item on this page: the OS version. Please include that in any communications you might have with our Technical Support department. And always install the latest firmware in your Hydrasynth so you can take advantage of new features as they are added! -
Page 92: Control Combinations
Control Combinations [INIT] + Button X The following modules can be initialized by holding [INIT] and pressing the Access button. Button Button Button Button LFO (1-5) Mutant (1-4) Reverb Arp On Macro Assign Osc (1, 2, 3) Ribbon Delay Mixer Post-FX Ring-Noise Env (1-5) -
Page 93: [Random] + Button
[RANDOM] + Button X The following modules can be randomized by holding [RANDOM] and pressing the Access button. Button Button Button Button LFO (1-5) Osc (1, 2, 3) Ring-Noise Arp On Macro Assign Post-FX Voice Delay Mixer Pre-FX < or > (select random patch) Env (1-5) Mod Matrix Reverb... -
Page 94: [Shift] + Control Knob
[SHIFT] + Control Knob X The following value jumps are available by holding [SHIFT] and turning the appropriate Control knob. Location Control knob Behavior Tempo Fine-tune by 0.1 Length Jump to the closest special value [1, 2, 4, 8, 16, 32] Phrase Jump to the closest first phrase of each group Browse... -
Page 95: Scales
Scales Below are the notes of each scale relative to the key of C. An “x” means that note is in the scale; a dash means it is not. Scale C /D D /E F /G G /A A /B Chromatic Major BeBop Maj... - Page 96 Scale C /D D /E F /G G /A A /B Algerian Gypsy Hungarian Ukranian Dim. Whole Tone Locrian Neapolitan Major Neapolitan Minor Phrygian Flamenco Persian Phrygian Dominant Enigmatic Tritone Insen Augmented Blues Pentatonic Minor Hirajoshi...
-
Page 97: Hydrasynth Specifications
Hydrasynth Specifications Keyboard Desktop Dimensions: 80 x 35 x 10.3 cm Dimensions: 44 x 22.3 x 7 cm (31.5 x 13.78 x 4.05 inches) (17.32 x 8.78 x 2.76 inches) Weight: 10kg (22.05 lbs) Weight: 3.6kg (7.94 lbs) Connections: Rear Panel •... -
Page 98: Declaration Of Conformity
If this equipment meets FCC requirements. Modifications not does cause harmful interference, which can be expressly approved by Ashun Sound Machines determined by turning the equipment off and could void your FCC authorization to use this on, please try to correct the interference by product in the USA.
Need help?
Do you have a question about the HYDRASYNTH and is the answer not in the manual?
Questions and answers