Gima OXY-100 User Manual
Hide thumbs
Also See for OXY-100:
- Use and maintenance book (97 pages) ,
- User manual (32 pages) ,
- Use and maintenance book (40 pages)
Table of Contents
Advertisement
Quick Links
PROFESSIONAL MEDICAL PRODUCTS
PULSOXIMETRO OXY-100
OXY-100 PULSE OXIMETER
OXYMÈTRE OXY-100
OXÍMETRO OXY-100
OXÍMETRO DE PULSO OXY-100
Manuale d'uso - User manual
Manuel de l'utilisateur
Guía de uso - Guia para utilização
ATTENZIONE: Gli operatori devono leggere
e capire completamente questo manuale
prima di utilizzare il prodotto.
ATTENTION: The operators must carefully read
and completely understand the present manual
before using the product.
AVIS: Les opérateurs doivent lire et bien
comprendre ce manuel avant d'utiliser le produit.
ATENCIÓN: Los operadores tienen que leer y entender
completamente este manual antes de utilizar el producto.
ATENÇÃO: Os operadores devem ler e entender
completamente este manual antes de usar o produto.
34342
Gima S.p.A.
Via Marconi, 1
20060 Gessate (MI) Italy
Made in China
Gima S.p.A.
Via Marconi, 1 - 20060 Gessate (MI) Italy
gima@gimaitaly.com - export@gimaitaly.com
www.gimaitaly.com
0476
Advertisement
Table of Contents

Related Manuals for Gima OXY-100


Summary of Contents for Gima OXY-100
- Page 1 PROFESSIONAL MEDICAL PRODUCTS PULSOXIMETRO OXY-100 OXY-100 PULSE OXIMETER OXYMÈTRE OXY-100 OXÍMETRO OXY-100 OXÍMETRO DE PULSO OXY-100 Manuale d’uso - User manual Manuel de l’utilisateur Guía de uso - Guia para utilização ATTENZIONE: Gli operatori devono leggere e capire completamente questo manuale prima di utilizzare il prodotto.
- Page 2 ENGLISH Instructions for Safe Operation - Check the device to make sure that there is no visible damage that may affect user’s safety and measurement performance. It is recommended that the device should be inspected minimally before each use. If there is obvious damage, stop using the device.
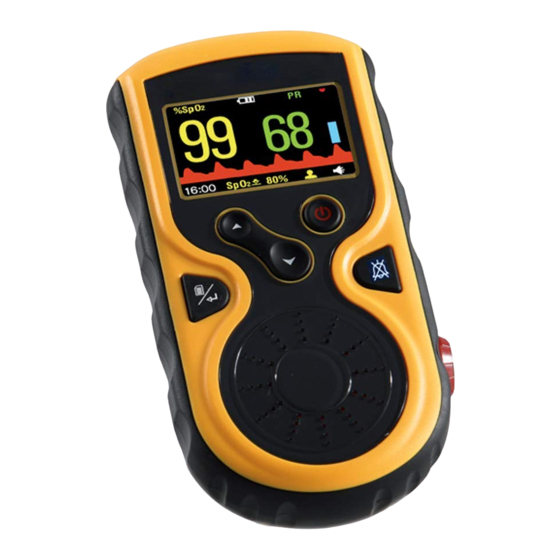
- Page 3 ENGLISH 1 Overview 1.1 Appearance Data interface DC power input Display screen Power / Back Navigation key Recall / Mute Mode / OK probe connector Figura 1-1 1. Display screen: display SpO plethysmogram and parameter values. 2. Navigation key: : Up/Left/Increase Press this key, the default screen can be shifted to display pulse rate (PR) or perfusion index (PI).
- Page 4 - Data transmission to PC for view and analysis (Optional) - Power saving mode is available 1.5 Intended Use This Oxy-100 Pulse Oximeter is intended for measuring and recording the pulse rate and functional oxygen saturation (SpO ). It is applicable for monitoring and pulse rate of adult and pediatric patients in clinical institutions and homes.
- Page 5 ENGLISH 1.6 Working Environment Operating temperature: 5~40°C Operating humidity: 30~80% Atmospheric pressure: 70kPa~106kPa 2 Installation of Battery and Holder 1) Open the rear panel with coin or an ordinary flat screwdriver, as shown in Figure 2-1. 2) AA Alkaline batteries or Lithium battery (optional): Figure 2-1 - If AA alkaline batteries (non-chargeable) are provided, then according to the polarity mark,...
-
Page 6: Safety Instruction For Operation
ENGLISH When the screen shows icon “ “, it means the battery is fully charged. Pulling out the charging cable, then the above icon will disappear. Safety instruction for operation Do not throw the battery into the water, liquid and fire. Keep the battery out of the reach of the child. -
Page 7: Instructions Of Operation
ENGLISH Instructions of Operation 1. The finger should be put in properly and correctly. 2. Do not shake the finger and keep at ease during measurement. 3. Do not put wet finger directly into sensor. 4. Avoid placing the sensor on the same limb which is wrapped with a cuff for blood pressure measurement or during venous infusion. - Page 8 ENGLISH Figure 4-1 Default Screen Description: Sound indicator “ “ means the device is on mute status, the user can turn on the indication sound by short pressing recall/mute “ ” key. During the measurement, over-limit event or probe off event can activate the alert indication sound.
-
Page 9: Screen Description
ENGLISH 4.3 Display Screen with PI Value On the default display screen, press “ ” Navigation key to shift screens between default screen and display screen with PI value. The display screen with PI value is shown below. Figure 4-2 Display Screen with PI Value 4.4 Menu Setup On the above mentioned screens, longtime press “... - Page 10 ENGLISH 4.4.1 Setting On the menu screen, select “Setting” and then press “ ” key for entering into system setup screen. The setup screen is as shown in the following figures. Figure 4-4 System Setup Screen Operation Instructions: - Patient: two options:”ADU ”...
- Page 11 ENGLISH Note: The setting operations of other parameters (such as TIME, PATIENT, RECORDING INTERVAL, POWER SAVING etc.) are the same with date setting. - Time: Time setting - Recording: Time interval for recording data (SpO & PR), there are five options: “1s, 2s, 4s, 8s”...
- Page 12 ENGLISH 4.4.2 Upload Data On the menu screen, select “UPLOAD DATA” and then press “ ” key for entering into connecting status (as shown in Figure 4-5). Note: Make sure the USB data cable (optional) is well connected between the device and PC before uploading data.
- Page 13 ENGLISH 4.4.4 Version On the menu screen, select “VERSION” and then press “ ” key for entering into version screen (as shown in Figure 4-7). Figure 4-7 4.5 Data Recall On the default display screen, longtime press “ ” ( Recall/mute) key to enter into record list display screen.
- Page 14 ENGLISH 4.5.1 Data Recall Choose one record in the record list, then press “ ” (mode/OK) key, the display screen will display trend graph, as shown in Figure 4-9A. Recording interval Trend graph ordinate PR ordinate PR Trend graph Figure 4-9A Trend Graph Display Screen Operation Instructions: - Short time press “...
-
Page 15: Technical Specifications
ENGLISH 4.5.2 Data Deletion On the menu screen, longtime press “ ” key and the records list will appear. At this time, longtime pressing “ ” key again, an message “Are you sure to delete all?” prompts on the screen, as shown in Figure 4-10. Figure 4-10 At this time, press “... -
Page 16: Over-Limit Indication
ENGLISH Over-limit setting range: 25bpm~250bpm Default setting limit: High -- 120bpm, Low -- 50bpm E. Perfusion Index Display Range: 0.2%~20% F. Operating Environment Operating Temperature: 5°C ~40°C Operating Humidity: 30%~80% Atmospheric pressure: 70kPa~106kPa Note: portable and mobile RF communications equipment may affect the performance of the Oximeter. - Page 17 ENGLISH 6.2 Alert sound mute setting - During the measurement, if the alert sound is set to on, short time press “ “ recall/mute key, then the alert sound will mute for 90 seconds, but the over-limited value still keeps blinking. At this moment, the sound indication icon “...
- Page 18 The warranty is valid for 12 months from the date of supply of GIMA. During the period of validity of the warranty, GIMA will repair and/or replace free of charge all the defected parts due to production reasons. Labor costs and personnel traveling expenses and packaging not included.
-
Page 19: Troubleshooting
ENGLISH 9 Troubleshooting Trouble Possible Reason Solution Unstable SpO 1. The finger is not placed 1 . P l a c e t h e f i n g e r Pulse Rate display far enough inside. correctly inside and try 2. - Page 20 ENGLISH Appendix Symbols on the panels Symbols on the screen Symbol Description Symbol Description SpO2 probe connector %SpO The oxygen saturation Perfusion Index Power/Back Key Pulse rate (Unit: beats per minute) Mode/OK Key Low battery voltage Recall/Mute Key Battery full /...
- Page 21 ENGLISH Common Knowledge 1 Meaning of SpO is the saturation percentage of oxygen in the blood, so called O concentration in the blood; it is defined by the percentage of oxyhemoglobin (HbO ) in the total hemoglobin of the arterial blood. SpO is an important physiological parameter to reflect the respiration function;...
- Page 22 ENGLISH 4 Factors affecting SpO accuracy (interference reason) - Intravascular dyes such as indocyanine green or methylene blue - Exposure to excessive illumination, such as surgical lamps, bilirubin lamps, fluorescent lights, infrared heating lamps, or direct sunlight. - Vascular dyes or external used color-up product such as nail enamel or color skin care - Excessive patient movement - Placement of a sensor on an extremity with a blood pressure cuff, arterial...
Need help?
Do you have a question about the OXY-100 and is the answer not in the manual?
Questions and answers