Table of Contents
Advertisement
Quick Links
PROFESSIONAL MEDICAL PRODUCTS
PULSOXIMETRO OXY 110
OXY 110 PULSE OXIMETER
PULSIOXÍMETRO OXY 110
OXYMÈTRE DE POULS OXY 110
Manuale d'uso - User manual
Manuel de l'utilisateur - Guía de uso
ATTENZIONE: Gli operatori devono leggere
e capire completamente questo manuale
prima di utilizzare il prodotto.
ATTENTION: The operators must carefully read
and completely understand the present manual
before using the product.
AVIS: Les opérateurs doivent lire et bien
comprendre ce manuel avant d'utiliser le produit.
ATENCIÓN: Los operadores tienen que leer y entender
completamente este manual antes de utilizar el producto.
34341 / SP-20
Shenzhen Creative Industry Co., Ltd.
Floor 5, BLD 9, BaiWangxin High-Tech Industrial Park,
Songbai Road, Xili Street, Nanshan District,
518110 Shenzhen, P.R. China
Made in China
Shanghai International
Holding Corp. GmbH (Europe)
Eiffestrasse 80, 20537, Hamburg, Germany
Gima S.p.A.
Via Marconi, 1 - 20060 Gessate (MI) Italy
gima@gimaitaly.com - export@gimaitaly.com
www.gimaitaly.com
0123
Advertisement
Table of Contents

Subscribe to Our Youtube Channel
Related Manuals for Gima OXY 110


Summary of Contents for Gima OXY 110
- Page 1 PROFESSIONAL MEDICAL PRODUCTS PULSOXIMETRO OXY 110 OXY 110 PULSE OXIMETER PULSIOXÍMETRO OXY 110 OXYMÈTRE DE POULS OXY 110 Manuale d’uso - User manual Manuel de l’utilisateur - Guía de uso ATTENZIONE: Gli operatori devono leggere e capire completamente questo manuale prima di utilizzare il prodotto.
-
Page 2: Table Of Contents
ENGLISH Table of Contents 1 Overview ...................... 40 1.1 Appearance .................... 40 1.2 Product Name and Model ..............42 1.3 Structure ....................42 1.4 Features ....................42 1.5 Intended Use ..................42 1.6 Working Environment ................42 2 Power Supply ....................43 3 Make Measurement .................. -
Page 3: Overview
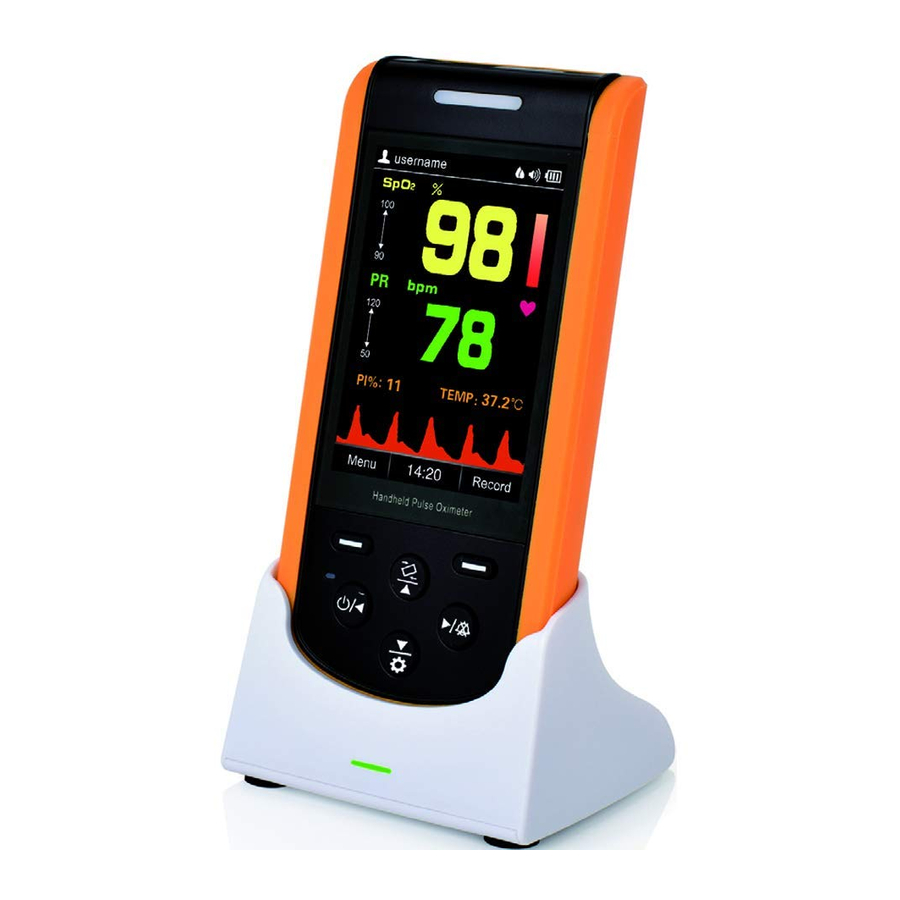
ENGLISH 1 Overview 1.1 Appearance Alert indicator Display screen Menu/Confirm Record/Back Auto-rotate /Up Power indicator Right /Sound Power/Left Setting/Down Figure 1.1 Front view TEMP: Temperature probe probe connector connector Figure 1.2 Upper-side view USB connector DC power input contact shoes with polarity Figure 1.3 Bottom side view indication... - Page 4 ENGLISH 1. Display screen: Display measurement result, trends and menus. (Power/Left): Power on/off the device by longtime pressing; On menu or sub-menu screen, short time press it to move the cursor left or adjust the param- eter values. (Right/Sound): On data recall screen, longtime press this key, then the delete dialog pops up;...
-
Page 5: Product Name And Model
ENGLISH 12. ( ) USB connector. Used for data uploading or charging. 13. ( ): DC power input contact shoes with polarity indication. Used for connecting external DC power input for charging the built-in rechargeable bat- tery via the base. 1.2 Product Name and Model Name: Handheld Pulse Oximeter Model: SP-20... -
Page 6: Power Supply
ENGLISH 2 Power Supply 1. Internal power supply with built-in battery: Built-in battery specification: 2000mAh lithium battery. 2. External power from the AC power adapter: Use the AC power adapter provided by the manufacturer. Make sure the mains power supply is 100-240VAC with 50/60Hz. Note: it’s recommended to use the AC power adapter provided by the manufacturer. - Page 7 ENGLISH Oximeter Insert the oximeter into the base by this direction Base Figure 2.2 Connection between oximeter and base...
-
Page 8: Make Measurement
ENGLISH 3 Make Measurement 3.1 SpO Measurement Operation procedures: 1. Connect the SpO probe to the connector on the upper-side of the device marked with “SpO ”. (Note: When disconnecting the connector, be sure to hold the head of the connector firmly and pull). 2. -
Page 9: Temperature Measurement (Optional)
ENGLISH Remove nail polish or other cosmetic products from the fingernail. The fingernail should be of normal length. The SpO sensor cannot be immersed into water, liquid or cleanser. The SpO sensor can be repeatedly used. Please clean and disinfect before reuse. ... -
Page 10: Operation
ENGLISH Nota: • If the temperature probe detects a hardware failure, the display screen on the infra- red temperature probe will show “Err” and will not enter into measurement mode. • The infrared temperature probe will switch to standby state automatically if there is no operation for 1 minute. -
Page 11: Default Display Screen
ENGLISH 4.2 Default Display Screen Press “ ” power key for 2 seconds to start up the Oximeter, then the screen will display the default screen, as shown in Figure 4.2. Auto-rotate icon Wireless icon Auto power off Recording mode disable icon Sound indicator User ID... -
Page 12: Menu
ENGLISH screen, it means the auto rotation function is enabled, if you place this oxime- ter horizontally, then the display shows in horizontal, as shown in figure 4.2B. Figure 4.2B Default Display Screen---in horizontal • Sound indicator “ ” means that the global sound is disabled, the user can enable the global sound by longtime pressing “... - Page 13 ENGLISH There are 9 functional icons in main menu screen, press Up/Down/Left/ Right key can move the cursor to make selection and press “ ” Menu/Confirm key again to confirm the selection. • User ID: Add new or edit the current User ID.
- Page 14 ENGLISH Figure 4.4A User ID setup screen Move the cursor on “Edit” and press Confirm key “ ”; when the cursor turns to blue, then the user can edit the User ID, and move the cursor on “OK” to confirm the edit, the edit screen is as shown in figure 4.4B.
- Page 15 4.3.3 Recording Mode On main menu screen, move the cursor on “Recording Mode” and press Confirm key “ ”, then the oximeter enters into Re- cording Mode Setup screen, as shown in figure 4.6. Figure 4.6 Recording mode setup screen Note: When selecting “Spot-check Record”...
- Page 16 Figure 4.8 TEMP record list screen 4.3.6 Date On main menu screen, move the cursor on “Date” and press Confirm key “ ”, then the oximeter enters into date setup screen, as shown in figure 4.9. Figure 4.9 Date setup screen Date setting procedure: 1) Move the cursor stays on the Year of the date, press Confirm key “...
- Page 17 ENGLISH Note: The setting operations of other parameters (such as User ID, User, Auto Power Off, Power Saving etc.) are the same with date setting. 4.3.7 Settings On main menu screen, move the cursor on “Settings” and press Confirm key “ ”, then the oximeter enters into system setting screen, as shown in figure 4.10.
- Page 18 ENGLISH option, the factory default is “°F”, as shown in figure 4.10H. • Factory Default: Enter into the factory default setting, as shown in figure 4.10I. • Version: For viewing version number of the software, as shown in figure 4.10J. •...
- Page 19 ENGLISH Figure 4.10H Version info Figure 4.10J Default setting Notes: • When the Auto Power Off is set to “On” op- tion, if there is no key operation for 3 minutes, then the oximeter will power off automatically. • When the Power Saving Mode is set to “On” option, during the measurement, if there is no key operation for 1 minute, the screen dis- play will be dim for power saving.
- Page 20 ENGLISH • SpO Lo-Limit: SpO low limit setting; range: 50%~99%, the step is 1%. The fac- tory default value for adult is 90% and 95% for Neonate. • PR Hi-Limit: High limit setting of pulse rate; range: 100~240bpm. From 100 to 150, the step is 1bpm, and from 150 to 240, the step is 5bpm.
-
Page 21: Record
ENGLISH 4.4 Record 4.4.1 Data Recall On main default screen, short time press Record/Back key “ ” to enter into data recall screen, as shown in figure 4.13. Figure 4.13 SpO2 record records include two types, Spot-check and Trend Record, Spot-check Re- cord is a list showing the recording time, SpO value and pulse rate value for each spot-checking event, as shown in figure 4.14... - Page 22 ENGLISH The corresponding User and User ID for the selected record Figure 4.15 Trend record---List The corresponding User and Recording User ID for the time selected record trend graph PR trend graph Figure 4.16 Trend record---Trend graph...
- Page 23 ENGLISH 4.4.2 Data Deletion On the record list screen shown in figure 4.14 or 4.15, move the cursor on the record you want to delete, and longtime pressing Sound/Right key (“ ”), then an mes- sage “Are you sure to delete all?” prompts on the screen, as shown in figure 4.16. Figure 4.16 Delete records At this time, short time press Menu/Confirm (“...
-
Page 24: Technical Specifications
ENGLISH The pairing and transmitting distance of wireless function is 8 meters in the normal. If the host can’t pair with the SP-20, you will try to narrow the distance between the host and SP-20. The SP-20 can pair and transmit with the host under the wireless coexistence envi- ronment, but other wireless device may still interface with pairing and transmission between the host and the SP-20 device under uncertain environment. - Page 25 ENGLISH F. Temperature Measurement Measuring range: 32.0°C~43.0°C Measuring accuracy: ±0.2°C for temperature range from 35.0°C to 42.0°C, and ±0.3°C for the rest. Response time: ≤5s Patient Group: Adult and Neonate Measuring site: earhole Deviation: ≤0.1°C G. Operating Environment Operating Temperature: 5°C ~40°C Operating Humidity: 15%~93% Atmospheric pressure:...
-
Page 26: Over-Limit Indication
ENGLISH Note: The oximeter is calibrated in the factory before sale, and there is no need for user to calibrate again. 6 Over-limit Indication 6.1 Limit settings • SpO low limit setting range: 50% ~ 99%. • Pulse Rate limits setting range: High: 100bpm--240bpm Low: 30bpm--99bpm During the measurement, if the measured value exceeds the preset value, the alert... -
Page 27: Repair And Maintenance
ENGLISH 6. A temperature probe (optional) 7. Charging cable (optional) 8. A USB data cable (optional) Notes: 1. The accessories are subject to change. See the package in your hand for detailed items and quantity. 2. All the parts of the device should NOT be replaced at will. If necessary, please use the components provided by the manufacture or those that are of the same model and standards as the accessories along with the device which are provided by the same factory. -
Page 28: Troubleshooting
ENGLISH 9 Troubleshooting Trouble Possible Reason Solution Unstable SpO 1. The finger is not placed 1. Place the finger and Pulse Rate far enough inside. correctly inside and try display 2. The finger is shaking again. or the patient is moving. 2. -
Page 29: Frequently Asked Questions
ENGLISH 10 Frequently Asked Questions 1. Q: What’s SpO A: SpO means the saturation percentage of oxygen in the blood. 2. Q: What’s the normal range of SpO value for healthy people? A: The normal range varies by individual, but usually over 95%, otherwise, please consult your physician. -
Page 30: Appendix
ENGLISH Appendix I. Key of Symbols Symbols on the screen Symbol Description %SpO The oxygen saturation Perfusion Index Pulse rate (Unit: beats per minute) Pulse bar graph Low battery voltage Battery is full Alert reset icon Speaker mute icon Speaker volume icon spot-check record memory full trend record memory full Temperature memory full... - Page 31 ENGLISH Symbols on the panels Symbol Description Symbol Description Caution: read instructions probe connector (warnings) carefully Temperature probe TEMP Keep in a cool, dry place connector Power/Left Key Product code Right/ Sound Key Lot number Auto-rotate/Up Key Keep away from sunlight Setting/Down Key Date of manufacture Menu/Confirm key...
-
Page 32: Common Knowledge
ENGLISH II. Common Knowledge 1 Meaning of SpO is the saturation percentage of oxygen in the blood, so called O2 concentration in the blood; it is defined by the percentage of oxyhemoglobin ( HbO ) in the total hemoglobin of the arterial blood. SpO is an important physiological parameter to reflect the respiration function;... - Page 33 The warranty is valid for 12 months from the date of supply of GIMA. During the period of validity of the warranty, GIMA will repair and/or replace free of charge all the defected parts due to production reasons. Labor costs and personnel traveling expenses and packaging not included.
- Page 34 FRANÇAIS Cher client, Merci pour avoir acheté ce produit de qualité. Veuillez lire attentivement le mode d’em- ploi avant d’utiliser l’appareil. Le non respect de ces instructions peut causer des anomalies dans les résultats de la mesure ou endommager l’oxymètre. Il est interdit de photocopier, reproduire ou traduire ce document sans l’accord écrit préalable du fabricant.
- Page 35 FRANÇAIS Le fait de serrer trop le doigt avec le capteur SpO peut provoquer des pulsations veineuses et gêner la circulation du sang, risquant ainsi de créer un œdème inters- titiel, des phénomènes d’hypoxie et d’obtenir des mesures inexactes. ...
Need help?
Do you have a question about the OXY 110 and is the answer not in the manual?
Questions and answers