
Related Manuals for ORQA FPV.ONE

Summary of Contents for ORQA FPV.ONE
- Page 1 FPV VIDEO GOGGLES User Manual Rev. 1.2 | December 2019. Orqa FPV.ONE User Manual, Rev.1.2 ©2019. Orqa Ltd.
-
Page 2: Table Of Contents
FEATURES......................13 BATTERY ......................14 ABOUT ........................ 15 DVR ........................16 VIDEO PLAYBACK ..................19 CONNECTIONS PINOUT ................20 ORQA ORIGINAL BATTERY................21 CHARGING THE BATTERY ................22 TECHNICAL SPECIFICATIONS ..............23 Orqa FPV.ONE User Manual, Rev.1.2 ©2019. Orqa Ltd. -
Page 3: Package Contents
PACKAGE CONTENTS GOGGLES CARRYING CASE BATTERY FOAM PADS MICRO HDMI – HDMI CABLE OPTICS CLEANING (OPTIONAL) CLOTH Orqa FPV.ONE User Manual, Rev.1.2 ©2019. Orqa Ltd. -
Page 4: Getting To Know The Goggles
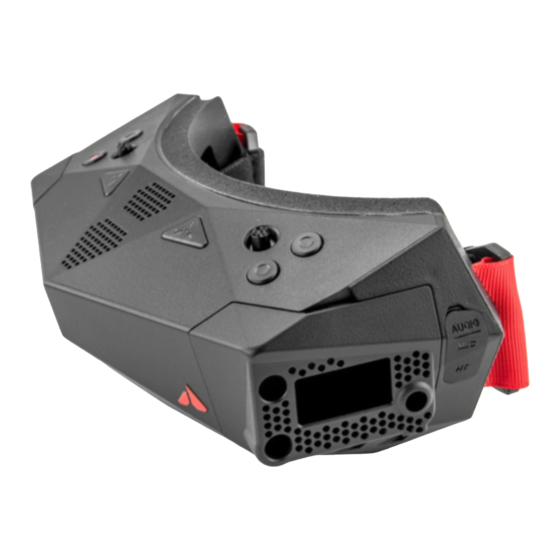
6. DVR Quick Record 7. Channel Down 8. Channel Up 9. Defogging Air Intake 10. Cooling Air Exhaust 11. Left IPD Adjust Wheel 12. Right IPD Adjust Wheel 13. Cooling Air Intake Orqa FPV.ONE User Manual, Rev.1.2 ©2019. Orqa Ltd. - Page 5 GETTING TO KNOW THE GOGGLES 14. Audio Out / Mic In 15. Head Tracker Output 16. Receiver Bay 17. Power Connector 18. AV Input 19. MicroHDMI Input 20. Secondary Bay 21. Module Interface FFC Orqa FPV.ONE User Manual, Rev.1.2 ©2019. Orqa Ltd.
- Page 6 GETTING TO KNOW THE GOGGLES 22. Micro SD Card Slot 23. Diopter Slot 24. Stand-By Sensor Orqa FPV.ONE User Manual, Rev.1.2 ©2019. Orqa Ltd.
-
Page 7: Controlling The Goggles
Additionally, long press this button to change the receiver band. Channel Up Press the Channel Up Button to change the receiver channel up Additionally, long press this button to change the receiver band. Orqa FPV.ONE User Manual, Rev.1.2 ©2019. Orqa Ltd. -
Page 8: Navigating The Menus
To exit the menu, move the joystick to the left or wait for 10 seconds to automatically exit the menu. Changes will be saved only if the menu is closed before turning the goggles off. Orqa FPV.ONE User Manual, Rev.1.2 ©2019. Orqa Ltd. -
Page 9: Receiver Settings
Additionally, by entering the channel table in the menu you can select the desired frequency of the RapidFire receiver module. Please note that RapidFire firmware must be updated to at least version 1.3. to have the full functionallity with the Orqa goggles. Orqa FPV.ONE User Manual, Rev.1.2 ©2019. Orqa Ltd. -
Page 10: Input Source
HDMI Input” message will appear on-screen. Automatic setting priority 1. HDMI 2. AV in 3. RX Please note that the splash screen with the Orqa logo will be displayed if there is no valid input signal present. Orqa FPV.ONE User Manual, Rev.1.2 ©2019. Orqa Ltd. -
Page 11: Image Settings
The SUPER SIZE setting is for users, who want to use 100% of the screen. The RESET setting is used to reset all the parameters of the image to their factory-set values. Orqa FPV.ONE User Manual, Rev.1.2 ©2019. Orqa Ltd. -
Page 12: Stand By
Once the goggles are put back on, they will automatically turn back on. Please note that the Stand-by function will turn off only the microdisplays and the receiver installed in the main receiver bay. The rest of the system will stay powered on. Orqa FPV.ONE User Manual, Rev.1.2 ©2019. Orqa Ltd. -
Page 13: Features
FEATURES FPV.ONE goggles are equipped with various features and settings for a better overall user experience. ▪ The HEAD TRACKER feature uses goggles’ integrated IMU to track the movement of the pilots’ head. This feature requires the IMU to be reset every time this feature is used. -
Page 14: Battery
The goggles can alarm you when the battery is low. If the battery voltage drops to 6.55V (which is about 10% of the original Orqa battery capacity) the goggles will notify you with three short beeps and the battery voltage (or percentage) will be displayed in red color on the screen. -
Page 15: About
QR code inside of the secondary module bay and on the packing box. UPDATING THE FIRMWARE To update the firmware, download the firmware (*.orqa file) from the Orqa website and save it to the root of your micro SD card. Power down the goggles. Insert the micro SD card into the slot located at the faceplate. -
Page 16: Dvr
Note that DVR will not record any of the goggle’s OSD features which might be shown on screen during recording. OSD features generated by a receiver (e.g. RapidFire RSS bars) will be recorded. Orqa FPV.ONE User Manual, Rev.1.2 ©2019. Orqa Ltd. - Page 17 Please note that the “Auto Delete” function will delete only the files created by the Orqa DVR system. All other files that might be present on the micro SD card will not be deleted.
- Page 18 “NO SD CARD” message will be displayed. Format SD Card is used to fast format the inserted micro SD card to the corresponding FAT system. The system can manage SD Cards up to 2TB. Orqa FPV.ONE User Manual, Rev.1.2 ©2019. Orqa Ltd.
-
Page 19: Video Playback
Please note that the system will only recognize and display the files created by the goggles’ DVR. Other files which might be present on the micro SD card will not be visible in this list. Orqa FPV.ONE User Manual, Rev.1.2 ©2019. Orqa Ltd. -
Page 20: Connections Pinout
CONNECTIONS PINOUT AUDIO/MIC 3.5mm JACK BATTERY CONNECTOR AV in 3.5mm JACK HEAD TRACKER 3.5mm JACK Orqa FPV.ONE User Manual, Rev.1.2 ©2019. Orqa Ltd. -
Page 21: Orqa Original Battery
ORQA ORIGINAL BATTERY The goggles should be powered by a power source with a voltage between 6.0 and 10.0 VDC. The best way to power your goggles is to use the supplied Orqa Original Battery. The Orqa Original Battery holds two 18500 Li-ion cells inside connected in 2S configuration. -
Page 22: Charging The Battery
CHARGING THE BATTERY The Orqa Original Battery should be recharged once the battery voltage is low. To charge the battery you will need the battery charger with the Li-ion or Li-Po charging profile. The best way to recharge the battery is the “balance charge”... -
Page 23: Technical Specifications
1280x960, 50/60fps, H.264, mp4 ▪ Standard receiver bay High power ▪ Secondary bay for additional modules 3.3V, SDIO, UART ▪ Weight (without battery) 232g ▪ Dimensions 177 x 99 x 72 mm Orqa FPV.ONE User Manual, Rev.1.2 ©2019. Orqa Ltd.
Need help?
Do you have a question about the FPV.ONE and is the answer not in the manual?
Questions and answers