Advertisement
Quick Links
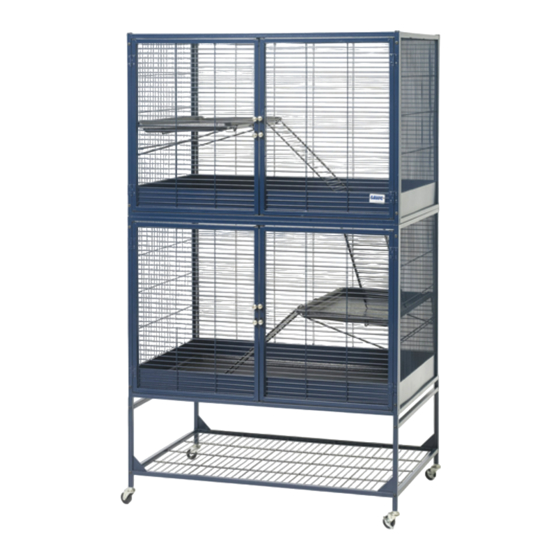
Suite Royale
de luxe small animal home
Assembly instructions for the Suite Royale
Richtlijnen voor de montage van de Suite Royale
Instructions pour le montage de la Suite Royale
Aufbau-Anleitung des Suite Royale
Instrucciones de montaje de la Suite Royale
инструкция по сборке Suite Royale
95 x 63 x 159 cm (total)
95 x 63 x 120 cm (cage)
Advertisement

Related Manuals for Savic Suite Royale


Summary of Contents for Savic Suite Royale
- Page 1 Suite Royale de luxe small animal home Assembly instructions for the Suite Royale Richtlijnen voor de montage van de Suite Royale Instructions pour le montage de la Suite Royale Aufbau-Anleitung des Suite Royale Instrucciones de montaje de la Suite Royale инструкция...
- Page 2 Savic would like to thank you for your purchase and Wir, die Firma Savic, danken Ihnen für Ihren Einkauf und confidence in our Suite Royale cage. Ihr Vertrauen in unserem Käfig Suite Royale. We can assure you that you have acquired a high quality Wir sind davon überzeugt, daß...
- Page 3 Parts list - Inhoud onderdelen - Liste des pièces livrées Gelieferte teile - Lista de piezas - Обозначения деталей A - 2 x B - 2 x door panels – deurpanelen – panneaux avec porte – back panels – achterpanelen – panneaux arrières – Türen –...
- Page 4 F - 1 x G - 1 x closed bottom tray – gesloten bodemschuif – bac de open intermediate tray – open middenschuif – bac fond fermé – geschlossene Unterschale – bandeja de intermédiaire ouvert – offene Mittelschale – bandeja fondo cerrada –...
- Page 5 2 polybags containing - 2 plastic zakken met - 2 sachets avec - 2 Polybeutel mit - 2 bolsas con - в полиэтиленовом пакете содержатся O - 8 x P - 24 x metal connectors – verbindingsstukken – screws – schroeven – vis – raccords - metall Verbindungsstücke –...
- Page 6 Attach the tube with hole (L) to the H-shape tube (N) with a screw (P) but do not tighten. Make sure that the holes of both tubes are facing inwards. Bevestig de buis met opening (L) aan de H-vormige buis (N) met een schroef (P) maar schroef niet aan.
- Page 7 Place the full grid with large holes (D1) between the tubes (L+N). The pins of the grid need to be placed in the holes of the tubes. Plaats het volledige rooster met grote openingen (D1) tussen de buizen (L+N). De pinnen van het rooster moeten in de openingen van de buizen zitten.
- Page 8 Install the 4 castors (Q+R) by turning them in at the bottom of the H-shape tubes (N). The wheels with brake need to be installed at the front of the cage. Installeer de 4 wielen (Q+R) door ze onderaan in de H-vormige buis (N) te draaien.
- Page 9 Take the back panel (B) and slide it over the back metal connectors(O). Do not tighten. Make sure the holes of the back panel are facing inwards. Neem het rugpaneel (B) en laat het over de achterste verbindingsstukken (O) zakken. Maak nog niet vast. Zorg ervoor dat de openingen van het rugpaneel naar binnen zijn gericht.
- Page 10 Take one door panel (A). Lift up the floor grid (D1) and place the pins in the holes on the inside of the door panel (A). Then slide the front panel over the metal connectors (O). Neem één van de deurpanelen (A). Hef het bodemrooster (D1) omhoog en steek de pinnen in de openingen aan de binnenzijde van het deurpaneel (A).
- Page 11 Take the middle grid (E) and place it between the 4 panels. The pins need to be correctly positioned in the holes of all the panels. Make sure the opening of the middle grid is in the front right corner, adjacent to the front door.
- Page 12 Take the second back panel (B) and slide it over the back metal connectors (O). Do not tighten yet. Make sure the holes of the back panel are facing inwards. Neem het tweede rugpaneel (B) en laat het over de achterste verbindingsstukken (O) zakken.
- Page 13 Install the remaining side panels (C). Make sure the pins of the grid are firmly secured in the holes of the side panels. Attach the side panels to the front and back panels with screws (P). Tighten all the screws where necessary. Installeer de resterende zijpanelen (C).
- Page 14 Place the closed bottom tray (F) at the bottom of the cage. Plaats de gesloten bodemschuif (F) onderaan de kooi. Placez le bac de fond fermé (F) au fond de la cage. Schieben Sie die komplette Unterschale (F) unten in den Käfig. Instalar la bandeja de fondo cerrada (F) en la jaula.
- Page 15 Detach the ladder (K) from the S-hook and lay the open middle tray (G) on the grid. Maak de ladder (K) los van de S-haak en leg de open middenschuif (G) op de rooster. Détachez l’échelle (K) du crochet S et placez le bac intermédiaire ouvert (G) sur la grille.
- Page 16 (H+I). Your small animals will have maximum space for playing and living. It is also possible to make 2 separate cages out of the Suite Royale: do not install the ladder (K) and replace the open intermediate tray with an additional complete bottom tray (F), which can be obtained as a spare part (Art.nr.: 951089).
Need help?
Do you have a question about the Suite Royale and is the answer not in the manual?
Questions and answers