Advertisement
Table of Contents
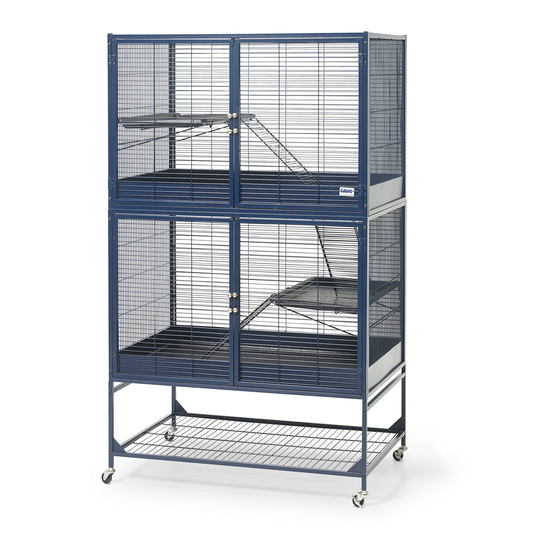
SUITE ROYALE
extra large small animal home
Assembly instructions for the Suite Royal
Richtlijnen voor de montage van de Suite Royal
Instructions pour le montage de la Suite Royal
Aufbau-Anleitung des Suite Royal
Instrucciones de montaje de la Suite Royal
Инструкция по сборке Suite Royal
Advertisement
Table of Contents

Subscribe to Our Youtube Channel
Related Manuals for Savic SUITE ROYALE


Summary of Contents for Savic SUITE ROYALE
- Page 1 SUITE ROYALE extra large small animal home Assembly instructions for the Suite Royal Richtlijnen voor de montage van de Suite Royal Instructions pour le montage de la Suite Royal Aufbau-Anleitung des Suite Royal Instrucciones de montaje de la Suite Royal...
- Page 2 Parts list - Inhoud onderdelen - Liste des pieces livrees - Savic would like to thank you for your purchase Wir, die Firma Savic, danken Ihnen für Ihren and confidence in our Suite Royal cage. We can Einkauf und Ihr Vertrauen in unserem Käfig Gelieferte teile - Lista de piezas - Обозначения...
- Page 3 2 polybags containing - 2 plastiekzakken met - 2 sachets avec - 2 Polybeutel mit - 2 bolsas con - В полиэтиленовом пакете содержатся screws – schroeven – vis – Schrauben – Tornillas – шурупа closed bottom tray – gesloten bodemschuif – bac de open intermediate tray –...
- Page 4 Attach the second H-shape tube (N) to the tube with hole (L) Install the 4 castors (R+S) by turning them in at the bottom of the with a screw (P) and once again do not tighten. Make sure that H-shape tubes (N). The wheels with brake need to be installed at the holes of the tube are facing inwards.
- Page 5 Take the back panel (B) and slide it over the back metal Tomar una pared con puertas (A). Poner los hilos del rejillo connectors (O). Do not tighten. Make sure the holes of the completo (D1) en las aberturas correspondientes de la pared back panel are facing inwards.
- Page 6 Prenez la grille ouverte intermédiaire (E) et placez-la entre les Take the second back panel (B) and slide it over the back metal 4 panneaux. Les chevilles de la grille doivent entrer dans les connectors (O). Do not tighten yet. Make sure the holes of the ouvertures des panneaux.
- Page 7 Install the remaining side panels (C). Make sure the pins of Hang the platform support (I) in the middle opening of the the grid (D2) are firmly secured in the holes of the side panels. right side panel of the lower level. Then place the platform (H) Attach the side panels to the front and back panels (A+B) with on the support and attach the ladder (J).
- Page 8 Available spare parts – beschikbare wisselstukken Repeat step 18. The cage is now fully assembled. pièces de rechange disponibles – verfügbare Ersatzteile Herhaal stap 18. De kooi is nu volledig gemonteerd. piezas de recambio disponibles – Запасные части Répétez pas 18. La cage est maintenant complètement assemblée.
- Page 9 Ringlaan 10 • B-8501 Heule • Belgium Tel. +32 56 35 33 45 • Fax +32 56 35 77 30 info@savic.be...
Need help?
Do you have a question about the SUITE ROYALE and is the answer not in the manual?
Questions and answers