
Related Manuals for OLIMEX OLIMEXINO-85


Summary of Contents for OLIMEX OLIMEXINO-85
- Page 1 OLIMEXINO-85 Arduino-compatible board USER’S MANUAL Document revision D, July 2015 Designed by OLIMEX Ltd, 2013 All boards produced by Olimex LTD are ROHS compliant...
-
Page 2: Disclaimer
This document is intended only to assist the reader in the use of the product. OLIMEX Ltd. shall not be liable for any loss or damage arising from the use of any information in this document or any error or omission in such information or any incorrect use of the product. -
Page 3: Table Of Contents
1.3 Board variants .......................... 6 1.4 Board version used in the manual ..................6 1.5 Organization ..........................6 CHAPTER 2: SETTING UP THE OLIMEXINO-85 BOARD ....... 8 2. Introduction to the chapter ....................... 8 2.1 Electrostatic warning ....................... 8 2.2 Requirements ........................... 8 2.3 Powering the board ........................ - Page 4 OLIMEX© 2015 OLIMEXINO-85 user's manual 7.3 Useful web links and purchase codes ................... 22 7.4 Product support ........................23 Page 4 of 23...
-
Page 5: Chapter 1: Overview
1. Introduction to the chapter Thank you for choosing the OLIMEXINO-85 from Olimex! This document provides a user’s guide for OLIMEXINO-85. As an overview, this chapter gives the scope of this document and lists the board’s features. The document’s organization is then detailed. -
Page 6: Board Variants
The hardware revision of your OLIMEXINO-85 is printed on the top under the name of the board. 1.5 Organization Each section in this document covers a separate topic, organized as follows: –... - Page 7 OLIMEX© 2015 OLIMEXINO-85 user's manual – Chapter 6 provides the schematics and the dimensions of the board – Chapter 7 contains the revision history, useful links and support information Page 7 of 23...
-
Page 8: Chapter 2: Setting Up The Olimexino-85 Board
2.2 Requirements In order to set up the OLIMEXINO-85 optimally one or more additional items may be used. They might be generally placed in two categories: Required – items that are needed in order to achieve minimum functionality;... -
Page 9: Powering The Board
There are also good instructions on how to select the proper board so you can upload programs. It is important that due to the small size of OLIMEXINO-85 it has a specific set of settings and a special algorithm of uploading. -
Page 10: Reprogramming The Attiny85
In both cases you would need to download the default bootloader to ATtiny85 to be able to connect and program via the Digispark's Arduino. Since the OLIMEXINO-85 lacks the required interface you would need jumper wires or your own external socket suitable for the task. You might find a table with correct connections and operations required to do in chapter 4.2 of this user's manual. -
Page 11: Chapter 3: Olimexino-85 Board Description
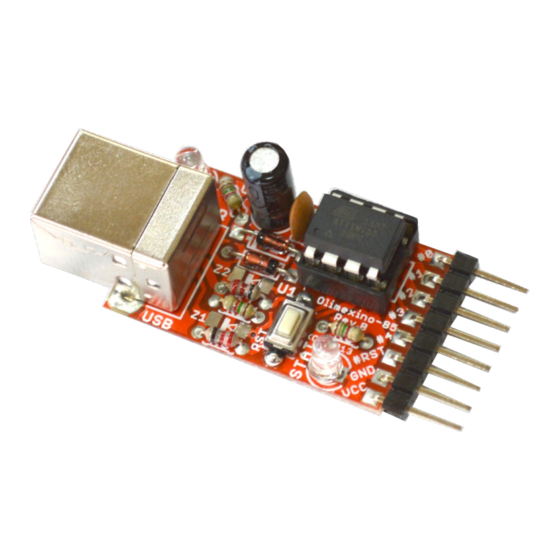
Here you get acquainted with the main parts of the board. Note the names used on the board might differ from the names used below to describe them. For the actual names check the OLIMEXINO- 85-ASM board itself. 3.1 Layout (top view) The picture below shows top layout of the initial revision of OLIMEXINO-85-ASM. Page 11 of 23... -
Page 12: Layout (Bottom View)
OLIMEX© 2015 OLIMEXINO-85 user's manual 3.2 Layout (bottom view) The bottom of the board doesn't contain any active or passive elements. It is the place where most soldering is done and you should be careful for the surface you place the board on, to avoid accidental short-circuits. -
Page 13: Chapter 4: Atmel Avr Attiny85
CHAPTER 4: ATMEL AVR ATTINY85 4. Introduction to the chapter In this chapter is located the information about the heart of OLIMEXINO-85 – its microcontroller. The information is a modified version of the datasheet provided by its manufacturers. 4.1 The microcontroller The list of features for ATtiny85 is listed below: ... -
Page 14: Serial Programming Of The Microcontroller
OLIMEX© 2015 OLIMEXINO-85 user's manual 1.8 - 5.5V for ATtiny25V/45V/85V 2.7 - 5.5V for ATtiny25/45/85 Speed Grade ATtiny25V/45V/85V: 0 – 4 MHz @ 1.8 - 5.5V, 0 - 10 MHz @ 2.7 – 5.5V ATtiny25/45/85: 0 – 10 MHz @ 2.7 - 5.5V, 0 - 20 MHz @ 4.5 – 5.5V ... - Page 15 OLIMEX© 2015 OLIMEXINO-85 user's manual Page 15 of 23...
-
Page 16: Chapter 5: Connectors And Pinout
Note that the connection to the IDE is possible only a few seconds after powering the OLIMEXINO-85. This is because the bootloader code that establishes the connection is active for a short period of time – after that period the board starts executing user's code. -
Page 17: Jumper Description
5.3 Jumper description The board has no hardware jumpers. 5.4 Additional hardware components The components below are mounted on OLIMEXINO-85 but are not discussed above. They are listed here for completeness: Reset button – used to reset the board PWR LED – green LED that turns on upon powering the board STAT LED –... -
Page 18: Chapter 6: Schematics
In this chapter is located information about the schematics describing logically and physically OLIMEXINO-85. 6.1 Eagle schematic Search-able OLIMEXINO-85 schematics and sources may be found at the device's web page at our GitHub repository here: https://github.com/OLIMEX/OLIMEXINO- 85/tree/master/HARDWARE/OLIMEXINO-85-ASM. An image of the schematic might be found on the next manual page for quicker reference. - Page 19 OLIMEX© 2015 OLIMEXINO-85 user's manual Page 19 of 23...
-
Page 20: Physical Dimensions
OLIMEX© 2015 OLIMEXINO-85 user's manual 6.2 Physical dimensions Note that all dimensions are in inches. The highest element on the board is capacitor C1 with 0.5 inches of height (includes the PCB height). Page 20 of 23... -
Page 21: Chapter 7: Revision History And Support
OLIMEX© 2015 OLIMEXINO-85 user's manual CHAPTER 7: REVISION HISTORY AND SUPPORT 7. Introduction to the chapter In this chapter you will find the current and the previous version of the document you are reading. Also the web-page for your device is listed. Be sure to check it after a purchase for the latest available updates and examples. -
Page 22: Useful Web Links And Purchase Codes
ORDER CODES: OLIMEXINO-85-ASM – the assembled version of OLIMEXINO-85 OLIMEXINO-85-KIT – the kit version of OLIMEXINO-85, you would need to first solder it together to be able to use it USB-A-B-CABLE for latest board revisions; USB-MINI-CABLE for board revision A –... -
Page 23: Product Support
All goods are checked before they are sent out. In the unlikely event that goods are faulty, they must be returned, to OLIMEX at the address listed on your order invoice. OLIMEX will not accept goods that have clearly been used more than the amount needed to evaluate their functionality. - Page 24 Mouser Electronics Authorized Distributor Click to View Pricing, Inventory, Delivery & Lifecycle Information: Olimex Ltd. OLIMEXINO-85-ASM OLIMEXINO-85-KIT...
Need help?
Do you have a question about the OLIMEXINO-85 and is the answer not in the manual?
Questions and answers