OLIMEX A20-OLinuXino-MICRO User Manual
Open-source single-board
android/linux mini-computer
Hide thumbs
Also See for A20-OLinuXino-MICRO:
- User manual (57 pages) ,
- User manual (56 pages) ,
- User manual (56 pages)

Subscribe to Our Youtube Channel
Related Manuals for OLIMEX A20-OLinuXino-MICRO


Summary of Contents for OLIMEX A20-OLinuXino-MICRO
- Page 1 A20-OLinuXino-MICRO Open-source single-board Android/Linux mini-computer USER’S MANUAL Revision I, May 2014 Designed by OLIMEX Ltd, 2014 All boards produced by Olimex LTD are ROHS compliant...
-
Page 2: Disclaimer
This document is intended only to assist the reader in the use of the product. OLIMEX Ltd. shall not be liable for any loss or damage arising from the use of any information in this document or any error or omission in such information or any incorrect use of the product. -
Page 3: Table Of Contents
2.6.2 Debian calibration ............................12 2.7 Software support ........................12 2.8 Button functions and NAND image restore in Android ............. 12 CHAPTER 3: A20-OLinuXino-MICRO BOARD DESCRIPTION ..... 14 3. Introduction to the chapter ..................... 14 3.1 Layout (top view) ........................14 3.2 Layout (bottom view) ...................... - Page 4 OLIMEX© 2014 A20-OLinuXino-MICRO user's manual 6.2.1 SD/MMC1 slot .............................. 22 6.2.2 SD/MMC slot ..............................23 6.3 PWR jack ..........................24 6.4 MIC_IN & HEADPHONES connectors ................25 6.5 USB_OTG connector ......................26 6.6 USB_HOST connector ......................27 6.7 Ethernet ..........................28 6.8 HDMI connector ........................
-
Page 5: Chapter 1: Overview
Thank you for choosing this OLinuXino single board computer from Olimex! This document provides a user’s guide for the Olimex A20-OLinuXino board. As an overview, this chapter gives the scope of this document and lists the board’s features. The document’s organization is then detailed. -
Page 6: Target Market And Purpose Of The Board
SD card. The 4GB version comes with already programmed Android 4.2.2 image. The other Olimex boards with close characteristics are the ones with A13 and A10/A10s microcontrollers. The A13 boards feature a generation older processor but since they have been longer on the market they have better Linux and Android support. - Page 7 OLIMEX© 2014 A20-OLinuXino-MICRO user's manual – Chapter 5 is an explanation of the control circuitry associated with the microcontroller – Chapter 6 covers the connector pinout, peripherals and jumper description – Chapter 7 provides the schematics and the dimensions of the board –...
-
Page 8: Chapter 2: Setting Up The Olinuxino Board
In rare cases different polarity might cause hardware damage to the board. 2.2 Requirements In order to set up the A20-OLinuXino-MICRO optimally one or more additional items may be used. They might be generally placed in three categories: Required – items that are needed in order to achieve minimum functionality;... -
Page 9: Powering The Board
A20-Android-SD – a tested class 10 micro SD card with the latest (by the time of leaving the Olimex facilities) official Android release A20-Debian-SD – a tested class 10 micro SD card with the latest (by the time of leaving Olimex facilities) official Debian Linux release USB-SERIAL-CABLE-F –... -
Page 10: Prebuilt Software
A20-OLinuXino-MICRO user's manual driving the board when using external display connected to the HDMI connector. The typical consumption of A20-OLinuXino-MICRO-4GB is between 100mA and 320mA depending on the current load and the power voltage applied. If the board has entered power-down state you can bring it back without restart using the PWR_BUT. - Page 11 9. 1080p50 10. 1080p60 For VGA: (note that the VGA signals are routed to custom 6 pin connector and you need to from adapter to standard VGA connector, Olimex also sells such adapter cables) 0. 1680×1050 1. 1440×900 2. 1360×768 3.
-
Page 12: Calibrating A Display
If the problem is under Debian Linux make sure you are properly logged in the XFCE interface! Else applying calibration would not happen for the current user – if you are calibrating from the X graphical interface make sure that you are logged as user “olimex” (if calibrating without the X, the user is “root”). - Page 13 OLIMEX© 2014 A20-OLinuXino-MICRO user's manual PWR_BUT – used to perform software turn off, software turn on; used to turn on board when powered by battery – has to be held down for at least couple of seconds to perform each action RESET –...
-
Page 14: Chapter 3: A20-Olinuxino-Micro Board Description
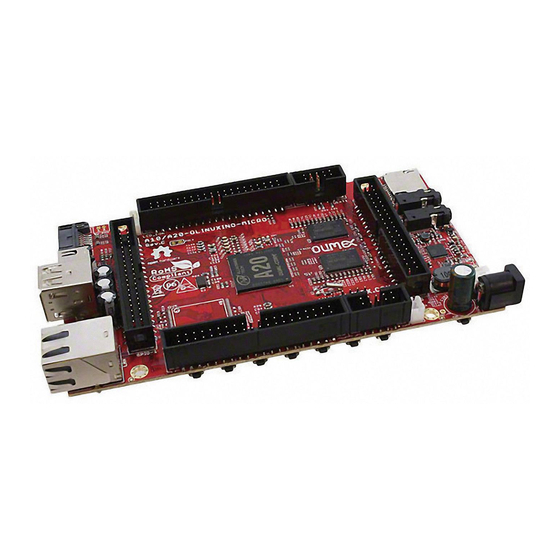
For the actual names check the A20- OLinuXino-MICRO board itself. 3.1 Layout (top view) The picture below shows the initial revision of A20-OLinuXino-MICRO. Please note that the NAND memory is present only in the 4GB version of the board. Page 14 of 44... -
Page 15: Layout (Bottom View)
OLIMEX© 2014 A20-OLinuXino-MICRO user's manual 3.2 Layout (bottom view) At the bottom of the board there are mainly buttons and the large SD/MMC connector. Page 15 of 44... -
Page 16: Chapter 4: The Allwinner A20 Embedded Processor
OLIMEX© 2014 A20-OLinuXino-MICRO user's manual CHAPTER 4: THE ALLWINNER A20 EMBEDDED PROCESSOR 4. Introduction to the chapter In this chapter is located the information about the heart of OLinuXino – its microcontroller. The information is a modified version of the datasheet provided by its manufacturers. -
Page 17: Block Diagram
OLIMEX© 2014 A20-OLinuXino-MICRO user's manual NAND Flash controller with 64-bit ECC AUDIO Integrated HI-FI 100dB Audio Codec Dual analog mic amplifiers More information can be found on Allwinner's web site at the following web-address: http://www.allwinnertech.com/en/product/A20.html 4.2 Block diagram The block diagram is taken from Allwinner's web-site. -
Page 18: Chapter 5: Control Circuity
A20 processor. It is mounted on the board but since it is relatively hard to find we also sell it separately. The power supply circuit of A20-OLinuXino-MICRO requires input supply of 6-16V. The minimum wattage is 5W, and this threshold may raise if using a lot of devices on the USB-HOST (via external hub), a lot of GPIOs and the LCD_CON. -
Page 19: Chapter 6: Connectors And Pinout
LCD that is connected on LCD_CON connector and others. 6.1.1 USB-OTG communication (NAND firmware repair/update) The main way of changing the firmware image located on the NAND of A20-OLinuXino-MICRO- 4GB is via the USB-OTG connector. - Page 20 OLIMEX© 2014 A20-OLinuXino-MICRO user's manual 4. Press and hold RECOVERY button, apply power supply (6-16)V, release RECOVERY button. 5. Connect USB cable to the mini USB connector 6. You will be asked for drivers for the bootloader. Navigate to the folder where you extracted the PhoenixSuit and install the drivers from the respective executables (or manually point the installer to the drivers folder in the PhoenixSuit installation path).
-
Page 21: Uart0, Uext1, Uext2 Interface
7 SPI1-MISO SPI1-MOSI 9 SPI1-CLK SPI1-CS0 The UEXT connectors are used as an interface for the Olimex's UEXT modules (usually boards with MOD- prefix in their commercial names). For more information on UEXT please visit: https://www.olimex.com/Products/Modules/UEXT/resources/UEXT.pdf Page 21 of 44... -
Page 22: Sd Card Connectors
When in doubt – try the same operation with another card from another brand. Olimex sells microSD cards with Linux or Android images, that have been tested – please refer to chapter “2.2 Requirements”. Of course, if you already have a large enough microSD card you can download the official Linux image from the wiki pages: https://www.olimex.com/wiki/A20-... -
Page 23: Sd/Mmc Slot
OLIMEX© 2014 A20-OLinuXino-MICRO user's manual image especially if you have ordered a version of the board without NAND memory. It is also recommended to use Class 10 (10MByte/sec) card for faster read/write operations, lower class cards (especially higher capacity ones) might slow down the whole system. -
Page 24: Pwr Jack
6.3 PWR jack The power jack used is the typical 2.5mm one used by Olimex in most of our products. You should provide 6 to 16 volts direct current and the required current may vary depending on the peripherals connected to the board. -
Page 25: Mic_In & Headphones Connectors
OLIMEX© 2014 A20-OLinuXino-MICRO user's manual 6.4 MIC_IN & HEADPHONES connectors The part of the schematic related to those connectors is listed below: Standard MIC_IN jack is mounted for audio input to the board. Note that it is a single channel MIC_IN. -
Page 26: Usb_Otg Connector
OLIMEX© 2014 A20-OLinuXino-MICRO user's manual The connector can interface standard 3.5 mm phone connector (also known stereo plug or audio plug). The default audio output is set to the HDMI connector (for displays and monitors with built-in audio speakers). If you wish to use audio out you need to first disconnect the HDMI, boot the board, connect the audio out device (speakers) and finally connect the HDMI. -
Page 27: Usb_Host Connector
OLIMEX© 2014 A20-OLinuXino-MICRO user's manual 6.6 USB_HOST connector The part of the schematic related to the USB_HOST connector is listed below: The USB_HOST connector features two levels – called USB1 and USB2 in the schematic. The connector is situated between the USB_OTG and the HDMI connector. Each of slots them features a low loss power distribution switch SY6280 which protects the board in case the devices you have plugged to each level USB_HOST try to draw more than the allowed current. -
Page 28: Ethernet
OLIMEX© 2014 A20-OLinuXino-MICRO user's manual USB_HOST two-level connector Pin # Signal name Processor pin Pin # Signal name Processor pin Connected to SY628 Connected to SY628 UDM1 UDM2 UDP1 UDP2 The GND is common for both levels of the USB_HOST. - Page 29 OLIMEX© 2014 A20-OLinuXino-MICRO user's manual gateway 192.168.1.254 The EEPROM memory may be used to store the MAC address. Important: In some Debian images it is possible that the Ethernet doesn't get auto-detected during boot-up. This is done on purpose because if there is auto-detection enabled and you don't want to use the Ethernet connector or you have forgotten to plug a cable the start-up would be greatly delayed.
-
Page 30: Hdmi Connector
OLIMEX© 2014 A20-OLinuXino-MICRO user's manual Color Usage Right Green Link status Left Yellow Activity status 6.8 HDMI connector The part of the schematic that describes the HDMI module is shown below: Note that there are different Linux images depending whether the HDMI TV works at 50Hz or 60Hz refresh rate. -
Page 31: Vga Connector
6.9 VGA connector You would probably need an adapter cable for the VGA display (6-pin connector to 15-pin female RGB cable). You can make the cable or the connection yourself or you can purchase the Olimex- made cable: https://www.olimex.com/Products/Components/Cables/A20-VGA-CABLE/.Note that you also have to change the script under Debian as explained in chapter 2.6 “Calibrating a display”. -
Page 32: Sata Connector And Power
OLIMEX© 2014 A20-OLinuXino-MICRO user's manual 6.10 SATA connector and power The part of the schematic describing the SATA module is shown below: SATA connector Pin # Signal name Processor pin SATA-TXP SATA-TXM SATA-RXM SATA-RXP 6.11 GPIO-1 (General Purpose Input/Output) 14pin connector** The GPIO-1 plastic connector has 14 pins. -
Page 33: Gpio-2 (General Purpose Input/Output) 40Pin Connector
OLIMEX© 2014 A20-OLinuXino-MICRO user's manual 37 VGA-R AC17* 38 MIC1OUTP AC22 39 LRADC1 AB22* 40 MIC1OUTN AC23 *Signals marked with * are multiplexed with either a peripheral device or another connector. Ensure that the multiplexing is handled properly on software and/or hardware level (else there would probably occur wrong levels, loss of data, etc). -
Page 34: Gpio-3 (General Purpose Input/Output) 10Pin Connector
We have tested the ability of the board to interact with such a display. They allow the user to attach additional hardware, check readings or perform hardware debug. Important: you need additional 40PIN ribbon cable to connect an Olimex display and the LCD_CON. - Page 35 (else there would probably occur wrong levels, loss of data, etc). The LCD connector is suitable for a number of Olimex displays and touchscreen panels with different native resolution – the smallest available is the 4.3'' one called A13-LCD43TS with native screen resolution of 480×272, through the 7'' one named A13-LCD7 with 800×480, to the...
-
Page 36: Jumper Description
OLIMEX© 2014 A20-OLinuXino-MICRO user's manual In Debian Linux you would need to start a start a shell script to change the built-in the image resolution settings. Start it with ./change_display_A20_OLinuXino.sh and follow the instructions. Please refer to chapter 2.5 “Changing the default image resolution” for more details. -
Page 37: Chapter 7: Schematics
OLIMEX© 2014 A20-OLinuXino-MICRO user's manual CHAPTER 7: SCHEMATICS 7. Introduction to the chapter In this chapter is located information about the schematics describing logically and physically A20- OLinuXino-MICRO. 7.1 Eagle schematic OLinuXino schematics may be found it on the OLinuXino's GitHub repository: https://github.com/OLIMEX/OLINUXINO/tree/master/HARDWARE/A20-OLinuXino-MICRO. -
Page 38: Physical Dimensions
OLIMEX© 2014 A20-OLinuXino-MICRO user's manual 7.2 Physical dimensions Note that all dimensions are in mils. The three highest elements on the board in order from the tallest to the shortest are: USB_HOST connector – 700mils, capacitors C202 – 650mils, the Ethernet connector – 600mils. -
Page 39: Chapter 8: Revision History And Support
OLIMEX© 2014 A20-OLinuXino-MICRO user's manual CHAPTER 8: REVISION HISTORY AND SUPPORT 8. Introduction to the chapter In this chapter you will find the current and the previous version of the document you are reading. Also the web-page for your device is listed. Be sure to check it after a purchase for the latest available updates and examples. -
Page 40: Board Revision
OLIMEX© 2014 A20-OLinuXino-MICRO user's manual Revision, date Changes Modified page 1. Added more information about SSH connection G, 24.10.13 2. Added more information about VGA output requirements 3. Improved the FAQ section 1. Added more information about USB host ports H, 27.05.14... -
Page 41: Useful Web Links And Purchase Codes
A20-Android-SD – a tested class 10 micro SD card with the latest (by the time of leaving the Olimex facilities) official Android release A20-Debian-SD – a tested class 10 micro SD card with the latest (by the time of leaving Olimex facilities) official Debian Linux release A13-LCD43TS –... -
Page 42: Frequently Asked Questions
How to purchase? You can purchase directly from our online shop or from any of our distributors. Note that usually it is faster and cheaper to purchase Olimex products from our distributors. List of confirmed Olimex LTD distributors and resellers: https://www.olimex.com/Distributors. - Page 43 Q: How to generate boot-able SD-card Debian Linux image for A20-OLinuXino? Follow our blog post with step by step instructions (at link: http://olimex.wordpress.com/2013/09/18/7795/) note that Linux-Sunxi Kernel is a work-in- progress, this means you can try the current stage/sunxi-3.4 branch but if something is broken and doesn't work just revert to the git tags we give in the blog and they should work for sure.
-
Page 44: Product Support
All goods are checked before they are sent out. In the unlikely event that goods are faulty, they must be returned, to OLIMEX at the address listed on your order invoice. OLIMEX will not accept goods that have clearly been used more than the amount needed to evaluate their functionality.
Need help?
Do you have a question about the A20-OLinuXino-MICRO and is the answer not in the manual?
Questions and answers