
Related Manuals for OLIMEX AVR-ISP-MK2


Summary of Contents for OLIMEX AVR-ISP-MK2
- Page 1 AVR-ISP-MK2 programmer USER’S MANUAL Document revision P, February 2018 Designed by OLIMEX Ltd, 2012 All boards produced by Olimex LTD are ROHS compliant...
-
Page 2: Disclaimer
This document is intended only to assist the reader in the use of the product. OLIMEX Ltd. shall not be liable for any loss or damage arising from the use of any information in this document or any error or omission in such information or any incorrect use of the product. - Page 3 OLIMEX© 2018 AVR-ISP-MK2 user's manual The product is based on Dean Camera's LUFA USB stack. More info at: http://www.fourwalledcubicle.com/ The LUFA library is currently released under the MIT license, included below. Copyright (C) Dean Camera, 2016 dean [at] fourwalledcubicle [dot] com www.lufa-lib.org...
-
Page 4: Table Of Contents
CHAPTER 2 PROGRAMMER DESCRIPTION ................7 2. Introduction to the chapter ....................... 7 2.1 Layout (top view) ........................7 CHAPTER 2 SETTING UP THE AVR-ISP-MK2 BOARD ............8 2. Introduction to the chapter ....................... 8 2.1 Electrostatic warning ....................... 8 2.2 Requirements .......................... -
Page 5: Chapter 1 Overview
Thank you for choosing the AVR-ISP-MK2 programmer from Olimex! This document provides a user’s guide for the Olimex AVR-ISP-MK2 programmer. As an overview, this chapter gives the scope of this document and lists the programmer’s features. The document’s organization is then detailed. -
Page 6: Document Organization
– Chapter 2 contains the general board layout – Chapter 3 provides a guide for quickly setting up the board – Chapter 4 mentions the main software tools used with AVR-ISP-MK2 – Chapter 5 is an explanation of the interfaces, the LEDs and the jumpers position –... -
Page 7: Chapter 2 Programmer Description
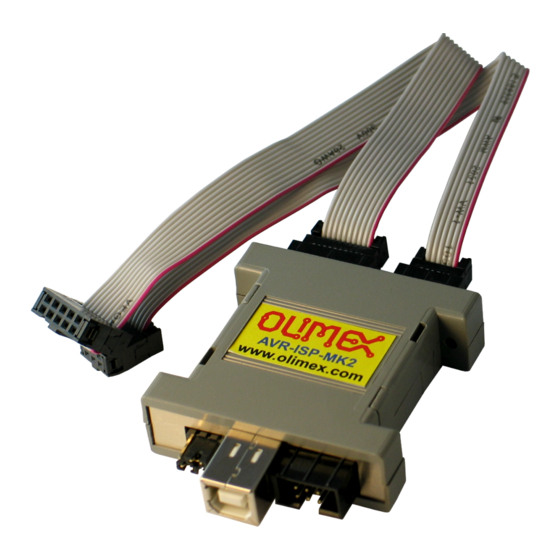
2. Introduction to the chapter Here you would get acquainted with the main parts of the board. Note the names used on the board differ from the names used to describe them. For the actual names check the AVR-ISP-MK2 itself. 2.1 Layout (top view) The programmer comes with two cables (10-pin one and 6-pin one) with female-female plastic connectors. -
Page 8: Chapter 2 Setting Up The Avr-Isp-Mk2 Board
The AVR-ISP-MK2 comes in a plastic cover but make sure boards and devices interfacing with the programmer are properly grounded. 2.2 Requirements In order to set up the AVR-ISP-MK2 optimally, you might need to update your set of hardware and/or software tools. The major components needed are listed below. Required hardware tools: - USB type A to USB type B cable - Atmel board or chip that can be programmed via ISP, TPI, or PDI interface. -
Page 9: Quick Setup
AVR-ISP-MK2 user's manual 2.3 Quick setup The purpose of this sub-chapter is to provide instructions on how to quickly set up AVR-ISP-MK2 under Windows. The quick setup had been tested under Windows 10 x64 and under Windows 7 x64. The quick setup had been tested with Atmel Studio 7, AVRDUDE v6.2 compiled for Windows, and Arduino IDE... - Page 10 “Tools” → “Device Programming”. Select the proper target from the drop down menu and finally click “Apply”. A successful connection is shown below: At this point you have AVR-ISP-MK2 and Atmel Studio 7 successfully working together. If you also wish to use AVRDUDE continue with the optional steps below.
- Page 11 -p m16 -P usb -c avrispmkii -B5 Refer to the picture below: At this point you have AVR-ISP-MK2 properly working with AVRDUDE v6.2 and also with Atmel Studio 7. If you wish to also test the Arduino IDE connection continue with the next optional step.
- Page 12 OLIMEX© 2018 AVR-ISP-MK2 user's manual Page 12 of 30...
-
Page 13: Chapter 4 Recommended Software Tools
AVR Studio and Atmel Studio simultaneously on the same machine – in order to do it each time you would need to manually switch the AVR-ISP-MK2 drivers. Something more – to complicate things further – Jungo Windows drivers for AVR Studio and the... -
Page 14: Driver Installation For Avr Studio In Windows
4.1.1 Driver installation for AVR Studio in Windows Using AVR Studio 4 and 5 with AVR-ISP-MK2 is possible, but not recommended. Consider that the last release of AVR Studio 4 (v4.19) was released in September 2011. For comparison, Windows 8 was released October 26, 2012. -
Page 15: Manually Pointing To New Drivers (Windows 10 Only)
3. You should now have some entry for it in “Windows Device Manager”. If you can't identify the entry unplug and re-plug the AVR-ISP-MK2 until you are sure. It might be good idea to uninstall any drivers related to the tool, but in most cases if you do everything correctly this shouldn't matter. -
Page 16: Arduino, Avrdude, Linux
It is impossible to use the AVR-ISP-MK2 simultaneously with AVRDUDE and AVR Studio. It would depend on you which one you prefer. You need to change the firmware of AVR-ISP-MK2 (using Atmel Flip or dfu-programmer software) AND the Windows drivers every time you switch between Arduino and AVR Studio (or vice versa). - Page 17 AVRISP-MKII.hex – the first hex is the firmware for AVR/Atmel Studio/Atmel USB/Jungo, the second one is for AVRDUDE/Arduino/libusb. 6. Click “Run” and after it completes, unplug and plug again AVR-ISP-MK2 from the USB. 7. Uninstall any previous drivers (selecting delete option) from device manager and scan for hardware changes or plug/unplug again.
- Page 18 OLIMEX© 2018 AVR-ISP-MK2 user's manual 9. Install the new drivers corresponding to your needs (usually by right-clicking over the programmer entry and selecting “Update Driver Software...”) The next picture shows how to install the libusb-win32 drivers over the Jungo ones – you have to point to the libusb folder and agree to install despite the warning.
-
Page 19: Changing Firmware For Linux (Avrdude) Users
4.2.2 Changing firmware for Linux (AVRDUDE) users 1. Download and install “dfu-programmer” package (apt-get...). 2. Connect the programmer AVR-ISP-MK2 to the computer and press the upgrade button with a sharp object (you can use a piece of thick wire or a needle). - Page 20 OLIMEX© 2018 AVR-ISP-MK2 user's manual ATTR{idVendor}=="03eb", SYSFS{idProduct}=="2104", MODE="660", GROUP="dialout" # Atmel Corp. Dragon ATTR{idVendor}=="03eb", SYSFS{idProduct}=="2107", MODE="660", GROUP="dialout" LABEL="avrisp_end" In some kernels SYSFS module is disabled by default. There are two flags responsible and you can enable SYSFS by manipulating one or both of the flags CONFIG_SYSFS and CONFIG_SYSFS_DEPRECATED_V2.
-
Page 21: Using Arduino Ide With Avr-Isp-Mk2
4.2.3 Using Arduino IDE with AVR-ISP-MK2 1. Download suitable Arduino IDE version and run it 2. Plug the AVR-ISP-MK2 to the computer and follow chapter 4.2.1 for firmware and driver install 3. Power your target Arduino-compatible board via the AVR-ISP-MK2 (setting the jumpers properly) or externally (make sure AVR-ISP-MK2 doesn't provide additional voltage –... -
Page 22: 10-Pin Icsp To 6-Pin Icsp Cable
In case you encounter erros consider the AVRDUDE bug mentioned at the end of the previous sub- chapter. Try using Arduino IDE version 1.5.7 or earlier. Special mention for Olimex boards – sometimes the board refuses to reset before programming when using Arduino. Try holding the reset button and release it simultaneously while clicking “Upload Using Programmer”. -
Page 23: Chapter 5 Interfaces And Hardware
In this chapter are presented the interfaces found on the programmed that can be found on the board. Jumpers functions are described. 5.1 Programming interfaces AVR-ISP-MK2 has three programming interfaces aiming at different processors. More information about each of them is located in the following sub-chapters. 5.1.1 10-pin ICSP The ICSP (in-circuit serial programming) interface is suitable for programming tinyAVR and megaAVR chips. -
Page 24: Bootloader Restore
AVR-ISP-MK2 via USB and “Atmel Flip”. It is stored on the main microcontroller inside AVR-ISP-MK2. In rare cases it is possible to corrupt this software bootloader and, thus, make it impossible to change the firmware inside using only USB and “Atmel Flip”. In such cases you would need to re-upload it with the help of a third-party programmer. -
Page 25: Jumpers Description
10-pin ICSP connector – instead of programming – it would get programmed. 3. Connect a compatible programmer (able to program AT90USB162, it can also be another AVR- USP-MK2) to AVR-ISP-MK2's 10-pin ICSP connector on one side and to your computer on the other. -
Page 26: Leds Explained
– read//write Red – turns on after successful USB initialization 5.6 USB connector The AVR-ISP-MK2 has a USB type B connector. It is used to establish a connection between a personal computer and AVR-ISP-MK2. The typical hardware setup is as follows: PERSONAL COMPUTER ↔USB CABLE ↔... -
Page 27: Chapter 6 Revision History And Support
Added few specifics about the programmer installation under Linux. 16, 17, 18 J, 01.09.14 Added information on bootloader restore Added information about OLIMEX AVR-ICSP Improved dfu-programmer information Added information about AVRDUDE 6.x.x bug K, 08.07.15 that affects LUFA-based tools Added USB connector information Additional FAQ L, 08.10.15... -
Page 28: Useful Web Links And Purchase Codes
3. If you are using a custom made board or you connect the microcontroller directly with wires make sure you follow the AVR ICSP programming standards. 4. Make sure you are using the ISP interface of AVR-ISP-MK2. If your target board has a 6 pin connector instead of the 10 pin on AVR-ISP-MK2 make appropriate adapter. - Page 29 Q8: Previously I used AVR Studio 4 successfully. After I installed Atmel Studio 7 I can no longer connect to AVR-ISP-MK2 in AVR Studio 4. What can I do to use AVR Stduio 4 and Atmel Studio 7 at the same time? A8: The drivers installed with Atmel Studio 7 overwrote the drivers that worked with AVR Studio 4.
-
Page 30: Product Support
AVR-ISP-MK2 user's manual 6.4 Product support For product support, hardware information and error reports mail to: support@olimex.com. Note that we are primarily a hardware company and our software support is limited. Please consider reading the paragraph below about the warranty of Olimex products.
Need help?
Do you have a question about the AVR-ISP-MK2 and is the answer not in the manual?
Questions and answers