
Related Manuals for Holzmann TS 200


Summary of Contents for Holzmann TS 200
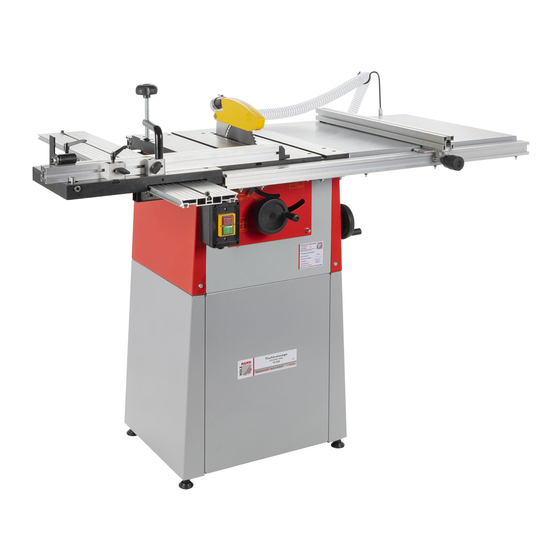
- Page 1 TS 200 / TS 250 OBSAH DODÁVKY / DELIVERY HOLZMANN Maschinen Austria www.holzmann-maschinen.at Strana 1 Stolní pila / table saw TS 200 / TS 250...
-
Page 2: Read The Manual
The operator is obligated to wear proper ear protection, safety goggles and safety shoes CE-SHODNÉ – Tento stroj odpovídá směrnicím EU. EC-CONFORM - This product complies with the EC-directives. HOLZMANN Maschinen Austria www.holzmann-maschinen.at Strana 2 Stolní pila / table saw TS 200 / TS 250... - Page 3 • Stroj obraťte a položte na kus kartónu. • Klíčem SW 10 odšroubujte transportní šrouby. • Pokud se matky ve stroji protáčejí, zachyťte je za strany stroje klíčem. HOLZMANN Maschinen Austria www.holzmann-maschinen.at Strana 3 Stolní pila / table saw TS 200 / TS 250...
- Page 4 • Smontovaný podstavec přisaďte ke stroji a s pomocí dodaných šroubů, podložek a matek na čtyřech stranách sešroubujte. 4 nastavitelné nožičky našroubujte do závitů podstavce. HOLZMANN Maschinen Austria www.holzmann-maschinen.at Strana 4 Stolní pila / table saw TS 200 / TS 250...
- Page 5 • 4x imbus šrouby nasaďte do odpovídajících závitů ve stole stroje. • Držák posuvného stolu nasaďte pod stůl na straně stolu a dotáhněte pevně ze shora imbus šrouby. HOLZMANN Maschinen Austria www.holzmann-maschinen.at Strana 5 Stolní pila / table saw TS 200 / TS 250...
- Page 6 Nedotahujte rolny příliš těsně, aby se stůl mohl lehce pohybovat! POZOR: • Oba horní imbus šrouby opět pevně dotáhněte, aby se stůl lehce a bez vůle pohyboval po vo- dící desce. HOLZMANN Maschinen Austria www.holzmann-maschinen.at Strana 6 Stolní pila / table saw TS 200 / TS 250...
- Page 7 • Uvolněte šrouby tak, aby se dal profil podélného pravítka lehce nasunout. • Profil nasuňte. • Nastavovacími šrouby je možné profil podélného pravítka nasta- vit. • Šrouby opět pevně dotáhněte. HOLZMANN Maschinen Austria www.holzmann-maschinen.at Strana 7 Stolní pila / table saw TS 200 / TS 250...
- Page 8 1.1.12 Montáž podélného pravítka Našroubujte adaptér na hliníkový profil jako na obrázku a za- suňte do vodícího profilu podélného pravítka. HOLZMANN Maschinen Austria www.holzmann-maschinen.at Strana 8 Stolní pila / table saw TS 200 / TS 250...
- Page 9 Nasaďte odsávací hadici na odsávací otvor hubice a dotáhněte upevňovací pásku. 1.1.15 Montáž držáku odsávací hadica Držák odsávací hadice může být našroubován na libovolné místo hliníkového profilu. HOLZMANN Maschinen Austria www.holzmann-maschinen.at Strana 9 Stolní pila / table saw TS 200 / TS 250...
- Page 10 • Nastavovacím imbusem (Einstellschraube) – Bod 6.2.8 – nastavte podélné pravítko rovno- běžně s pilovým kotoučem. • Upevňovací šrouby na vodícím profilu opět dotáhněte. HOLZMANN Maschinen Austria www.holzmann-maschinen.at Strana 10 Stolní pila / table saw TS 200 / TS 250...
- Page 11 • Ručním kolem B na straně stroje nastavíte náklon pilo- vého kotouče v rozmezí 90° - 45 • Zajišťovací páku poté pevně zatlačte zpět. HOLZMANN Maschinen Austria www.holzmann-maschinen.at Strana 11 Stolní pila / table saw TS 200 / TS 250...
-
Page 12: Výměna Pilového Kotouče
• Šroub s podložkou opět našroubujte na vřeteno a pevně dotáhněte. POKYN: Dbejte na správný směr otáčení pilového kotouče. Vložte vložku stolu zpět na místo a přišroubujte. • HOLZMANN Maschinen Austria www.holzmann-maschinen.at Strana 12 Stolní pila / table saw TS 200 / TS 250... - Page 13 • The reason base consists of 2 different disks. The plates are bolted together with 3 screws, wa- shers and nuts. Make sure that the screw holes for the adjustment feet below. HOLZMANN Maschinen Austria www.holzmann-maschinen.at Strana 13 Stolní pila / table saw TS 200 / TS 250...
- Page 14 • If rotate the nuts in the machine, can be passed laterally into the machine and the nuts are secured against rotate. Remove screws supplied as package, Suction and miter angles from the machine. 3.1.3 Mounting base socket on the machine HOLZMANN Maschinen Austria www.holzmann-maschinen.at Strana 14 Stolní pila / table saw TS 200 / TS 250...
- Page 15 • Use 4x Allen screws in corresponding holes on both sides on worktable. • Creating the sliding table holders laterally below the work table and top with Allen screw them on firmly. HOLZMANN Maschinen Austria www.holzmann-maschinen.at Strana 15 Stolní pila / table saw TS 200 / TS 250...
- Page 16 Do not over tighten so that the sliding table still move easily! • Tighten the 2 Allen screws on the table top and back light backlash push the sliding table con- trol. HOLZMANN Maschinen Austria www.holzmann-maschinen.at Strana 16 Stolní pila / table saw TS 200 / TS 250...
- Page 17 (right and left profile) • Loosen the screws until the rip fence guide profile can be moved. • Adjust the guide profile. HOLZMANN Maschinen Austria www.holzmann-maschinen.at Strana 17 Stolní pila / table saw TS 200 / TS 250...
- Page 18 • The adjusting screw can be adjusted subsequently the rip fence guide profile. • Tighten the screws again. Adjustment screw -Allen screw- HOLZMANN Maschinen Austria www.holzmann-maschinen.at Strana 18 Stolní pila / table saw TS 200 / TS 250...
- Page 19 3.1.12 Assemble rip fence Screw the adapter as shown on the aluminum profile and slide it into the rip fence guide profile. HOLZMANN Maschinen Austria www.holzmann-maschinen.at Strana 19 Stolní pila / table saw TS 200 / TS 250...
-
Page 20: Operation
+ Check that the set speed for the saw blade used is not too high. Span only saw blades with a diameter of 200 mm. HOLZMANN Maschinen Austria www.holzmann-maschinen.at Strana 20 Stolní pila / table saw TS 200 / TS 250... - Page 21 • Attach the blade guard cover back on the riving knife. NOTE: This procedure should be repeated each time the when the blade is replaced. HOLZMANN Maschinen Austria www.holzmann-maschinen.at Strana 21 Stolní pila / table saw TS 200 / TS 250...
-
Page 22: Saw Blade Start / Stop
• To the saw blade by the tilt 90° - 45 ° is used to ad- just the wheel B on the side of the machine • Pull after setting the clamping lever solid again. HOLZMANN Maschinen Austria www.holzmann-maschinen.at Strana 22 Stolní pila / table saw TS 200 / TS 250... -
Page 23: Maintenance
• The screw with washer screw back into the shaft and tighten with wrench and Flange wrench. NOTE: Observe direction of rotation arrow on the blade. Insert and tighten table insert again • HOLZMANN Maschinen Austria www.holzmann-maschinen.at Strana 23 Stolní pila / table saw TS 200 / TS 250...
Need help?
Do you have a question about the TS 200 and is the answer not in the manual?
Questions and answers