
Related Manuals for SHOWTEC DUP-600


Summary of Contents for SHOWTEC DUP-600
- Page 1 DUP-600 6 channel dimmerpack ORDERCODE 50751 ORDERCODE 50751S ORDERCODE 50751M Highlite International B.V. Vestastraat 2 6468 EX Kerkrade The Netherlands Phone: +31 45-5667700...
- Page 2 For more information: iwant@showtec.info You can get some of the best quality, best priced products on the market from Showtec. So next time, turn to Showtec for more great lighting equipment. Always get the best -- with Showtec ! Thank you!
-
Page 3: Table Of Contents
Showtec Showtec DUP-600 Product Guide ™ Warning ................................... 3 Safety instructions ..............................3 Operating determinations ............................4 Connection with the mains ............................. 4 Return Procedure ..............................5 Claims ..................................5 Description of the device ............................. 6 Features ..................................6 Overview ..................................6 Back .................................... -
Page 4: Warning
Save the carton and all packing materials. In the event that a fixture must be returned to the factory, it is important that the fixture be returned in the original factory box and packing. Your shipment includes: • DUP-600 • User manual CAUTION! -
Page 5: Operating Determinations
If your Showtec device fails to work properly, discontinue use immediately. Pack the unit securely (preferably in the original packing material), and return it to your Showtec dealer for service. -
Page 6: Return Procedure
Return Procedure Returned merchandise must be sent prepaid and in the original packing, call tags will not be issued. Package must be clearly labeled with a Return Authorization Number (RMA number). Products returned without an RMA number will be refused. Highlite will not accept the returned goods or any responsibility. Call Highlite 0031-455667723 or mail aftersales@highlite.nl and request an RMA prior to shipping the fixture. -
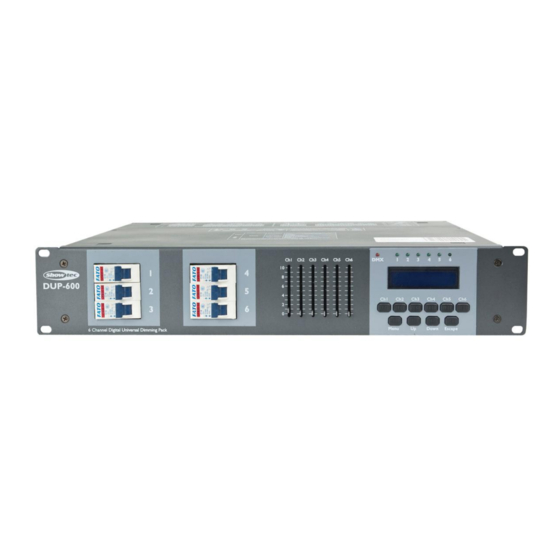
Page 7: Description Of The Device
Furthermore each channel can set its dedicated dimming curve. For easy control or preheat the DUP-600 has 6 faders for local control. The DUP-600 has a built-in DMX failure with back-up CUE, ensuring you that there will always be light when DMX fails. -
Page 8: Back
There is no indication that the unit is in DMX mode. Using a fader will force the corresponding channel back in manual mode. When the DUP-600 is powered on, each channel will start up in manual mode. Menu Button Pushing this button allows you to enter a (sub)menu. -
Page 9: Schuko Version
Multipin version 19) Multipin output Installation Remove all packing materials from the DUP-600. Check that all foam and plastic padding is removed. Let all wiring to and from the DUP-600 be carried out by a qualified technician. Hardwire version terminal connections Always disconnect from electric mains power supply before cleaning or servicing. -
Page 10: Occupation Of The Multipin Connectors
Occupation of the multipin connectors Pin assignment 9~14 7,8,15,16 Case Occupation of the XLR connection Occupation of the analog connector... -
Page 11: Set Up And Operation
Set Up and Operation Before plugging the unit in, always make sure that the power supply matches the product specification voltage. Do not attempt to operate a 120V specification product on 230V power, or vice versa. When powering the unit on, the initialisation screen will pop up. After approximately 15 seconds, the main menu will appear. -
Page 12: Menu Overview
Menu Overview... -
Page 13: Main Menu
Main menu 1) Press the menu (7) button to enter the menu for editing. Use the up (8) and down (9) buttons to select the appropriate submenu: Patching menu Curve menu Minimum level menu Maximum level menu ... -
Page 14: Curve Menu
Curve menu 1) Push the menu (7) button to enter the first submenu. Using the up (8) and down (9) buttons you are able to assign different curves for each channel, or assign one curve to all faders. You are able to select: ... -
Page 15: Minimum Level Menu
Minimum Level menu 1) Push the menu (7) button to enter the first submenu. Using the up (8) and down (9) buttons you are able to assign different minimum levels for each channel, or assign one minimum level for all faders. You are able to select: ... -
Page 16: Dmx Fail Menu
2) Once you’ve selected a submenu, push the menu (7) button to enter that submenu and use the up (8) and down (9) buttons adjust the maximum level between 70 and 100%. 3) When you’re finished editing, push the escape (10) button to return to the previous menu. DMX fail menu 1) Push the menu (7) button to enter the first submenu. -
Page 17: Running Chases
Pushing and holding the menu (7), up (8), down (9) and escape (10) buttons for 3 seconds will start a system reset. The display (5) will go blank for a few seconds and the factory settings of the DUP-600 will be restored. -
Page 18: Product Specification
Product Specification Model: Showtec DUP-600 • 2U 19" Rack mount • DMX-512 • Real time Zero crossing detection for less noise • Built-in chase programs for standalone operation • DMX failure with back up CUE availability. • Master / Slave operation •...
Need help?
Do you have a question about the DUP-600 and is the answer not in the manual?
Questions and answers