Advertisement
Quick Links
Advertisement

Related Manuals for Matrix C7xi


Summary of Contents for Matrix C7xi
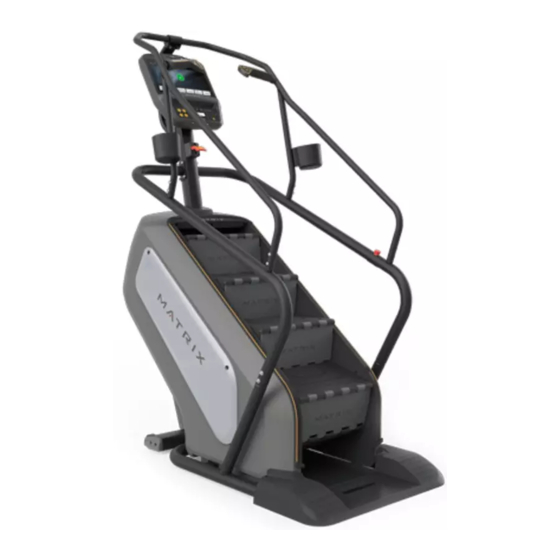
- Page 1 C7xi C7xe C3xe...
-
Page 3: Important Precautions
IMPORTANT PRECAUTIONS SAVE THESE INSTRUCTIONS • When using a ClimbMill, basic precautions should always be followed, including the following: Read all instructions before using this equipment. It is the responsibility of the owner to ensure that all users of this equipment are adequately informed of all warnings and precautions. •... -
Page 4: Power Requirements
All Matrix 3x, 3xe, 5x, 7xe and 7xi 120 V ClimbMills require the use of a 100-125 time. Additional time may be required to fully reactivate this unit once it has V, 60 Hz and a 15 A “Dedicated Circuit”, with a non-looped (isolated) neutral/... - Page 5 During each assembly step, ensure that ALL nuts and bolts are in place and partially threaded. F 1 Sweat Collector Tray (C7xi, C7xe, C5x only) Several parts have been pre-lubricated to aid in assembly and usage. Please do not wipe F 1 Control Zone (C7xi, C7xe, C5x only) this off.
- Page 6 Black Hardware Bag Blue Hardware Bag Green Hardware Bag Torque Value 24 Nm / 17.7 ft-lb Description Description Description Bolt Bolt (16 mm) Bolt (16 mm) Curved Washer Bolt (35 mm) Torque Value Bolt (20 mm) Flat Washer Flat Washer 24 Nm / 17.7 ft-lb...
- Page 7 2. Lift the Control Zone over the caster wheels. Push Bolt down firmly on both sides until it seats firmly. Torque Value C7xi 3. Slide the Sweat Collector Tray under the C7xe ClimbMill, latching the handle to the base. 9.8 Nm / 7.2 ft-lb...
-
Page 8: Before You Begin
BEFORE YOU BEGIN LOCATION OF THE UNIT Place the unit on a level and stable surface away from direct sunlight. The C3xe intense UV light can cause discoloration on the plastics. Locate your unit in an area with cool temperatures and low humidity. Please leave a clear zone behind the unit that is at least 24”... - Page 9 To access the levelers, remove the end caps (C3x, C3xe) or CONTROL which is located in the front of the equipment ZONE (C5x, C7xe and C7xi). CAUTION: There is an electrical plug located under the CONTROL near the stabilizer tube. The power switch is ZONE and will need to be unplugged before the cover can be completely removed.
-
Page 10: Maintenance
Please consult your physician. 3. MAINTAIN LABELS AND NAMEPLATES: Do not remove labels for any reason. They contain important information. If unreadable or missing, contact your MATRIX dealer for a replacement. PULSE GRIPS 4. MAINTAIN ALL EQUIPMENT: Preventative maintenance is the key to smooth operating equipment as well as keeping your liability Place the palm of your hands directly on the grip pulse handlebars. - Page 11 165 x 85 x 212 cm / 65” x 33.5” x 83.5” * Ensure a minimum clearance width of 0.6 meters (24”) for access to and passage around MATRIX equipment. Please note, 0.91 meters (36”) is the ADA recommended clearance width for...
- Page 12 ClimbMills Frame Part # 1000400289 © 2018 Johnson Health Tech Rev 1.1 A...
Need help?
Do you have a question about the C7xi and is the answer not in the manual?
Questions and answers