
Related Manuals for Vanco Evolution EVSW1040


Summary of Contents for Vanco Evolution EVSW1040
- Page 1 HDMI® 4x1 S W I T C H with Seamless Switching and Multiview Part Number: EVSW1040 HDMI® 4 x 1 Selector Switch with Seamless Switching and Multiview www.vanco1.com • 800.626.6445...
- Page 2 DEAR CUSTOMER Thank you for purchasing this product. For optimum performance and safety, please read these instructions carefully before connecting, operating or adjusting this product. Please keep this manual for future reference. This product is 100% inspected and tested in the United States to verify HDMI performance parameters.
- Page 3 FEATURES INTRODUCTION The EVSW1040 is a high performance 4 by 1 HDMI switcher with Quad-View and Picture-in-Picture (PIP) capabilities and seamless switching. As a switcher, it can seamlessly switch the four HDMI inputs freely. It supports four HDMI inputs/sources to be displayed on one screen either equally in Quad-View mode or with a larger main source in PIP mode. The product can be controlled through the front panel button control, IR control, and RS232 control.
-
Page 4: Specifications
SPECIFICATIONS Video Bandwidth ............2.25Gbps per TMDS Channel Input Ports ..............4 × HDMI (Female type),1x RS232; Output Ports ............. 1 × HDMI (Female type),1xRCA Audio output .............. PCM2, 5.1, 7.1CH, Dolby 5.1, DTS5.1 Input Resolution ............480i60Hz,480p60Hz,576i50Hz,576p50Hz,720p50/ 60Hz,1080i50/60Hz,1080p24/30/50/60Hz,800x600@60,1024x768@60,1280x720@60,1920x1080@60; Output Resolution ............1080p,1080i,720p,1024x768,1360x768 ESD Protection ............ -
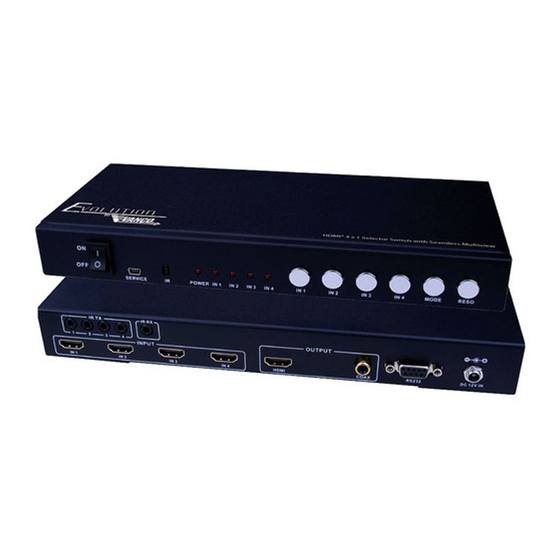
Page 5: Panel Descriptions
PANEL DESCRIPTIONS 1. ON/OFF: Power on/off switch. 2. SERVICE: For factory use only. 3. IR : Remote control receiver window. 4. POWER LED: This red LED illuminates when the device is connected with power supply. 5. IN 1,2,3,4 LED: These red LED lights illuminate when the output select to the corresponding input. 6. -
Page 6: Connection Diagram
6. Connect the power supply to an available electrical outlet and power on the device. NOTICE 1. Vanco High Speed HDMI cables are strongly recommended for use with this product to ensure best results. 2. Incorrect placement of IR Blaster and Receiver may result in the failure of the unit. Please check carefully before plugging in the IR accessories into the respective IR sockets. -
Page 7: Display Modes
WIDEBAND IR (30-60 KHz) IR BLASTER (TX) To control the source: Plug IR Blaster into IR TX port of transmitter unit; place blaster in front of the IR eye of the source. IR RECEIVER (RX) To control the source: Plug IR Receiver into IR RX port of receiver unit; place receiver at or near display. DISPLAY MODES The quad multi-viewer has 3 display modes. -
Page 8: Remote Control
REMOTE CONTROL 1. Input select button: Press these buttons, and the quad multi-viewer will select the corresponding input source for audio and/or video. The front panel LED will indicate the selected input source status. 2. Mode select button: Press these buttons and the quad multi-viewer will select the corresponding mode 3. - Page 9 PC CONTROLLER USER GUIDE Installation The PC controller is green software. Just use a cable to connect the PC via RS232 port and copy “Quad multi- viewer.exe” to PC to complete installation. Note: All software and firmware Preparation for this product can be found on the 1.
-
Page 10: Troubleshooting
4. If you are still encountering issues, attempt the “hot-plug concept. With all of the HDMI cables disconnected, turn on the source and plug in the HDMI cable into it’s output, then power up the Vanco unit and plug the HDMI cable into it’s input, finally turn on the display and plug the HDMI cable from the receiver into it. -
Page 11: Limited Warranty
If repairs are needed during the warranty period the purchaser will be required to provide a sales receipt/sales invoice or other acceptable proof of purchase to the seller of this equipment. The seller will then contact Vanco regarding warranty repair or replacement. - Page 12 ® Vanco International 506 Kingsland Drive Batavia, Illinois 60510 call: 800.626.6445 fax: 630.879.9189 visit: www.vanco1.com...
Need help?
Do you have a question about the Evolution EVSW1040 and is the answer not in the manual?
Questions and answers