
Related Manuals for Vintec ESPACE Series


Summary of Contents for Vintec ESPACE Series
- Page 1 User Manual Espace Walk-in Cellar ESPACE1000-KIT ESPACE3000-KIT ESPACE1500-KIT ESPACE3500-KIT ESPACE2000-KIT ESPACE4000-KIT ESPACE2500-KIT ESPACE1000-EXT vintec.com...
- Page 2 Products must be used, installed and operated in accordance with this manual. You may not be able to claim on the Vintec manufacturer’s warranty in the event that your product fault is due to failure to adhere to this manual.
- Page 3 Contents Description of your wine cellar Cellar Conditioner Power supply Caring for the environment and saving energy Installing your cellar Dimensions Preparation for installation Components list Assembly procedure Technical specifications Maintenance Loading and storing your wine Setting your cellar's temperature Notes Warranty Standard wine serving temperatures (°C)
-
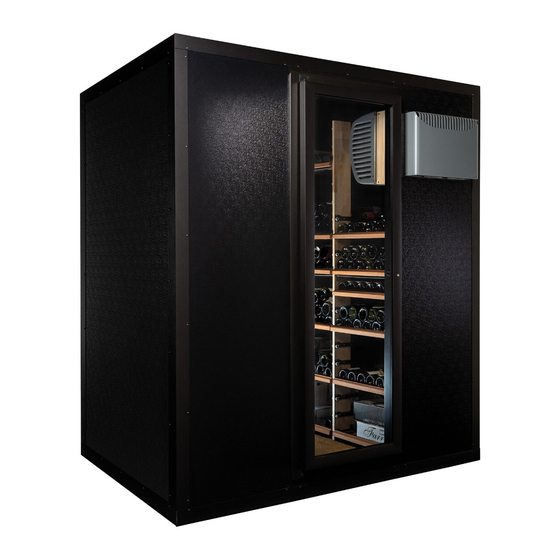
Page 4: Description Of Your Wine Cellar
Description of your wine cellar Cellar Body Exterior Door Upper hinge Conditioner unit Lower hinge Lock Interior Shelf runners Vertical shelving supports Shelves Conditioner Temperature display Decrease temperature Compressor operation Set / mute indicator Standby / increase Abnormal temperature temperature alarm Exhaust air outlet Defrost cycle operation... -
Page 5: Power Supply
To save energy Disposal of packaging • Install your wine cellar in a suitable location All packaging used by Vintec is made (see 'Installing your cellar') and observe the from recyclable materials. recommended temperature ranges. After unpacking your cellar, take the •... -
Page 6: Installing Your Cellar
Installing your cellar Cellar dimensions 1870 1170 53 (door) 85 (conditioner) FRONT VIEW SIDE VIEW Conditioner dimensions INTERIOR VIEW SIDE VIEW TOP VIEW NOTE: Illustrations not to scale. All dimensions in millimetres. User Manual Espace Walk-in Cellar... -
Page 7: Preparation For Installation
Installing your cellar (cont'd) Preparation for installation IMPORTANT CONSIDERATIONS: CRITICAL WARNINGS: • LOCATION FLOOR LOAD: This walk in cellar and • Space for assembly: Allow ample room for assembly its contents are EXTREMELY heavy. It is vital that the of the cellar’s walls. The gap should be big enough to floor where it will be located is level and strong enough allow the walls to be screwed together and for you to to handle the load. - Page 8 Installing your cellar (cont'd) • Direct sunlight/heat: The cellar (particularly the procedure’ on page 12. The cellar door itself is not conditioning unit) must never receive prolonged exposure suitable for full integration or mounting behind cabinetry. to direct sunlight or similar sources of intense heat. •...
-
Page 9: Components List
Installing your cellar (cont'd) Components list CELLAR COMPONENTS User Manual Espace Walk-in Cellar... - Page 10 Installing your cellar (cont'd) ASSEMBLY COMPONENTS User Manual Espace Walk-in Cellar...
- Page 11 Installing your cellar (cont'd) CONDITIONER COMPONENTS Exterior Door Interior frame SHELVING COMPONENTS User Manual Espace Walk-in Cellar...
-
Page 12: Assembly Procedure
Installing your cellar (cont'd) Assembly procedure Exterior body assembly Arrange the two floor panels on a flat, level surface, leaving enough space around to be able to NOTE: This information is for assembly of the standard assemble the walls later. Check that the surface is clean Espace 1000 kit (ESPACE1000-KIT) without any and will not scratch the panels –... - Page 13 Installing your cellar (cont'd) 5 Stand left side panel and small back left panel 9 Position right side panel nested against to form upright in their positions at the rear left corner of the the rear right corner of the cellar, and secure the corner floor (when viewed from the front).
- Page 14 Installing your cellar (cont'd) 12 Complete the front side of the cellar by slotting the front 17 Ensure that all other panels are also firmly pressed right (conditioner) panel into the front right edge of together tightly so that no space is left between any the floor.
- Page 15 Installing your cellar (cont'd) 30 Prepare the condensation water hose connection on WARNING: Each of the pre-drilled bolt holes in the wall the base of the conditioner unit by removing the plastic panel have a captive nut secured inside them, which will shroud over the hose connector outlet.
- Page 16 Installing your cellar (cont'd) 41 Position the central double-sided support frame and NOTE: The shorter support frame must be installed screw it to the drilled cross-bars to secure it, then go in the front right corner of the cellar, underneath the back and firmly secure the screws attached at step 40.
- Page 17 Installing your cellar (cont'd) Adding extension modules (ESPACE1000-EXT) 45 Repeat steps 39 to 44 to install shelving on the right hand side of the cellar, starting at the front and working The Espace range enables you to expand your wine collection to the back, ensuring that the shorter support frame is by adding extension modules that increase the capacity positioned at the front (under the conditioner unit).
-
Page 18: Technical Specifications
Based on a 750mL Standard Bordeaux Bottle In a well isolated cellar Maintenance Your Vintec cellar is a tried and tested appliance. However, we recommend the following maintenance operations be carried out approximately once a year for optimal performance: Switch off and unplug the conditioner unit. -
Page 19: Loading And Storing Your Wine
Loading and storing your wine Different types of shelving Layout advice available for your Espace cellar Your Espace wine cellar has been designed to safely hold a maximum number of bottles. We recommend that Wooden standard shelf you observe the following suggestions to optimise loading. Model #: TAS19WA NOTE: Bottles must be arranged so that they do not come into contact with the walls of the cellar. -
Page 20: Setting Your Cellar's Temperature
Important wine information 3 Confirm the target temperature by pressing the Your Vintec cellar has been designed to provide the button again. NOTE: If you do not confirm the setting, optimum conditions for storing and/or serving your wine. the modification will not be registered. -
Page 21: Notes
Notes User Manual Espace Walk-in Cellar... - Page 22 Notes User Manual Espace Walk-in Cellar...
-
Page 23: Warranty
(c) ‘ASC’ means Electrolux’s authorised serviced centres; (viii) insect or vermin infestation; (d) ‘Vintec/Transtherm’ is the brand controlled by Electrolux Home Products (ix) failure to comply with any additional instructions supplied with Pty Ltd of 163 O’Riordan Street, Mascot NSW 2020, ABN 51 004 the Appliance;... - Page 24 Service and support In the rare event that your Vintec cabinet does not perform to your satisfaction, contact our dedicated support team: 1800 771 776 concierge@vintecclub.com Vintec. We are part of the Electrolux Family. To add a touch of professional inspiration to your home, visit electrolux.com.au...
Need help?
Do you have a question about the ESPACE Series and is the answer not in the manual?
Questions and answers