Advertisement
Available languages
Available languages
Quick Links
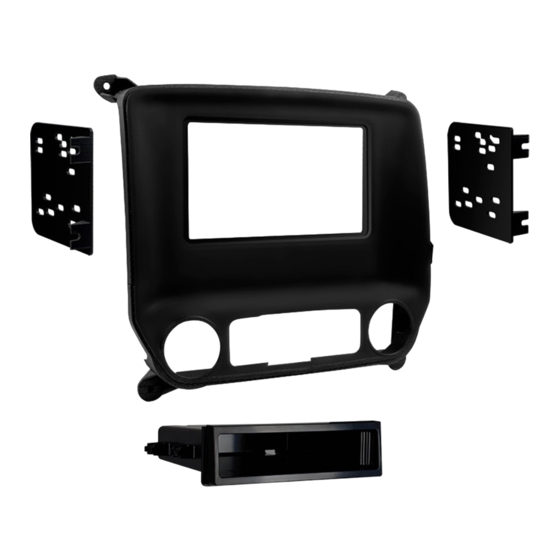
KIT COMPONENTS
• A) Radio trim panel • B) Radio brackets • C) Pocket • D) Phillips screws (8)
A
B
APPLICATIONS
Chevrolet
Silverado 1500.................2014-2018
Silverado 1500 LD.....................2019
Silverado 1500/2500..........2015-up
Metra. The World's Best Kits.
®
Chevrolet Silverado / GMC Sierra
Visit
MetraOnline.com
for more detailed information about the product and up-to-date
vehicle specific applications
KIT FEATURES
• ISO DIN radio provision with pocket
• ISO DDIN radio provision
• Painted gunmetal gray
C
D
GMC
Sierra 1500.......................2014-2018
Sierra 2500/3500................2015-up
MetraOnline.com
2014-up
Sierra 1500 Limited...................2019
© COPYRIGHT 2019 METRA ELECTRONICS CORPORATION
99-3014G
I N S TA L L AT I O N I N S T R U C T I O N S
TABLE OF CONTENTS
Dash Disassembly ..................................................2
Kit Preparation .......................................................3
Kit Assembly
–ISO DIN radio provision with pocket ..................4
–ISO DDIN radio provision .....................................5
WIRING & ANTENNA CONNECTIONS (sold separately)
Wiring Harness: Please visit metraonline.com
for wiring harness options
Antenna Adapter: 40-EU55
TOOLS REQUIRED
• Panel removal tool • Phillips screwdriver
• 9/32" socket wrench • Cutting tool
Attention!
Let the vehicle sit with the key
out of the ignition for a few minutes before
removing the factory radio. When testing the
aftermarket equipment, ensure that all factory
equipment is connected before cycling the
key to ignition.
REV. 4/23/19 INST99-3014G
Advertisement

Related Manuals for Metra Electronics 99-3014G


Summary of Contents for Metra Electronics 99-3014G
- Page 1 Silverado 1500....2014-2018 Silverado 1500 LD.....2019 Sierra 1500.......2014-2018 Sierra 1500 Limited....2019 equipment is connected before cycling the key to ignition. Silverado 1500/2500..2015-up Sierra 2500/3500....2015-up Metra. The World’s Best Kits. MetraOnline.com ® © COPYRIGHT 2019 METRA ELECTRONICS CORPORATION REV. 4/23/19 INST99-3014G...
- Page 2 DASH DISASSEMBLY 1. Unclip and remove the trim panel 3. Remove (2) 9/32” screws securing the surrounding the radio/climate control CD player. Slide the CD player out, then panel. (Figure A) unplug and remove the CD player. (Figure C) 2. Remove (4) 9/32” screws securing the 4.
- Page 3 KIT PREPARATION 1. Cut the sub-dash to allow room for the aftermarket radio. (Figure A) 2. Relocate the OnStar module lower in the sub-dash where the factory CD player was installed to allow room for the aftermarket radio. (Figure B) Continue to Kit Assembly (Figure A) (Figure B)
- Page 4 KIT ASSEMBLY ISO DIN radio provision 4. Clip the factory climate controls into the radio trim panel. (Figure D) 1. Secure the radio brackets to the pocket using (4) Phillips screws supplied. 5. Locate the factory wiring harness and (Figure A) antenna connector in the dash.
- Page 5 KIT ASSEMBLY ISO DDIN radio provision 1. Secure the radio brackets to the radio trim panel using (4) Phillips screws supplied. (Figure A) 2. Slide the radio between the radio brackets, then secure using screws supplied with the radio. (Figure B) 3.
- Page 6 1.800.221.0932 MetraOnline.com...
- Page 7 REV. 4/23/2019 INST99-3014G...
- Page 8 Log onto www.installerinstitute.com or call 800-354-6782 for more information and take steps toward a better tomorrow. Metra recommends MECP certified technicians Metra. The World’s Best Kits. MetraOnline.com ® © COPYRIGHT 2019 METRA ELECTRONICS CORPORATION REV. 4/23/19 INST99-3014G...
- Page 9 Silverado 1500 LD.....2019 Sierra 1500 Limited....2019 de encendido ni con el vehículo funcionando. Silverado 1500/2500..2015 y mas Sierra 2500/3500...2015 y mas Metra. The World’s Best Kits. MetraOnline.com ® © COPYRIGHT 2019 METRA ELECTRONICS CORPORATION REV. 4/23/19 INST99-3014G...
- Page 10 DESMONTAJE DEL TABLERO 1. Desenganche y quite el panel de 3. Quite los (2) tornillos de 9/32” que moldura que rodea el panel del radio/ sujetan el reproductor de CD y luego control del clima. (Figura A) desconecte y quite el reproductor. (Figura C) 2.
- Page 11 PREPARACIÓN DEL KIT 1. Corte y quite las áreas especificadas en el sub tablero. (Figura A) 2. Reubique el módulo OnStar en la parte inferior del tablero donde se instaló el reproductor de CD de fábrica para dejar espacio para la radio de posventa. (Figura B) Continúe con el ensamble del kit (Figura A)
- Page 12 ENSAMBLE DEL KIT Provisión de radio ISO DIN 4. Enganche los controles del clima de fábrica en el panel de la moldura 1. Monte la cavidad en los soportes del del radio. (Figura D) radio con los (4) tornillos Phillips #8 de 5.
- Page 13 ENSAMBLE DEL KIT Provisión de radio doble DIN 1. Coloque los soportes en el panel de la moldura del radio con los (4) tornillos suministrados #8 x 3/8”. (Figura A) 2. Deslice el radio dentro del ensamble del soporte/radio y sujételo al ensamble con los tornillos suministrados con el radio.
- Page 14 1.800.221.0932 MetraOnline.com...
- Page 15 REV. 4/23/2019 INST99-3014G...
- Page 16 800-354-6782 para obtener más información y avance hacia un futuro mejor. Metra recomienda MECP Técnicos certificados Metra. The World’s Best Kits. MetraOnline.com ® © COPYRIGHT 2019 METRA ELECTRONICS CORPORATION REV. 4/23/19 INST99-3014G...
Need help?
Do you have a question about the 99-3014G and is the answer not in the manual?
Questions and answers