Table of Contents
Advertisement
Quick Links
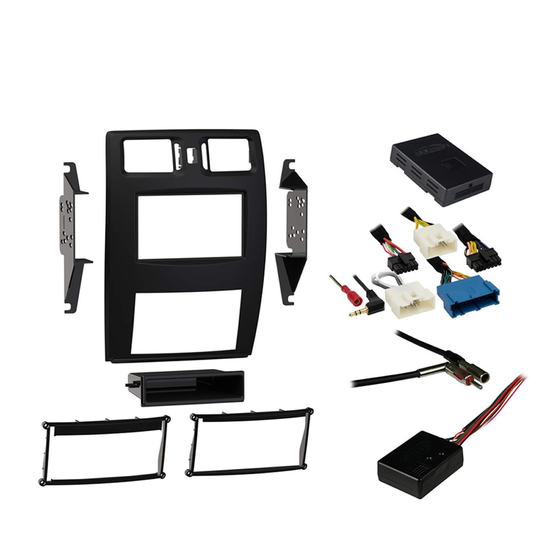
KIT COMPONENTS
• A) Radio/climate control panel • B) Radio brackets • C) Climate control trim panel A (04-05) • D) Climate control trim panel B (06-09) • E) Pocket
• F) (6) Panel clips • G) (12) #8 x 3/8" Phillips screws • H) Axxess interface and wiring harness (not shown) • I) Antenna adapter (not shown)
• J) ASWC-1 (not shown)
A
B
F
Metra. The World's Best Kits.
®
Cadillac XLR
Visit
MetraOnline.com
for more detailed information about the product and up-to-date vehicle
specific applications
KIT FEATURES
• ISO DIN radio provision with pocket
• ISO DDIN radio provision
• Complete center dash panel for a factory look
• Painted matte black
• Includes an Axxess interface, wiring harness, ASWC-1,
and antenna adapter for a complete installation
C
D
G
MetraOnline.com
2004-2009
E
© COPYRIGHT 2019 METRA ELECTRONICS CORPORATION
99-3030B
I N S TA L L AT I O N I N S T R U C T I O N S
TABLE OF CONTENTS
Dash Disassembly ...............................................2-3
Kit Preparation ...................................................4-5
Kit Assembly
–ISO DIN radio provision with pocket ..................6
–ISO DDIN radio provision .....................................7
Axxess Interface Installation .................................8
Final Assembly ...................................................... 11
WIRING & ANTENNA CONNECTIONS
Wiring Harness: Axxess interface included
Antenna Adapter: Included with kit
Steering wheel control interface: ASWC-1 included
TOOLS REQUIRED
• Panel removal tool • Phillips screwdriver
• 9/32" Socket wrench
Attention!
Let the vehicle sit with the key
out of the ignition for a few minutes before
removing the factory radio. When testing the
aftermarket equipment, ensure that all factory
equipment is connected before cycling the
key to ignition.
REV. 2/21/19 INST99-3030B
Advertisement
Table of Contents

Related Manuals for Metra Electronics 99-3030B


Summary of Contents for Metra Electronics 99-3030B
- Page 1 When testing the aftermarket equipment, ensure that all factory equipment is connected before cycling the key to ignition. Metra. The World’s Best Kits. MetraOnline.com ® © COPYRIGHT 2019 METRA ELECTRONICS CORPORATION REV. 2/21/19 INST99-3030B...
-
Page 2: Dash Disassembly
DASH DISASSEMBLY 1. On the bottom of the shifter, pull the chrome trim downward, and then remove (1) screw exposed. Pull up on the shifter to remove it. (Figure A) 2. Unclip the shifter trim plate, then set to the side. (Figure B) Continued on the next page (Figure A) (Figure B) -
Page 3: Dash Disassembly
DASH DISASSEMBLY (CONT.) 3. Unclip, unplug, and remove the radio/ climate control panel. (Figure C) 4. Remove (4) 9/32” screws securing the radio. Slide the radio out, then unplug and remove the radio. (Figure D) Continue to Kit Preparation (Figure C) (Figure D) REV. -
Page 4: Kit Preparation
KIT PREPARATION From the factory radio/climate control panel: 1. Unclip and remove the a/c vents. (Figure A) 2. Unclip and remove the hazard switch. (Figure A) 3. Remove (4) screws securing the climate controls, then remove the controls. (Figure A) Continued on the next page (Figure A) 1.800.221.0932... -
Page 5: Kit Preparation
KIT PREPARATION (CONT.) 4. Secure the appropriate climate control trim panel to the 99-3030B radio/ climate control panel using the (4) #8 x 3/8” Phillips screws provided. The climate control panel part number is stamped onto the back of the panel. -
Page 6: Axxess Interface
KIT ASSEMBLY ISO DIN radio provision with pocket 1. Secure the radio brackets to the pocket using the (4) #8 x 3/8” Phillips screws provided. (Figure A) 2. Remove the metal DIN sleeve and trim ring from the aftermarket radio. 3. -
Page 7: Iso Ddin Radio Provision
KIT ASSEMBLY ISO DDIN radio provision 1. Secure the radio brackets to the radio using the screws supplied with the radio. (Figure A) Continue to Axxess Interface Installation (Figure A) REV. 2/21/2019 INST99-3030B... -
Page 8: Axxess Interface Installation
AXXESS INTERFACE INSTALLATION INTERFACE FEATURES TABLE OF CONTENTS • Provides accessory power (12-volt 10-amp) Connections ..........................9-12 • Maintains the Retained Accessory Power (R.A.P.) feature Installation ...........................13 • Provides NAV outputs (parking brake, reverse, speed sense) Programming ..........................13 • Retains warning chimes Adjustments ..........................14 •... -
Page 9: Connections
CONNECTIONS From the 16-pin harness with stripped leads to the aftermarket radio: From the 3030 harness to the aftermarket radio: • Connect the Red wire to the accessory wire. • Connect the Black wire, and the (3) Black/White wires to the ground wire. Note: There will be a Red wire from the 3030 harness to connect as well. -
Page 10: Installation
INSTALLATION PROGRAMMING With the key in the off position: Attention! If the interface ever loses power, the following steps will need to be performed again. Please ensure that the owner of the vehicle knows this. 1. Connect the CD player jumper harness to the wiring harness in the vehicle. 1. -
Page 11: Adjustments
ADJUSTMENTS FINAL ASSEMBLY Audio level adjustment: 1. Secure the radio assembly to the dash using the factory screws. 1. With the vehicle and radio turned on, turn the volume up 3/4 of the way. 2. Reassemble the dash in reverse order of disassembly using the 99-3030 radio trim panel to complete the installation. - Page 12 Log onto www.installerinstitute.com or call 800-354-6782 for more information and take steps toward a better tomorrow. Metra recommends MECP certified technicians Metra. The World’s Best Kits. MetraOnline.com ® © COPYRIGHT 2019 METRA ELECTRONICS CORPORATION REV. 2/21/19 INST99-3030B...
Need help?
Do you have a question about the 99-3030B and is the answer not in the manual?
Questions and answers