Table of Contents
Advertisement
Available languages
Available languages
Quick Links
INSTALLATION INSTRUCTIONS FOR PART 99-3012G
Chevy Sonic 2012-up
KIT FEATURES
• ISO DIN head unit provision with pocket
• DDIN head unit provisions
• Interface included retains factory OnStar, Bluetooth,
and all warning chimes
• Provides a 12-volt accessory power and VSS,
parking brake, and reverse signals
• Painted Gray to match factory finish
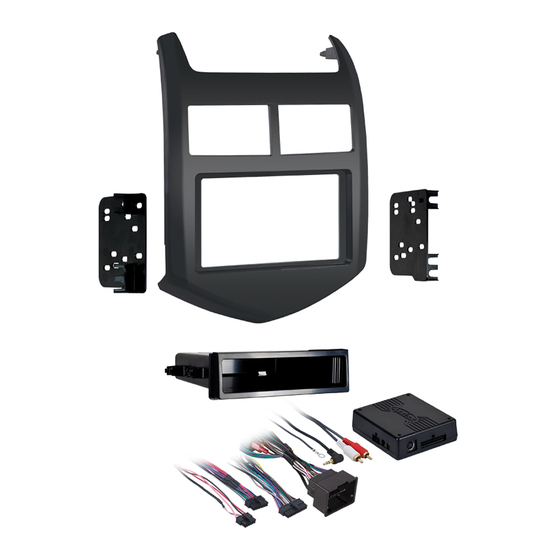
KIT COMPONENTS
• A) Radio trim panel • B) Radio brackets • C) Pocket • D) (4) #8 x 3/8" Phillips truss-head screws
• E) Panel clips • F) Interface • G) 16-pin harness • H) 4-pin to 4-pin resistor pad
• I) 22-pin to 44-pin harness
A
B
G
METRA. The World's best kits.
APPLICATIONS
99-3012G
C
D
H
I
™
1-800-221-0932
E
F
metraonline.com
WIRING & ANTENNA CONNECTIONS (sold separately)
Wiring Harness:
• Interface included
Antenna Adapter:
• 40-EU55 multi-use antenna adapter
TOOLS REQUIRED
• Panel removal tool • Phillips screwdriver
• Socket wrench
CAUTION: Metra recommends disconnecting the
negative battery terminal before beginning any
installation. All accessories, switches, and especially
air bag indicator lights must be plugged in before
reconnecting the battery or cycling the ignition.
NOTE: Refer to the instructions included with the
aftermarket radio.
© COPYRIGHT 2004-2013 METRA ELECTRONICS CORPORATION
Advertisement
Chapters
Table of Contents

Related Manuals for Metra Electronics 99-3012G


Summary of Contents for Metra Electronics 99-3012G
- Page 1 INSTALLATION INSTRUCTIONS FOR PART 99-3012G APPLICATIONS Chevy Sonic 2012-up WIRING & ANTENNA CONNECTIONS (sold separately) Wiring Harness: 99-3012G • Interface included Antenna Adapter: KIT FEATURES • 40-EU55 multi-use antenna adapter • ISO DIN head unit provision with pocket • DDIN head unit provisions • Interface included retains factory OnStar, Bluetooth, and all warning chimes • Provides a 12-volt accessory power and VSS, parking brake, and reverse signals TOOLS REQUIRED • Painted Gray to match factory finish • Panel removal tool • Phillips screwdriver • Socket wrench...
-
Page 2: Table Of Contents
99-3012G Table of Contents Dash Disassembly Dash Disassembly 1. Using a panel removal tool, unsnap and remove the panel surrounding – Chevy Sonic 2012-up ..................2 the radio (vents above radio included). (Figure A) Kit Assembly 2. Unclip and remove the factory A/C vents from the radio trim panel. – ISO DIN head unit provisions with pocket .............3 – Double DIN head unit provisions ................3 3. Remove four 7mm screws to remove the radio. (Figure B) Axxess Interface Installation ................4-6 Continue to kit assembly – Installing Interface ................... 4-5 (Figure A) – Vehicle Customization with Optional LCD .............6... -
Page 3: Kit Assembly
99-3012G Kit Assembly ISO DIN head unit provision with pocket Double DIN head unit provisions 1. Install factory vents into the 1. Install factory vents into the radio trim panel. (Figure A) radio trim panel. (Figure A) 2. Install the four included panel clips 2. Install the four included panel clips onto the appropriate locations of onto the appropriate locations of the radio trim panel. the radio trim panel. 3. Mount the pocket to the radio (Figure A) 3. Slide the Double DIN head unit into (Figure A) brackets with the (4) #8 x 3/8” the radio housing brackets and Phillips screws supplied. (Figure B) secure with screws supplied with the unit. -
Page 4: Axxess Interface Installation
99-3012G Axxess Interface Installing the Interface Installation From the 16-pin harness: • The Green/Black wire is not used in this application. • Connect the Red wires to the ignition/accessory The following wires are for the aftermarket radios that FEATURES wire of the aftermarket radio have navigation built in: • Provides accessory (12-volt 10-amp) • Connect the Orange/White wire to the • Connect the Light Green wire to the parking brake • Retains R.A.P. (Retained Accessory Power) illumination wire of the aftermarket radio. If the wire of the aftermarket navigation radio. • Used in amplified or non-amplified systems aftermarket radio has no illumination wire, tape off • Connect the Blue/Pink wire to the VSS or speed • Retains all warning chimes the Orange/White wire. sense wire of the aftermarket navigation radio. • Provides NAV outputs (parking brake, reverse, • Connect the Blue/White wire to the amp turn on... - Page 5 99-3012G Installing the Interface Amplified vehicles: Installing the Interface: Audio Level Adjustment 1. With all the connections completed, plug the 16 and 1) Start your vehicle and turn on the radio having • Connect the Violet wire to the right rear positive 22 pin harnesses into the interface. audio playing. wire of the aftermarket radio 2. Plug the 44 pin GM harness into the vehicle side 2) Turn your aftermarket radio’s volume up ¾ of the way. • Connect the Violet/Black wire to the right rear harness, and plug the aftermarket radio harness into negative wire of the aftermarket radio 3) With a small screwdriver adjust the potentiometer the aftermarket radio. clockwise to raise the audio level and • Connect the Green wire to the left rear positive wire 3. Reconnect the negative battery terminal. counterclockwise to lower the audio level. of the aftermarket radio 4) Once at desired level your audio adjustment • Connect the Green/Black wire to the left rear...
-
Page 6: Vehicle Customization With Optional Lcd
99-3012G Vehicle customization Notes with optional LCD (AXXESS part # XIA-LCD sold separately) The OEM radio is used to customize certain features of the vehicle. Use the optional LCD to adjust these features accordingly: 1. Press the “ESC” button and “Press Enter to Set Language” will appear on the screen. 2. To change the “Language” press the “Enter” button then press then press the UP and “Down” buttons to change the “Language”. 3. Once you have chosen you “Language” then press “ESC” to go back to be able to scroll through the other settings. 4. If you do not wish to change the “Language” you can scroll up and down through the different settings with the “Up” and “Down” buttons. 5. Remember to press “Enter” to change the desired setting. - Page 7 99-3012G Notes...
- Page 8 INSTALLATION INSTRUCTIONS FOR PART 99-3012G NOWLEDGE IS OWER Enhance your installation and fabrication skills by enrolling in the most recognized and respected mobile electronics school in our industry. Log onto www.installerinstitute.com or call 800-354-6782 for more information and take steps toward a better tomorrow.
- Page 9 INSTRUCCIONES DE INSTALACIÓN PARA LA PIEZA 99-3012G APLICACIONES Chevy Sonic 2012 y más recientes CABLEADO Y CONEXIONES DE ANTENA (se venden por separado) Arnés de cableado: 99-3012G • Se incluye interfase Adaptador de antena: CARACTERÍSTICAS DEL KIT • 40-EU55 de usos múltiples adaptador de antena •...
- Page 10 99-3012G Indice Desmontaje del tablero Desmontaje del tablero 1. Utilizando una herramienta de remoción de panel, suelte y retire – Chevy Sonic 2012 y mas ..................2 el panel que rodea el radio (se incluyen las rejillas arriba del radio). (Figura A) Ensamble del kit 2.
-
Page 11: Ensamble Del Kit
99-3012G Ensamble del kit Provisión de unidad central 6. Monte el conjunto del radio en Provisiones de unidad central doble DIN ISO DIN con bolsillo el tablero, coloque a presión el panel del radio y vuelva a armar 1. Instale las rejillas de fábrica en el 1. -
Page 12: Instalación De La Interfase Axxess
99-3012G Instalación de Instalación de la interfase la interfase Axxess Desde el arnés de 16-pins: • El cable Violeta/Negro no se utiliza en la aplicación. • Conecte los cables Rojos al cable de ignición/accesorio • El cable Verde no se utiliza en la aplicación. - Page 13 99-3012G Instalación de la interfase Vehículos amplificados: 2. Conecte el arnés GM de 44-pins en el arnés lateral 2) Aumente el volumen del radio de mercado secundario del vehículo y conecte el arnés del radio de mercado hasta llegar a ¾ del máximo nivel.
-
Page 14: Vehículo De Personalización Con Lcd Opcional
99-3012G Vehículo de personalización Notas con LCD opcional (Parte # AXXESS XIA-LCD se vende por separado) La radio OEM se utiliza para personalizar ciertas características del vehículo. Utilice la pantalla LCD opcional para ajustar estas características en consecuencia: 1. Pulse el botón “ESC” y “Press ENTER para ajustar Language” aparecerá en la pantalla. - Page 15 99-3012G Notas...
- Page 16 INSTRUCCIONES DE INSTALACIÓN PARA LA PIEZA 99-3012G EL CONOCIMIENTO ES PODER Mejore sus habilidades de instalación y NOWLEDGE IS OWER fabricación inscribiéndose en la escuela de Enhance your installation and fabrication skills by enrolling in the most recognized and respected dispositivos electrónicos móviles más reconocida...
Need help?
Do you have a question about the 99-3012G and is the answer not in the manual?
Questions and answers