Metra Electronics 99-3010S Installation Instructions Manual
Chevrolet camaro 2010-up
Hide thumbs
Also See for 99-3010S:
- Installation instructions manual (9 pages) ,
- Installation instructions manual (14 pages)
Table of Contents
Advertisement
Available languages
Available languages
INSTALLATION INSTRUCTIONS FOR PART 99-3010S
Chevrolet Camaro 2010-up
KIT FEATURES
• DIN head unit provision with pocket
• ISO DIN head unit provision with pocket
• Double DIN head unit provision
• Stacked ISO DIN head unit provision
• Painted Silver to match factory finish
KIT COMPONENTS
• A) Radio trim panel • B) Radio housing • C) ISO brackets • D) ISO trim plate • E) Double DIN brackets
• F) DDIN trim plate • G) Pocket •H) Interface • I) 20-pin GM harness • J) 4-pin to 4-pin resistor pad harness
• K) 22-pin to 44-pin Camaro harness • L) 18-pin to 10-pin HVAC harness
A
B
C
H
I
METRA. The World's best kits.
APPLICATIONS
99-3010S
D
E
J
K
™
1-800-221-0932
F
G
L
metraonline.com
WIRING & ANTENNA CONNECTIONS (sold separately)
Wiring Harness:
• Interface included
Antenna Adapter:
• 40-EU55 - Amplified antenna adapter
TOOLS REQUIRED
• Panel removal tool • Phillips screwdriver
• Socket wrench
CAUTION: Metra recommends disconnecting the
negative battery terminal before beginning any
installation. All accessories, switches, and especially
air bag indicator lights must be plugged in before
reconnecting the battery or cycling the ignition.
NOTE: Refer to the instructions included with the
aftermarket radio.
© COPYRIGHT 2004-2011 METRA ELECTRONICS CORPORATION
Advertisement
Chapters
Table of Contents

Related Manuals for Metra Electronics 99-3010S


Summary of Contents for Metra Electronics 99-3010S
- Page 1 INSTALLATION INSTRUCTIONS FOR PART 99-3010S APPLICATIONS Chevrolet Camaro 2010-up WIRING & ANTENNA CONNECTIONS (sold separately) Wiring Harness: 99-3010S • Interface included Antenna Adapter: KIT FEATURES • 40-EU55 - Amplified antenna adapter • DIN head unit provision with pocket • ISO DIN head unit provision with pocket • Double DIN head unit provision • Stacked ISO DIN head unit provision • Painted Silver to match factory finish TOOLS REQUIRED • Panel removal tool • Phillips screwdriver • Socket wrench KIT COMPONENTS • A) Radio trim panel • B) Radio housing • C) ISO brackets • D) ISO trim plate • E) Double DIN brackets...
-
Page 2: Table Of Contents
99-3010S Table of Contents Dash Disassembly Dash Disassembly 1. Unclip and remove the (2) side trim panels running the length of the – Chevrolet Camaro 2010-up ................2-3 center console. (Figure A) 2. Remove (1) 9/32” screw from Kit Preparation ......................3 each side of the front of the center console. (Figure B) Kit Assembly 3. Remove (2) 9/32” screws per side (Figure A) – DIN head unit provision with pocket ..............4 from the cover on the back of the center console then unclip and – ISO DIN head unit provision with pocket ...............4 remove the cover. (Figure C) – Double DIN/Stacked ISO DIN head unit provision . -
Page 3: Dash Disassembly
99-3010S Dash Disassembly Kit Preparation 4. Remove (2) 9/32” screws exposed 1. Cut and remove the sub dash under the cover on the back of radio support to make room for the console. (Figure D) interface and harnesses. (Figure A) 5. Lift up on the rear of the console 2. Remove panel clips from factory and slide toward the back of the radio and attach to the top of the vehicle then unclip and remove the kit housing. (Figure B) entire center console. (Figure E) Continue to kit assembly (Figure E) (Figure A) 6. Remove (2) 9/32” screws securing the climate control/radio trim panel and remove. (Figure F) 7. Remove (4) Phillips screws securing the radio chassis. (Figure G) Continue to kit preparation... -
Page 4: Kit Assembly
99-3010S Kit Assembly DIN head unit provision with pocket ISO DIN head unit provision with pocket 1. Slide the DIN cage into the radio 1. Mount the ISO brackets to the head housing and secure by bending unit with the screws supplied with the metal locking tabs down. the unit. (Figure A) (Figure A) 2. Snap the pocket into the bottom 2. Snap the pocket into the bottom opening of the radio housing. opening of the radio housing. (Figure B) (Figure A) (Figure A) (Figure B) 3. Slide the head unit into the radio 3. Slide the aftermarket head unit into opening until the side clips engage. -
Page 5: Double Din/Stacked Iso Din Head Unit Provision
99-3010S Kit Assembly Axxess Interface Installation Double DIN/Stacked ISO DIN head unit provision FEATURES 1. Cut and remove the center support • Provides accessory (12-volt 10-amp) (For DDIN only). (Figure A) • Retains R.A.P. (Retained Accessory Power) 2. Snap the Double DIN brackets to • Used in amplified or non-amplified systems the inside edge of the Double DIN • Retains all warning chimes radio housing. (Figure B) • Provides NAV outputs (parking brake, reverse, mute, and V.S.S.) (Figure A) • Retains OnStar/OE Bluetooth 3. Slide the Double DIN head unit or stacked ISO head units into the • Adjustable volume for chimes and OnStar bracket/radio housing assembly • High level speaker input... - Page 6 99-3010S For amplified vehicles: Axxess Interface front positive speaker output of the parking brake wire of the aftermarket Installation navigation radio. aftermarket radio. • Connect the Violet wire to the • Connect the White/Black wire to the • Connect the Blue/Pink wire to the VSS right rear positive wire of the From the 16-pin harness: left front negative speaker output of or speed sense wire of the aftermarket aftermarket radio. • Connect the Red wires to the navigation radio. the aftermarket radio. • Connect the Violet/Black wire to ignition/accessory wire of the the right rear negative wire of the • Connect the Gray wire to the right • Connect the Green/Purple wire to aftermarket radio. aftermarket radio. front positive speaker output of the the reverse wire of the aftermarket • Connect the Orange/White wire to the...
-
Page 7: Installing Interface
99-3010S Audio Level Adjustment • Connect the Green/Black wire to off and back on. Turn the ignition on, Vehicle customization the left rear negative wire of the and then turn the aftermarket radio on. with optional LCD 1) Start your vehicle and turn on the aftermarket radio. Push the OnStar button, the radio should radio having audio playing. (AXXESS part # XIA-LCD sold separately) turn off (radio will mute if mute wire is 2) Turn your aftermarket radio’s volume Additional 12-pin harness (ASWC-1): The OEM radio is used to customize connected) and you should hear OnStar. up ¾ of the way. certain features of the vehicle. -
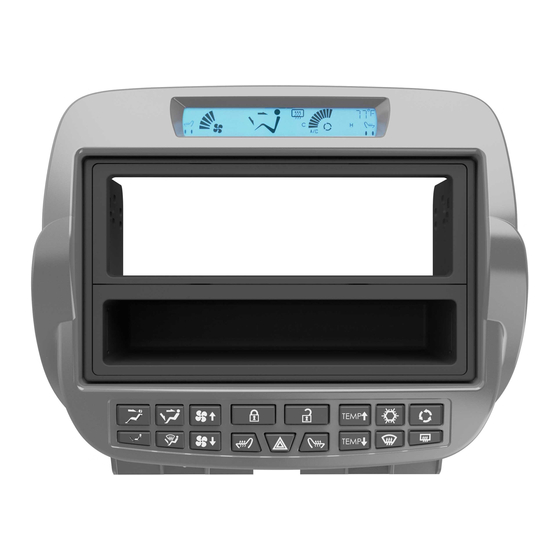
Page 8: Changing Display Backlight Color
INSTALLATION INSTRUCTIONS FOR PART 99-3010S Changing Display • Press and hold the “Face/Foot” button to increase Green. Backlight Color • Press and hold the “Def/Foot” button to 1. Press the front defrost button for 5 seconds, decrease Green. this will engage the “Configure Backlight • Press and hold the “Fan Up” button to Color” mode. Note, backlight will blink while increase Blue. in this mode. (Figure A) • Press and hold the “Fan Down” button to 2. Create your backlight color (Figure A): decrease Blue. • Press and hold the “Face” button to 3. After you have your desired color stop increase Red. pressing the button(s) and the blinking will • Press the “Foot” button to decrease Red. stop leaving your desired color. (Figure A) Green Blue NOWLEDGE IS... - Page 9 INSTALLATION INSTRUCTIONS FOR PART 99-3010S APPLICATIONS Chevrolet Camaro 2010 y mas CABLEADO Y CONEXIONES DE ANTENA (se venden por separado) Arnés de cableado: 99-3010S • Se incluye interfase Adaptador de antena: CARACTERÍSTICAS DEL KIT • 40-EU55 - Adaptador de antena •...
-
Page 10: Chevrolet Camaro 2010 Y Mas
99-3010S Indice Desmontaje del tablero Desmontaje del tablero 1. Desenganche y quite los (2) paneles de moldura laterales que – Chevrolet Camaro 2010 y mas ................. 2-3 corren por la longitud de la consola central. (Figura A) Preparación del kit ....................3 2. -
Page 11: Desmontaje Del Tablero
99-3010S Desmontaje del tablero Preparación del kit 5. Levante la parte trasera de la 1. Corte y quite el soporte del radio consola y deslice hacia la parte del sub tablero para hacer espacio trasera del vehículo, luego para la interfase y los arneses. -
Page 12: Ensamble Del Kit
5. Vuelva a armar el tablero en orden (Figura B) (Figura B) radio 99-3010S en lugar del panel inverso al desensamble, usando de fábrica. el panel de moldura de radio 99- 3010S en lugar del panel de fábrica. -
Page 13: Provisión De Unidad Central Doble Din/Iso Din Vertical
• Arnés de 22-pins a 44-pins de Camaro • Arnés desensamble, usando el panel de moldura de radio de 18-pins a 10-pins 99-3010S en lugar del panel de fábrica. 6. Programación: Debe ciclar la velocidad del ventilador de aire acondicionado totalmente... - Page 14 99-3010S • Conecte el cable Violeta al cable Instalación de la izquierda del radio de mercado navegación de mercado secundario. positivo posterior derecho del radio de interfase Axxess secundario. Desde el arnés de 44 vías: mercado secundario. • Conecte el cable Gris con la salida de Desde el arnés de 16-pins:...
-
Page 15: Instalación De La Interfase
99-3010S La radio OEM se utiliza para radio de mercado secundario. conecta cable del silenciador) y se oirá del máximo nivel. OnStar. Pulse el botón de OnStar cancel personalizar ciertas características 3) Con un pequeño destornillador, Adicional de 12-pines del y la radio debe venir de nuevo. -
Page 16: Cambio De La Pantalla Color De Retroiluminación
INSTALLATION INSTRUCTIONS FOR PART 99-3010S Cambio de la pantalla aumentar Verde. color de retroiluminación • Mantenga pulsado el botón “Def/Foot” para disminuir Verde. 1. Pulse el botón de deshielo frontal durante 5 segundos, esto hará que el “Luz de fondo •...
Need help?
Do you have a question about the 99-3010S and is the answer not in the manual?
Questions and answers