HACH LANGE Pocket Colorimeter II User Manual
Hide thumbs
Also See for Pocket Colorimeter II:
- User manual (222 pages) ,
- Basic user manual (146 pages) ,
- Application instructions (116 pages)
Table of Contents
Advertisement
Quick Links
Download this manual
See also:
User Manual
Advertisement
Table of Contents

Subscribe to Our Youtube Channel
Related Manuals for HACH LANGE Pocket Colorimeter II


Summary of Contents for HACH LANGE Pocket Colorimeter II
- Page 1 DOC022.52.80451 Pocket Colorimeter II User Manual 04/2014, Edition 1...
-
Page 3: Table Of Contents
Table of Contents Section 1 Specifications ..............3 Section 2 General information ............5 2.1 Safety information ..............5 2.1.1 Use of hazard information ........... 5 2.1.2 Precautionary labels ............6 2.1.3 Certification ................. 6 2.2 Product overview ................ 7 Section 3 Startup ................ - Page 4 Table of Contents...
-
Page 5: Section 1 Specifications
Section 1 Specifications Specifications are subject to change without notice. Specification Details Dimensions (W x D x H) 6.1 x 3.2 x 15.2 cm (2.4 x 1.25 x 6 in.) Enclosure IP67, waterproof at 1 m (3.3 ft) for 30 minutes (battery compartment not included). - Page 6 Specifications...
-
Page 7: Section 2 General Information
Section 2 General information In no event will the manufacturer be liable for direct, indirect, special, incidental or consequential damages resulting from any defect or omission in this manual. The manufacturer reserves the right to make changes in this manual and the products it describes at any time, without notice or obligation. -
Page 8: Precautionary Labels
General information N O T I C E Indicates a situation which, if not avoided, may cause damage to the instrument. Information that requires special emphasis. 2.1.2 Precautionary labels Read all labels and tags attached to the instrument. Personal injury or damage to the instrument could occur if not observed. -
Page 9: Product Overview
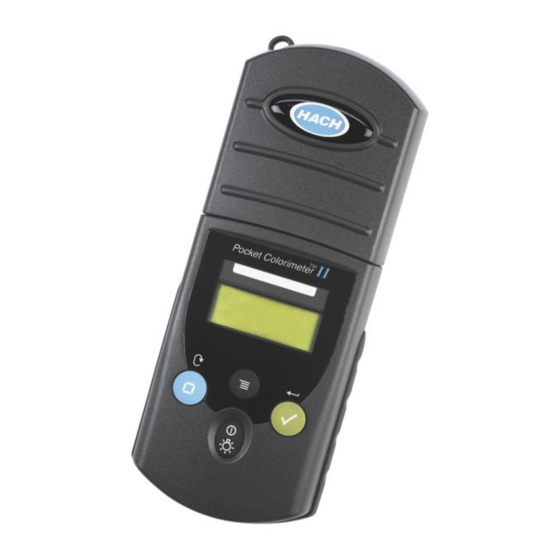
General information Changes or modifications to this equipment not expressly approved by the party responsible for compliance could void the user's authority to operate the equipment. This equipment has been tested and found to comply with the limits for a Class A digital device, pursuant to Part 15 of the FCC rules. - Page 10 General information Figure 1 Instrument overview 1 Instrument cap 3 Cell holder with 1-cm 5 Keypad cell adapter 2 Cell holder 4 Display Factory installed in some models...
-
Page 11: Section 3 Startup
Section 3 Startup Install the batteries W A R N I N G Explosion hazard. Incorrect battery installation can cause the release of explosive gases. Be sure that the batteries are of the same approved chemical type and are inserted in the correct orientation. Do not mix new and used batteries. -
Page 12: Install The Cap Cord
Startup Install the cap cord Attach the cap cord to prevent loss of the instrument cap. Refer to Figure Figure 3 Install the cap cord... -
Page 13: Section 4 User Interface And Navigation
Section 4 User interface and navigation Keypad description Figure 4 shows the keypad and gives the key functions. Figure 4 Keypad 1 Power/Backlight key: Sets the 3 Menu key: Enters and goes out of power to on and off. Push and hold menu mode. - Page 14 User interface and navigation Figure 5 Display 1 Numeric display: Measured value 4 Menu icon: The instrument is in or menu options menu mode. 2 Range icon: Selected range or 5 Calibration adjusted icon: The parameter factory default calibration was adjusted or a user-entered calibration curve was entered.
-
Page 15: Section 5 Operation
Section 5 Operation Configure the instrument 1. Push 2. Push to scroll through the menu options. Push to select an option. Option Description Sets the measurement range or parameter. Push to toggle between the measurement ranges or parameters. 00:00 Sets the time in 24-hour format (hh:mm). Push to change the time. - Page 16 Operation 3. Close the sample cell and clean the optical faces of the sample cell with a lint-free cloth. 4. Insert the blank sample cell into the cell holder. Make sure to install the blank sample cell in the correct and consistent orientation so that the results are more repeatable and precise.
- Page 17 Operation Figure 6 Sample cell orientation 1 Orientation mark 2 Sample cell, 25-mm 3 Sample cell, 1-cm (10 mL) (10 mL)
-
Page 18: Show The Recorded Measurements
Operation Figure 7 Install the instrument cap over the cell holder Show the recorded measurements Refer to the "rCL" option in Configure the instrument on page 13. -
Page 19: Standard Calibration Adjust
Operation Standard calibration adjust Use the standard calibration adjust (SCA) option when a calibration must be adjusted to meet regulatory requirements. The factory calibration is adjusted slightly with the standard calibration adjust (SCA) option so that the instrument shows the expected value of the standard solution. -
Page 20: Set The Standard Calibration Adjust To Off
Operation 5.4.2 Set the standard calibration adjust to off To use the factory default calibration again, set standard calibration adjust (SCA) to off. 1. Push 2. Push until “SCA” shows, then push 3. Push until "OFF" shows, then push Note: To set the SCA function to on again, calibrate with a standard. User-entered calibration This instrument accepts a user-prepared calibration curve. -
Page 21: Enter A Calibration Curve With Standards
Operation • “1” and “2” on the single wavelength instruments that are not calibrated Any chemistry that can be done at the instrument wavelength can contain a user-entered calibration in these channels. 5.5.2 Enter a calibration curve with standards Note: Deionized water can be used for the blank unless the sample is significantly more turbid or has more color than deionized water. -
Page 22: Enter A Calibration Curve With The Keypad
Operation 6. When "S0" shows on the display, push . Push to enter the blank value, then push Note: Push to go to the next digit. 7. When “A0” shows on the display, measure the absorbance of the blank. a. Insert the blank sample cell in the cell holder. b. -
Page 23: Remove A Calibration Point
Operation 1. Set the instrument to the range to calibrate. Refer to Configure the instrument on page 13. 2. Push and hold until "USER" and then "CAL" shows, then push Note: If "USER" and "CAL" do not show, the factory calibration cannot be changed on the selected range. -
Page 24: Set To The Factory Default Calibration
Operation 1. Set the instrument to the range to calibrate. Refer to Configure the instrument on page 13. 2. Push and hold until "USER" and then "CAL" shows. Note: If "USER" and "CAL" do not show, the factory calibration cannot be changed on the selected range. -
Page 25: Section 6 Maintenance
Section 6 Maintenance C A U T I O N Multiple hazards. Only qualified personnel must conduct the tasks described in this section of the document. N O T I C E Do not disassemble the instrument for maintenance. If the internal components must be cleaned or repaired, contact the manufacturer. -
Page 26: Replace The Batteries
Maintenance Special cleaning methods are necessary for individual procedures. When a brush is used to clean sample cells, take extra care to avoid scratches on the interior surfaces of the sample cells. Replace the batteries Replace the batteries when the battery power level is low. Refer to Install the batteries on page 9. -
Page 27: Section 7 Troubleshooting
Section 7 Troubleshooting Error Description Solution No zero In user calibration mode, a standard solution was measured before the instrument zero was set. Measure a blank solution to set the instrument to zero. Ambient light There is ambient light in the cell holder. Make error sure that the instrument cap is fully installed over the cell holder. - Page 28 Troubleshooting Error Description Solution If the reading is less than the instrument range, make sure that the instrument cap is fully installed over the cell holder. Measure a blank. If the blank reading is not zero, set the instrument to zero again. The reading is Reading more or less than...
-
Page 29: Section 8 Replacement Parts
Section 8 Replacement parts W A R N I N G Personal injury hazard. Use of non-approved parts may cause personal injury, damage to the instrument or equipment malfunction. The replacement parts in this section are approved by the manufacturer. Note: Product and Article numbers may vary for some selling regions. - Page 30 Replacement parts...
- Page 32 (800) 227-4224 (U.S.A. only) Fax +49 (0) 2 11 52 88-210 Tel. +41 22 594 6400 Fax (970) 669-2932 info@hach-lange.de Fax +41 22 594 6499 orders@hach.com www.hach-lange.de www.hach.com © Hach Company/Hach Lange GmbH, 2014. All rights reserved. Printed in Germany.
Need help?
Do you have a question about the Pocket Colorimeter II and is the answer not in the manual?
Questions and answers