Table of Contents
Advertisement
Quick Links
Advertisement
Table of Contents

Related Manuals for jablotron Azor


Summary of Contents for jablotron Azor
- Page 1 MLO51205 - 1 -...
-
Page 2: Table Of Contents
Contents Description ......................3 AZOR kit contents ....................4 AZ-10K GSM control unit ..................4 AZ-10D RFID tag reader ..................5 AZ-10M door-opening detector ................5 AZ-10P motion detector ..................6 Installation ......................7 Door-opening detector installation ..............7 Motion detector installation ................. 8 RFID tag reader installation ................ -
Page 3: Description
(alarms, power supply failure, who set or unset the system and when, etc.). If you decide to adjust Azor’s behaviour to suit your needs, you just need to connect it to a PC and use the included user-friendly A-Link software. -
Page 4: Azor Kit Contents
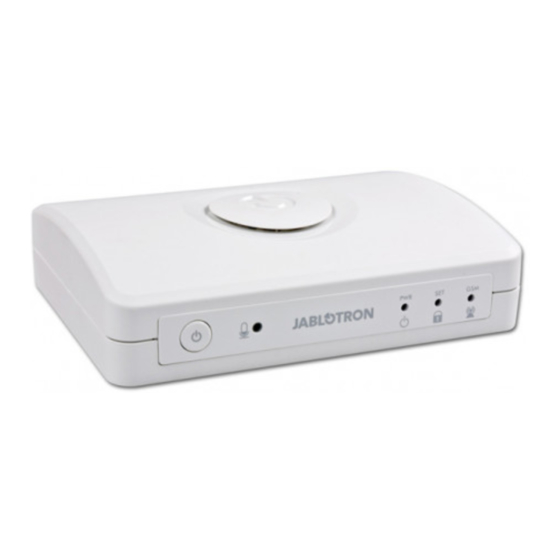
AZOR kit contents AZ-10K GSM control unit The GSM control unit, a wireless alarm control panel, processes information from all detectors in the system. It is usually installed in a hidden place. MLO51206 - 4 -... -
Page 5: Az-10D Rfid Tag Reader
AZ-10D RFID tag reader Serves for setting and unsetting. It is usually installed at the entrance door. AZ-10M door-opening detector Reports opening doors, windows, etc. - 5 - MLO51206... -
Page 6: Az-10P Motion Detector
AZ-10P motion detector Reports human motion MLO51206 - 6 -... -
Page 7: Installation
Installation First attach the detectors temporarily with double-sided adhesive tape. The screws can only be used after the communication test. If the surface is smooth and cohesive, it is possible to attach the detectors with only adhesive tape. The distance between a detector and the GSM control unit must not exceed 20m. Note: the radio signal can be blocked by metal objects, wet walls, and wall and ceiling supporting structures, etc. -
Page 8: Motion Detector Installation
Motion detector installation − The detector should be installed in the corner (facing the room), 2 to 2.5m above the floor. The detector is able to cover an area of up to 10 x 10m*. − The detector holder should be fixed so that the sensor window points diagonally into the room (the arrow in the holder should point upwards). -
Page 9: Rfid Tag Reader Installation
RFID tag reader installation − Install the RFID tag reader at the door (the magnet should be in the bottom left corner of the attachable bottom frame). If the reader is to be installed in an embedded box, insert the magnet in the top frame of the reader. −... - Page 10 Secure the SIM card with the latch in the direction of the arrow* (C). Connect the power adaptor (D). Press the GSM control unit button (E) and hold it for about 2 seconds (Azor will light up). Wait until all three green LED indicators light up.
-
Page 11: Installation Of The Gsm Control Unit And Its Antenna
• You can use the template on the back of the manual to mark the spots where you want to fix Azor to the wall. The screws should protrude a bit so that the box with electronics can be mounted on the screw heads and secured by moving it sideways. -
Page 12: Enrollment Of A Telephone
Tips and specifications Only one telephone without a hidden number can be enrolled. Azor must be unset in order to enroll the phone. Only the first user’s telephone can be enrolled the way mentioned above. You can use the same way to replace the first user’s telephone number with another one. The ... -
Page 13: Communication Test
It is not possible to set the system during test mode and no alarm can be triggered Azor regularly checks its connection with the detectors and the RFID tag reader. If the connection is lost, a report is sent to the user (must be set) and information is also stored in the event memory. In such a case please check the batteries in the detector or RFID tag reader concerned and check the signal level (it may be influenced e.g. -
Page 14: Control
The following description applies to Azor’s default settings. However, you can adjust its behaviour as you wish – see the Settings. A RFID tag reader is usually used to control Azor at the protected premises. Users whose telephone has been enrolled to the system can also control Azor via the voice menu. -
Page 15: Unsetting Azor
RFID tag, or by using a telephone and the voice menu. Tips and specifications If you receive an alarm call, Azor will not call the other users. If no one receives the alarm call, Azor tries to call all the users once more. -
Page 16: Listening In
Tips and specifications If the GSM network provides an exact time function, the informative SMS comprises of time as well. Azor’s internal clock can also be set from a connected PC – see the Settings. MLO51206 - 16 -... -
Page 17: Settings
USB communication. Once the connection has been established, you will find a USB disc named AZOR-USB in the computer. Further connections will be significantly faster. If Azor is connected to an ARC, access to the setup page can be blocked. In such a case ask ... -
Page 18: System Extension
System extension Individually bought devices should be enrolled to Azor using a registration code. The code consists of ten digits and it is in the following format: 123-4567-890. Enrollment (or removal) of a device is done with a computer by filling the registration code in (or erasing it from) the respective position of the device at the Detectors page. -
Page 19: Az-10P Motion Detector
The remote control cannot be used close to the control unit! AZ-10B doorbell button doorbell button can be enrolled in Azor. You can choose a melody (see the Settings). The doorbell button battery should last approx. 1 year. The button should be protected from rain (it is supplied with a plastic roof). -
Page 20: Ja-63St (10S) Wireless Combined Smoke And Heat Detector
The siren may be completely disabled by inserting a jumper (included) on the pair of pins called SIR If people in the premises smoke on a regular basis, Azor can be configured to react to a fire hazard ... -
Page 21: Other Information
GSM network. The time is written in the event memory and in an informative SMS. Warning: Some GSM networks do not provide an exact time signal. In such case Azor’s internal clock must be set manually from a PC via A-link. If the clock is not set, no time will be stated in the informative SMS. -
Page 22: Technical Specifications
Technical specifications AZ-10K GSM control unit GSM control unit power supply = 5 V 2.5 A max. Backup battery LI18650 = 3.7 V / 1.8 Ah (usual battery lifetime is approx. 5 years) The backup time of the control unit is 12 hours Number of users up to 10 (each may have one RFID tag and one remote control) Number of detectors... - Page 23 Can be operated according to ERC REC 70 03 JABLOTRON ALARMS a.s. hereby declares that the AZ-10K is in a compliance with the relevant Union harmonisation legislation: Directives No: 2014/53/EU, 2014/35/EU, 2014/30/EU, 2011/65/EU. The original of the conformity assessment can be found at www.jablotron.com...
-
Page 24: Troubleshooting
Troubleshooting Battery replacement If the batteries in any detector are low, Azor sends an SMS message and it is optically signalled by the detector. Azor must be unset during battery replacement. When you open the detector (or reader) cover, Azor emits a warning beep and sends an informative SMS with a tamper warning. - Page 25 - 25 - MLO51206...
Need help?
Do you have a question about the Azor and is the answer not in the manual?
Questions and answers