Avid Technology Pro Tools S6 Master Post Module Manual
Hide thumbs
Also See for Pro Tools S6 Master Post Module:
- Installation manual (92 pages) ,
- Assembling/disassembling (34 pages) ,
- User manual (20 pages)
Table of Contents
Advertisement
Quick Links
Advertisement
Table of Contents

Subscribe to Our Youtube Channel
Related Manuals for Avid Technology Pro Tools S6 Master Post Module


Summary of Contents for Avid Technology Pro Tools S6 Master Post Module
- Page 1 S6 Master Post Module...
- Page 2 Legal Notices © 2016 Avid Technology, Inc., (“Avid”), all rights reserved. This guide may not be duplicated in whole or in part without the written consent of Avid. 003, 192 Digital I/O, 192 I/O, 96 I/O, 96i I/O, Adrenaline, AirSpeed, ALEX, Alienbrain, AME, AniMatte, Archive, Archive II, Assistant Station, AudioPages,...
- Page 3 UL 60065 7th Ed., 2007-12-11, CAN/CSA C22.2 No. 60065-03, 1st Ed, 2006-04 +A1:2006, EN 60065:2002 + A1:2006 + A11:2008, IEC 60065:2001 + A1:2005 + A2:2010. Avid Technology Inc., has been authorized to apply the appropriate NRTL mark on its compliant equipment. Warning Important Safety Instructions 1) Read these instructions.
- Page 4 17) For products with a power switch: It should remain accessible after installation. 18) The equipment shall be used at a maximum ambient temperature of 40° C. 19) This unit is provided with a power supply cord set suitable for 120V AC input only (for U.S.A.and Canada). For other than U.S.A. and Canada, a qualified person must provide for use with this unit, an appropriate, approved power supply cord set which is in compli- ance with the end use country requirements and has a minimum cross-sectional area of 1.0mm2.
-
Page 5: Table Of Contents
Contents Introduction ..................1 Module Capabilities and Features . -
Page 6: Introduction
Chapter 1: Introduction ® The Pro Tools | S6 Master Post Module is a traditional film monitoring panel that lets you switch track monitoring between input sources, and punch tracks into and out of record. A comprehensive Speaker/Monitor Control section is also provided, along with Link controls and a bank of customizable Soft Keys. -
Page 7: Product Activation And Registration, And Software License Activation
Product Activation and Registration, and Software License Activation As soon as you have assembled your S6 system and confirmed a successful hardware installation, activate your S6 system software online. Use the alphanumeric code on the included S6 System Software Activation Card to activate and download all S6 system soft- ware and documentation. -
Page 8: Resources
Resources The Avid website ( ) is your best online source for information to help you get the most out of your Avid system. www.avid.com The following are just a few of the services and features available. Account Activation, Product Registration, and License Activation Activate your product to access downloads in your Avid account (or quickly create an account if you don’t have one). -
Page 9: Installing The Master Post Module
Chapter 2: Installing the Master Post Module The Master Post Module (MPM) is installed just like other S6 modules. This guide provides basic installation instructions to use as a guideline. Your exact installation procedure will differ depending on whether you are installing the module while assembling your S6 frame for the first time, or adding the module to an existing system. - Page 10 Install the module in an available slot in your S6 frame. • If you purchased a Mini Fill Panel (“1” in Figure 1) place it in the chassis first, then place the MPM (“2” in Figure 1) behind it. Optionally, install the MPM closest to the Bolster and install the Mini Fill Panel behind it. Figure 1.
- Page 11 Tap Next to continue. All controls on the surface illuminate. If the controls do not light, check your connections made during installation. To confirm that the module flashing in the Surface page is connected and correctly positioned, touch or press any physical con- trol on that module.
-
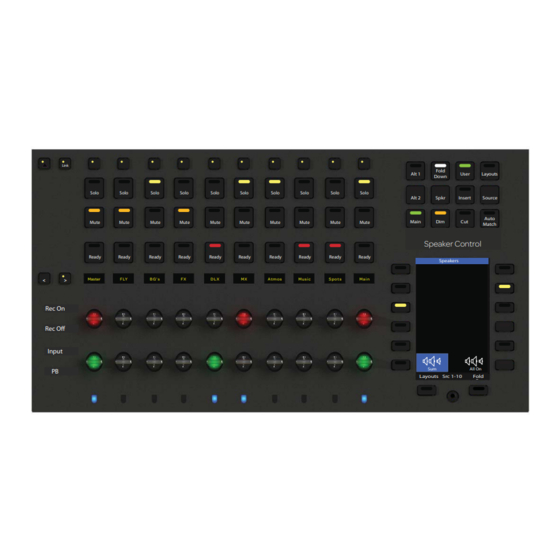
Page 12: Master Post Module Hardware Overview
Chapter 3: Master Post Module Hardware Overview This section identifies the controls and displays on the Master Post Module. For information on using the Master Post Module in sessions, see the What’s New in S6 v2.2.pdf, or the S6 Guide v2.2.pdf (see Resources Master Post Module Top Panel Link... - Page 13 2 – Page (Bank) < and > Banks tracks left or right across the MPM. When a VCA with more than 10 member tracks < and > < > < > is spilled, bank the member (slave) tracks. – Attention Enables Link Master Assign mode, and Lock Strip 1 mode.
-
Page 14: Appendix A. Utility Test Mode
Appendix A: Utility Test Mode If you want to run diagnostic tests on any module to troubleshoot it (except Display Modules), you can enable Utility Test mode on that module. Note that after running Utility Test mode on a module, the module will have to be rebooted from the page Surface on the Master Module. -
Page 15: Appendix B. Specifications
Appendix B: Specifications Module: S6 Master Post Module Mechanical S6 Master Post Module Mechanical Specifications Parameter Specification Dimensions (L x W x D) 6.0 x 11.6 x 2.3 inches (+ 0.6 inches including paddles) 153 x 294 x 59.3 mm (+ 15.1 mm including paddles) Weight 3.35 lbs (1.52 kg) Power Requirements... -
Page 16: Dimensions
Dimensions S6 Master Post Module 153.00 290.00 74.44 74.44 59.34 59.34 Appendix B: Specifications... -
Page 17: Appendix C. Compliance Information
Appendix C: Compliance Information Environmental Compliance Disposal of Waste Equipment by Users in the European Union This symbol on the product or its packaging indicates that this product must not be disposed of with other waste. Instead, it is your responsibility to dispose of your waste equipment by handing it over to a designated collection point for the recycling of waste elec- trical and electronic equipment. -
Page 18: Emc (Electromagnetic Compliance)
EMC (Electromagnetic Compliance) Avid declares that this product complies with the following standards regulating emissions and immunity: • FCC Part 15 Class B • EN 55022 Class B • AS/NZS CISPR 22 Class B • CISPR 22 Class B • EN 55103-1, Class E2 and E3 •... - Page 20 Avid Technical Support (USA) Product Information 280 N Bernardo Avenue Visit the Online Support Center For company and product information, Mountain View, CA 94043 USA at www.avid.com/support visit us on the web at www.avid.com...
Need help?
Do you have a question about the Pro Tools S6 Master Post Module and is the answer not in the manual?
Questions and answers