GeoVision GV Series Hardware Installation Manual
Gv-fisheye ip dome
Hide thumbs
Also See for GV Series:
- User manual (143 pages) ,
- Quick start manual (21 pages) ,
- How-to manual (15 pages)
Table of Contents
Advertisement
Quick Links
Hardware Installation Guide
GV-Fisheye IP Dome
Thank you for purchasing GV-Fisheye IP Camera. For advanced information on
how to use the GV-Fisheye IP Camera, please refer to GV-Fisheye IP Camera
User's Manual and Quick Start Guide online.
© 2015 GeoVision Inc. All rights reserved.
GV-FE2302 / 3402 / 5302 / 3403 / 5303
GV-FER3402 / 5302 / 3403 / 5303
2015/04
English
FEV3-QG-C
61-MEFERV3-Q001
Important
Note for Connecting to GV-System / GV-VMS
The GV-Fisheye IP Camera is designed to work with GV-System / GV-VMS,
a video management system. Note the following when the camera is
connected to GV-System / GV-VMS:
1. By default, the images are recorded to the memory card inserted in the
GV-Fisheye IP Camera.
2. Once the camera is connected to GV-System / GV-VMS, the resolution
set on GV-System / GV-VMS will override the resolution set on the
camera's Web interface. You can only change the resolution settings
through the Web interface when the connection to GV-System / GV-VMS
is interrupted.
Note for Recording
1. By default, the images are recorded to the memory card inserted in the
GV-Fisheye IP Camera. Make sure the Write recording data into local
storage option is enabled. If this option is disabled, the camera will stop
recording to the memory card while the live view is accessed through
Web browsers or other applications. For details, see Video Settings,
Administrator Chapter, GV-Fisheye IP Camera User's Manual online.
2. Mind the following when using a memory card for recording:
● Recorded data on the memory card can be damaged or lost if the
data are accessed while the camera is under physical shock, power
interruption, memory card detachment or when the memory card
reaches the end of its lifespan. No guarantee is provided for such
causes.
● To avoid power outage, it is highly suggested to apply a battery
backup (UPS).
● For better performance, it is highly suggested to use Micro SD card of
MLC NAND flash, Class 10.
● Replace the memory card when its read/write speed is lower than 6
MB/s or when the memory card is frequently undetected by the
camera.
Advertisement
Table of Contents

Related Manuals for GeoVision GV Series


Summary of Contents for GeoVision GV Series
- Page 1 GV-Fisheye IP Camera, please refer to GV-Fisheye IP Camera English MB/s or when the memory card is frequently undetected by the User's Manual and Quick Start Guide online. FEV3-QG-C camera. © 2015 GeoVision Inc. All rights reserved. 61-MEFERV3-Q001...
-
Page 2: Note For Usb Storage And Wifi Adapter
3. It is recommended to use memory cards of the following setting and 2. Any PoE, power, audio and I/O cables are waterproofed using waterproof specifications: silicon rubber or the like. ● Apply a battery backup (UPS) to avoid power outage. ●... -
Page 3: Packing List
GV-FER3402 / 5302 and GV-FER3403 / 5303 Packing List IR LED Ring Camera Cover Camera Cover Fisheye Camera (Hard Ceiling Mount) (In-Ceiling Mount) (GV-FER3403 / 5303) Screw x 3 Screw x 3 Support Bracket x 3 Plastic Screw Anchor x 3 Torx Wrench (Hard Ceiling Mount) (In-Ceiling Mount) -
Page 4: Connecting The Camera
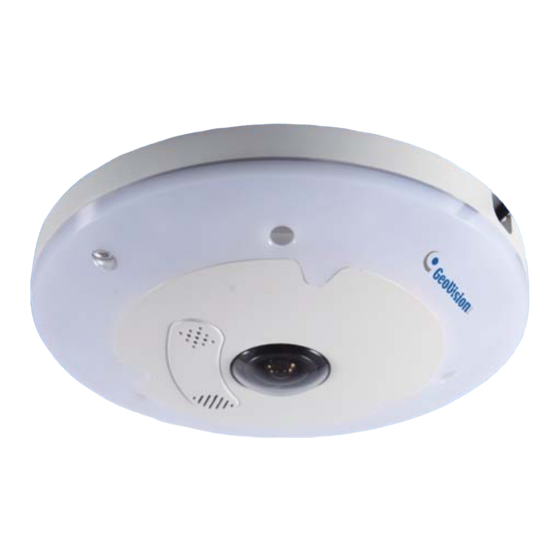
Overview Connecting the Camera Speaker Lens Microphone 1. Remove the camera cover with the supplied torx wrench. 2. Connect the camera to a Power over Ethernet (PoE) switch with a standard network cable to supply power and network. To waterproof the cable, you should have 2 components of the supplied cable connector: Default Button LEDs... -
Page 5: Installation
Installation IMPORTANT: Item 1 must be secured tightly to waterproof the cable. Hard Ceiling Mount 3. Optionally insert a micro SD card (SD/SDHC, version 2.0 only, Class 10). 4. Secure the camera cover with the supplied torx wrench. Assembling the Power Adapter In addition to using PoE power supply, you can use the power adapter to supply the power to the camera. - Page 6 At the 3 red dots, drill a hole slightly smaller than the plastic screw For the camera with an IR LED ring, follow the steps below to anchors provided. secure the IR LED ring to the camera. A. Secure the safety lock to the camera. Then secure the camera cover.
-
Page 7: In-Ceiling Mount
In-Ceiling Mount Align the 3 support brackets with the notches on the side of the In-Ceiling Mount allows the GV-Fisheye IP Camera to be mounted into the camera and secure on the back with the in-ceiling mount screws provided. ceiling, revealing a small portion of the camera. In-Ceiling Mount requires the ceiling board to be between 0.5 –... - Page 8 GV-FE2302 / 3402 / 5302 and GV-FE3403 / 5303 Packing List On the back side, make sure the black plastic clips are slightly above the ceiling board and pointing outward. Fisheye Camera Camera Cover (Hard Ceiling Mount) From the front side of the camera, tighten the screws. Camera Cover IR LED Ring (In-Ceiling Mount)
- Page 9 Overview Speaker Lens Support Bracket x 3 Plastic Screw Anchor x 3 Microphone Screw x 3 Screw x 3 Torx Wrench (Hard Ceiling Mount) (In-Ceiling Mount) Rubber Bung PoE Converter Device Default Button Status LED PoE Converter Device Device PoE Converter Audio Out Installation Sticker Mini USB Extension Cable...
- Page 10 Connecting the Camera Connecting PoE Converter and IR LED Ring for GV-FE3403 / 5303 To install a PoE converter, follow the steps below. Note: Instead of installing the PoE converter, you can connect the camera to a PoE switch and the IR LED ring with a power adapter (optional accessory) separately.
- Page 11 Installation Hard Ceiling Mount 3. Plug one of the PoE converter’s terminal blocks to the camera and the other one to the IR LED ring. IMPORTANT: It is advised to shorten the IR LED ring’s wire to approximately 20 cm for it to fit inside the PoE converter. 20cm Without IR LED Ring With IR LED Ring...
- Page 12 (GV-FE3403 / 5303). Note: Be sure to have the camera installed with the rubber bung to prevent the intrusion of any objects. 9F, No. 246, Sec. 1, Neihu Rd., Neihu District, Taipei, Taiwan Tel: +886-2-8797-8376 Fax: +886-2-8797-8335 support@geovision.com.tw http://www.geovision.com.tw...
Need help?
Do you have a question about the GV Series and is the answer not in the manual?
Questions and answers