Table of Contents
Advertisement
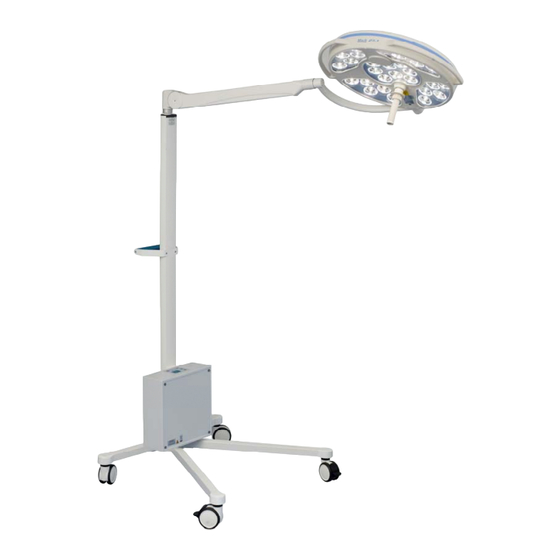
Emergency power lamp
M
o
u
n
t
i
M
o
u
n
t
i
E
M
E
M
Triaflex / Triaflex R96 emergency power lamp
Mach M2 / M2 F / -H / F/H emergency power lamp
Mach M3 F- / DF- / F/H- / DF/H emergency power lamp
Mach LED 2 MC/SC emergency power lamp
Mach LED 3 MC/SC emergency power lamp
Accessories
Clamp rail ___________________________________________ Order no. 74961002
Table _______________________________________________ Order no. 74961004
Dr. Mach
59520002_e
n
g
i
n
s
t
r
u
c
t
i
n
g
i
n
s
t
r
u
c
t
E
R
G
E
N
C
E
R
G
E
N
C
GmbH u. Co., Flossmannstrasse 28, D-85560 Ebersberg
Tel.: +49 (0)8092 2093 0, Fax +49 (0)8092 2093 50
Internet: www.dr-mach.com, E-mail:
o
n
s
D
i
r
e
c
t
i
o
n
s
D
i
r
e
c
t
Y
P
O
W
E
R
Y
P
O
W
E
R
info@dr-mach.de
Edition 13
Dr. Mach
Lamps and Engineering
i
o
n
s
f
o
r
u
s
e
i
o
n
s
f
o
r
u
s
e
L
A
M
P
L
A
M
P
22.02.2013 / Bak Page 1/25
Advertisement
Table of Contents

Related Manuals for Dr. Mach Mach LED 2 MC


Summary of Contents for Dr. Mach Mach LED 2 MC
- Page 1 Triaflex / Triaflex R96 emergency power lamp Mach M2 / M2 F / -H / F/H emergency power lamp Mach M3 F- / DF- / F/H- / DF/H emergency power lamp Mach LED 2 MC/SC emergency power lamp Mach LED 3 MC/SC emergency power lamp Accessories Clamp rail ___________________________________________ Order no.
-
Page 2: Table Of Contents
Dr. Mach Emergency power lamp Lamps and Engineering Table of content Instructions for use/operating instructions for sealed lead-acid batteries ......Page 3 General instructions ....................... Page 5 Wiring diagram ....................... Page 6 Controls .......................... Page 6 Key to wiring diagram ....................Page 7 Mounting the stand tube and the battery box to the stand foot ........ -
Page 3: Instructions For Use/Operating Instructions For Sealed Lead-Acid Batteries
Dr. Mach Emergency power lamp Lamps and Engineering Instructions for use / operating Instructions for sealed lead - acid batteries 1. Identification, operating data Type of battery: BTX 12-24 Block voltage: Length Delivery date: 12-2002 Number of blocks: 2 Width:... - Page 4 Dr. Mach Emergency power lamp Lamps and Engineering 5. Operation The regulations of DIN/VDE 0107, DIN/VDE 0108, DIN/EN 50272-2 (VDE 0510-2) or DIN/VDE 0510-7 as well as IEC 896-2 (DIN/EN 60896-2) should be observed when operating static sealed batteries. 6 Charging, discharging 6.1 Charging...
-
Page 5: General Instructions
These installation instructions must be kept in a safe place together with the relevant operating instructions for the light, so they can be consulted whenever necessary. 1. General instructions All Dr. Mach emergency lighting systems are supplied with all parts necessary for installation and connec- tion. The supporting pole is divided into two parts. -
Page 6: Wiring Diagram
Dr. Mach Emergency power lamp Lamps and Engineering 2. Wiring diagram 3. Controls 59520002_e Edition 13 22.02.2013 / Bak Page 6/25... -
Page 7: Key To Wiring Diagram
Dr. Mach Emergency power lamp Lamps and Engineering 4. Key to the wiring diagram Charge regulator Electronic control module Output level for charge regulator Mains fuse Mains fuse Battery fuse LED green to show mains operation LED yellow to show battery operation... -
Page 8: Mounting The Stand Tube And The Battery Box To The Stand Foot
Dr. Mach Emergency power lamp Lamps and Engineering 5. Mounting the stand tube and the battery box to the stand foot Loosen two screws 1 before mounting each foot. Then insert the four feet and fix them with the screws (do not tighten!) For mounting the stand foot proceed as described in the enclosed figures and drawings. - Page 9 Dr. Mach Emergency power lamp Lamps and Engineering Mounting the covers and accessories The mounting procedure is described in particular for covers and accessories. Remark: The number of covers can be different depend- ing on the design of the stand.
- Page 10 Dr. Mach Emergency power lamp Lamps and Engineering Mounting the spring arm / central spring For mounting the spring arm / central spring arm to the stand tube proceed as follows: Insert journal 1 of the spring arm into stand head 2.
-
Page 11: Mounting The Lamp To The Spring Arm
Dr. Mach Emergency power lamp Lamps and Engineering 6. Mounting the lamp to the spring arm 6.1 Mounting the lamp to the regular spring arm (Triaflex lamp) In order to keep the system easy running throughout its life span, we recommend that the hinges should be greased every two years with an acid-free grease. -
Page 12: Mounting The Lamp To The Central Spring Arm
Dr. Mach Emergency power lamp Lamps and Engineering 6.2 Mounting the lamp to the central spring arm (Trigenflex / Mach M2 / M3 / Mach 380 lamp) Preparatory work Attention! Power off the on-site power supply and protect it from being switched on again. -
Page 13: Cleaning
Dr. Mach Emergency power lamp Lamps and Engineering DANGER OF INJURY! During the transport of the stand with lamp tip the stand for maximum 5° to avoid dan- ger of injury! Each delivered stand has a sticker with this warning. -
Page 14: Adjusting The Spring Arm
Dr. Mach Emergency power lamp Lamps and Engineering 8. Adjusting the spring arm 8.1 Central spring arm (for Mach M2, M3, 380, Trigenflex) 8.1.1 Height adjustment At delivery the spring arm is set in the horizontal position. The vertical movement of the spring arm can be enlarged up to 45 degrees upwards. -
Page 15: Adjusting The Spring Force
Dr. Mach Emergency power lamp Lamps and Engineering 8.1.2 Adjusting the spring force Hole 6 To adjust the spring force make sure that the spring arm with the lamp / device can come to rest in any desired position. ... -
Page 16: Adjusting The Spring Force
The procedure for balancing the weights must in this case be car- ried out by Dr. Mach or someone authorised by Dr. Mach. Spring arm for light weighted central axis... -
Page 17: Properties
Dr. Mach Emergency power lamp Lamps and Engineering 9. Properties The device is designed for supplying 24V-consumers, which have to be suitable for alternating cur- rent AC and for direct current DC. A safety low voltage SELV according to DIN VDE 0100, T. 410 is available for a maximum power consumption of 170W. -
Page 18: First Use
Dr. Mach Emergency power lamp Lamps and Engineering 12. First use Loosen the four fixing screws of the cover and remove it. The slot for the battery fuse is empty. Remove the cable binder with the blue battery fuse. -
Page 19: Mains Operation
Dr. Mach Emergency power lamp Lamps and Engineering The green LED „MAINS“ is burning now. The green or yellow LED of the „LEVEL“ – marking is also burning. The LED „BATTERY FAIL“ turns off. The output of the unit is supplied with 24 V. -
Page 20: Test"-Operation
Dr. Mach Emergency power lamp Lamps and Engineering 15. „TEST“-operation Before every use (on every day) the status of the unit must be checked by pushing touch-button „TEST“. A line failure with battery operation, as described above, will be simulated for approx. 5 sec- onds. -
Page 21: Malfunction And Possible Causes
Dr. Mach Emergency power lamp Lamps and Engineering 19. Malfunction and possible causes No mains operation possible: Mains voltage not available or too low Mains cable not plugged in Mains switch turned OFF Mains fuses out of order ... -
Page 22: Technical Data
Class of protection ..........I. Isolation E – A ............VDE 0551 Power ..............170W Suitable for Dr. Mach lamps ........Mach 380; M2; M3; Trigenflex; Triaflex Mains voltage ............230 V, 50 Hz Secondary voltage ..........24 V AC/DC, adjustable +/- 5% Battery .............. -
Page 23: Ce-Mark
Dr. Mach Emergency power lamp Lamps and Engineering Controls Mains operation ..............LED green Battery operation ..............LED red, acoustic signal Battery status ..............LED green, fully charged .................... LED yellow, charged 80% - 20% .................... LED red, battery discharged Battery capacity .............. -
Page 24: Dimensions
Dr. Mach Emergency power lamp Lamps and Engineering 23. Dimensions Example: lamp Mach M3 1450 Swivelling range of the spring arm upwards 520mm downwards 630mm total 1150mm 59520002_e Edition 13 22.02.2013 / Bak Page 24/25... -
Page 25: Spare Parts
Dr. Mach Emergency power lamp Lamps and Engineering 24. Spare parts Item Qty. Name EDVNO Remarks Stand for OT-lamp 74961001 Handle 74961003 Mach emergency power unit NVE 170 67581002 Power 170 Watt Central spring arm AC2000 12,0 – 18,0kg 74803005...
Need help?
Do you have a question about the Mach LED 2 MC and is the answer not in the manual?
Questions and answers